






Enable Disable Inline AutoComplete Feature in Windows
In this article, let’s learn the methods to enable Disable Inline AutoComplete Feature in Windows. File Explorer is a useful tool to navigate, manage files and folders in a system. It also has cool features like Inline AutoComplete or AutoSuggest, which provides suggestions when typing anything in its address bar.
This Inline AutoComplete features enhances productivity by quickly suggesting the relevant paths, filename, or URLs by preventing time & effort. The AutoComplete is an automatic suggestion feature where you can see a drop-down list when you start typing. Whether the Inline AutoComplete feature, when you start typing, automatically completes the relevant suggestions.
The AutoComplete feature may be turned on by default, but Inline AutoComplete is not turned off in default settings. It depends on whether the user wishes to enable or disable AutoComplete and the inline autocomplete features in Internet Explorer.
The Inline AutoComplete feature helps to fill in the Run dialog box and the address bar of the file explorer with quick suggestions relating to your search. In this post, we will discuss the process and the types of methods to turn Inline AutoComplete on or off in Windows 11.

- Enable Disable Personal Data Encryption on Windows 11 Devices using Intune Settings Catalog
- Best Method to Prevent Users from Modifying Settings Policy Using Intune
What is Inline AutoComplete Feature in Windows 11
Inline AutoComplete Feature in Windows 11 shows quick suggestions when typing. It shows the relevant paths, file names, or URLs to save time with less effort. It helps when you type on the Run dialog box and the address bar of the file explorer relating to your searches.
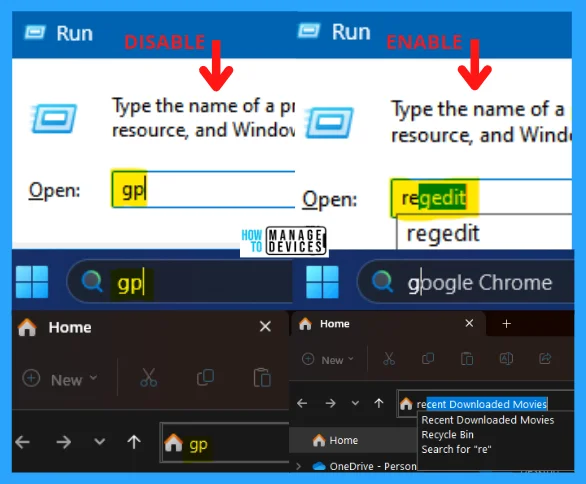
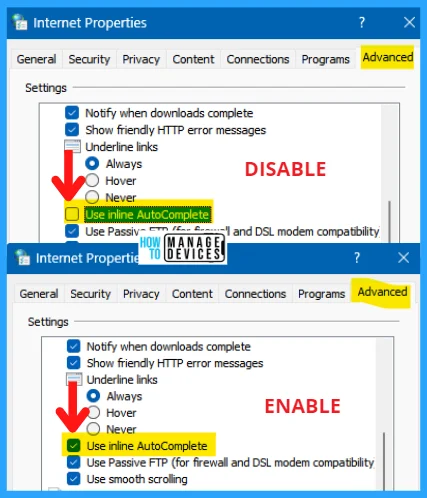
If your Inline AutoComplete Feature is turned off, no suggestions will be shown in any address bar or dialog box. The suggestions depend upon your address bar history. How it looks after enabling or disabling the Inline AutoComplete features is shown below for reference.
Enable or Disable Inline AutoComplete Feature Using Internet Option
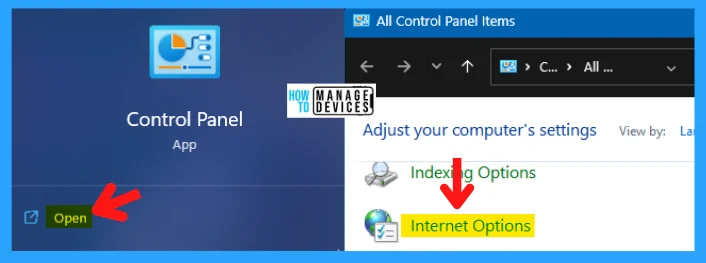
To enable or disable the inline auto-complete feature in Windows, open the control panel and choose large or small icons for further steps. Now find the Internet Option in the list of options or Windows settings. Click on the Internet Option to open it.
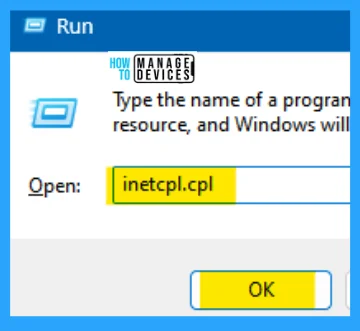
Or you can open it another way, like opening Run Window and simultaneously pressing Windows Key + R from the keyboard. This is the keyboard shortcut to open the run window. Now, type inetcpl. cpl and click on OK to continue.
- Window Key + R (To open run command)
- Type ‘inetcpl.cpl‘ and press OK
Now the Internet Options window opens. Click on the Advanced tab to open options under it. This contains various types of options to make any changes to your Device. Now follow the process listed below to perform the tasks.
- Open Internet Option
- Click on Advanced Tab
- Find the Browsing Setting
- Under the Browsing Setting, check to enable or uncheck to disable the Use Inline AutoComplete Option.
- Then press Apply and OK.
Enable or Disable Inline AutoComplete Feature Using Registry Editor
Using the registry editor, there is a way to Enable or Disable Inline AutoComplete Feature in Windows 11. This procedure is done using the Registry Editor. Let’s discuss the step-by-step guidelines for it.
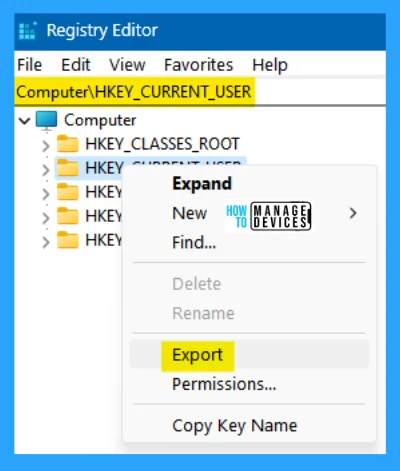
NOTE! Take Backup – Registry Editor may affect the system if any mistake occurs. It is advisable to take a backup of the Registry before proceeding. For backup, go to File in the top left corner of the Registry Editor. Click on it, then select Export and save the backup.
- Go to File
- Right-click on HKEY_CURRENT_USER
- Click on Export
- Please save it
| Setting Type | Hive | Key | Value | Value Name | Value Data |
|---|---|---|---|---|---|
| Registry | HKEY_CURRENT_USER | Software\Microsoft\Windows\CurrentVersion\Explorer\AutoComplete | String | Append Completion | Yes or No |
| Registry | HKEY_CURRENT_USER | Software\Microsoft\Windows\CurrentVersion\Explorer\AutoComplete | String | AutoSuggest | Yes or no |
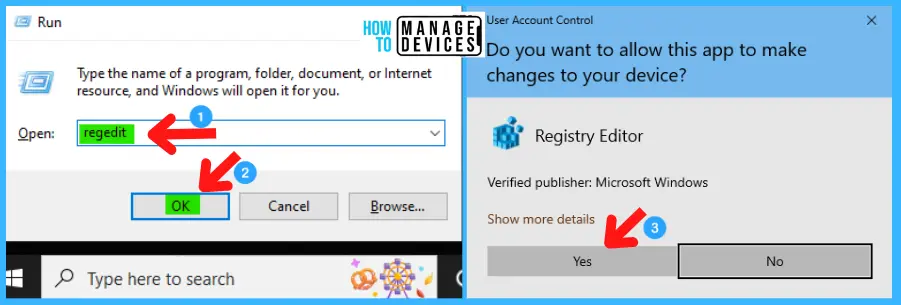
Now, open Run Window, and press Windows Key + R from the keyboard simultaneously. This is the keyboard shortcut to open the run window. Now, type regedit and click on OK to continue. Then it asks the Admin’s permission to change the Device on the User Account Control window. Click Yes.
- Window Key + R (To open run command)
- Type ‘regedit‘ and press OK
- Administrator Permission press Yes
Now, the Registry Editor opens. Find the path ‘HKEY_CURRENT_USER\Software\Microsoft\Windows\CurrentVersion\Explorer\AutoComplet.’ Following the trail, I reached the Edge sub-folder for further action. If there is no capture folder under Device, create one to perform.
HKEY_CURRENT_USER\Software\Microsoft\Windows\CurrentVersion\Explorer\AutoComplete
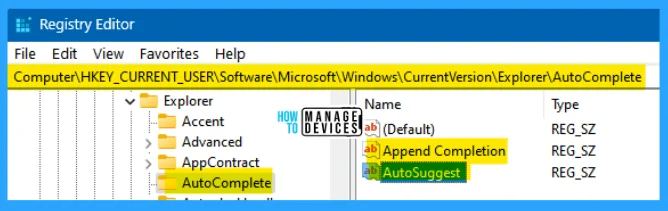
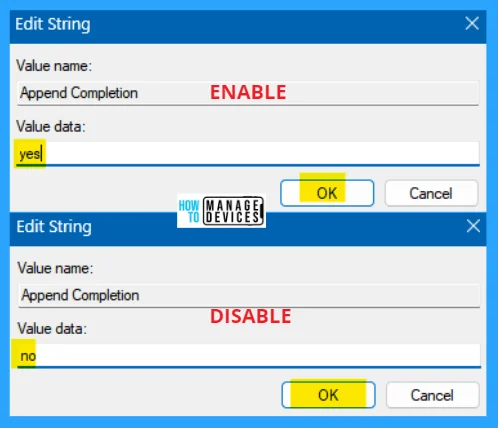
The String Value is Append Completion; right-click on it and select Modify. The new window opens as edit String. If there is no String available, then create one. For creating a String, right-click in the blank space on the right side, select New, then select String Value and name it Append Completion.
To disable the Inline AutoComplete, set the value to No and enter the Modify window. To enable the Inline AutoComplete, set the value to Yes and enter if you cannot see the changes. Restart your Device to apply the changes.
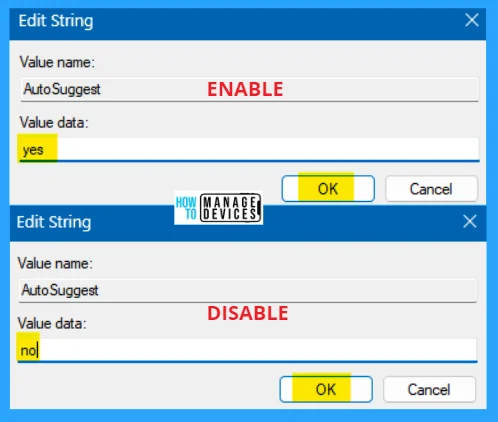
Another String Value is AutoSuggest; right-click on it and select Modify. The new window opens as edit String. If there is no String Value available, then create one. For creating a String Value, right-click in the blank space on the right side, select New, then select String Value and name it AutoSuggest.
To disable the auto-suggestions, set the value to No and enter the Modify window. To enable the auto-suggestions indicator, set the value to Yes and enter if you cannot see the changes. Restart your Device to apply the changes.
NOTE! Restart your PC after modifying it in Registry Editor.
I hope the information on Enable Disable Inline AutoComplete Feature in Windows is helpful. Please follow us on HTMD Community and visit our website HTMD Forum if you like our content. Suggest improvements, if any, and we love to know which topic you want us to explore next.
Author
Alok is a Master of Computer Applications (MCA) graduate. He loves writing on Windows 11 and related technologies. He likes to share his knowledge, quick tips, and tricks with Windows 11 or Windows 10 with the community.




Discussion