






Enable Disable Memory Compression on Windows 11
Let’s learn how to Enable Disable Memory Compression on Windows 11. The memory compression allows your device to run smoothly using a limited amount of RAM. The more data stored in the physical memory drives into a fast-running system with great performance.
This function is enabled by default in Windows 11. You are able to make any modifications to these settings. Memory Compression allows Windows 11 to make better use of available memory on all systems and reduces physical memory utilization.
Memory Compression improves the speed of writing and reading from disk when the memory manager defines paging must be passed. Microsoft enables the memory manager to compress rarely accessed memory pages, reducing the amount of reads and writes to the disk.
Memory compression reduces the amount of memory used per process and allows the operating system to maintain more physical memory applications before passing traditional paging. This guide shows you how to enable or disable memory compression and how to check it.

- Use Memory Integrity System Readiness Scan Tool in Windows 11
- Use Windows Core Isolation Memory Integrity Device Protection Feature
What is Memory Compression?
How to Check the Amount of Memory Compression
Memory Compression is faster than the page file but uses more CPU resources. Your system may not perform as fast as it would if it did not need to compress data in memory. If you see a lot of compressed memory and suspect it is why your PC is a bit slow, then the only solution is to install more physical memory (RAM) or disable Memory Compression.
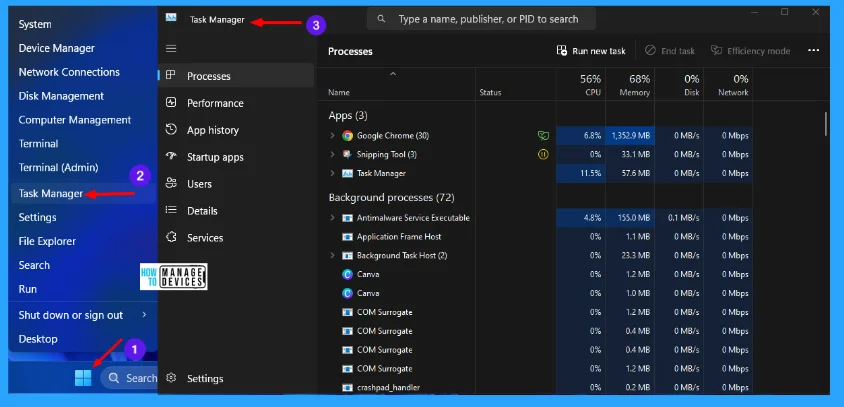
There is a simple process to check your system memory compression status to know the details. Open the Task Manager by right-clicking on the Windows key and then clicking on Task Manager to open it.
NOTE: You must have login with Administrative privilege to perform the task.
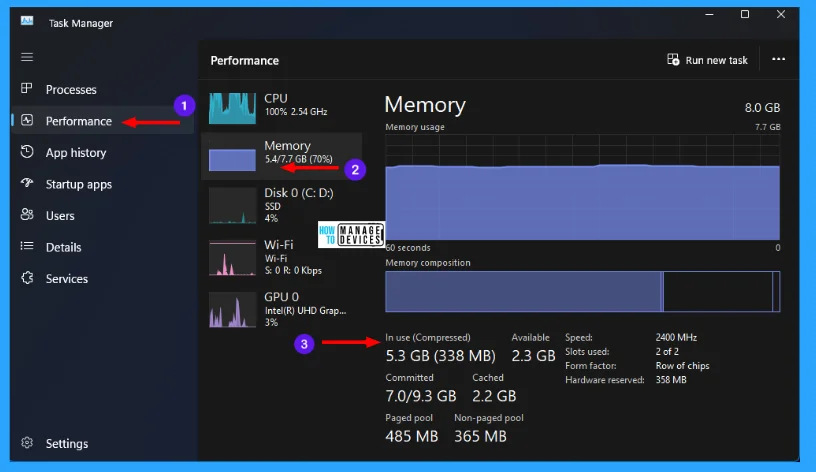
When the Task Manager opens, click on the Performance option in the left panel, as shown in the image below, then click on the Memory under the Performance option, which shows the details of memory occupied. This shows that the memory compression is activated.
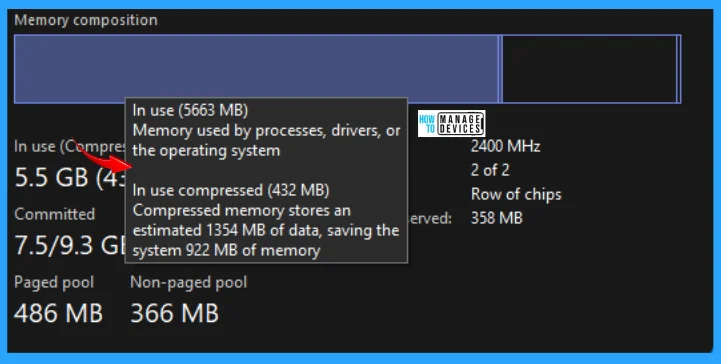
When you hover your mouse over Memory Composition, you can see the details of the memory used. You can see the message below in the image.
In Use (5663 MB) Memory used by processes, drivers, or the operating system. In use compressed (432 MB) Compressed memory stores an estimated 1354 MB of data, saving the system 922 MB of memory.
How to Check Memory Compression Status Using PowerShell
There is another option, using PowerShell; you can also know the details about a system. Open PowerShell in Administrator mode.
To do so, type PowerShell in the Search Box on the Taskbar, when the PowerShell option appears, click on Run as Administrator. A User Account Control window opens, which needs permission to make changes to your device, click on Yes.
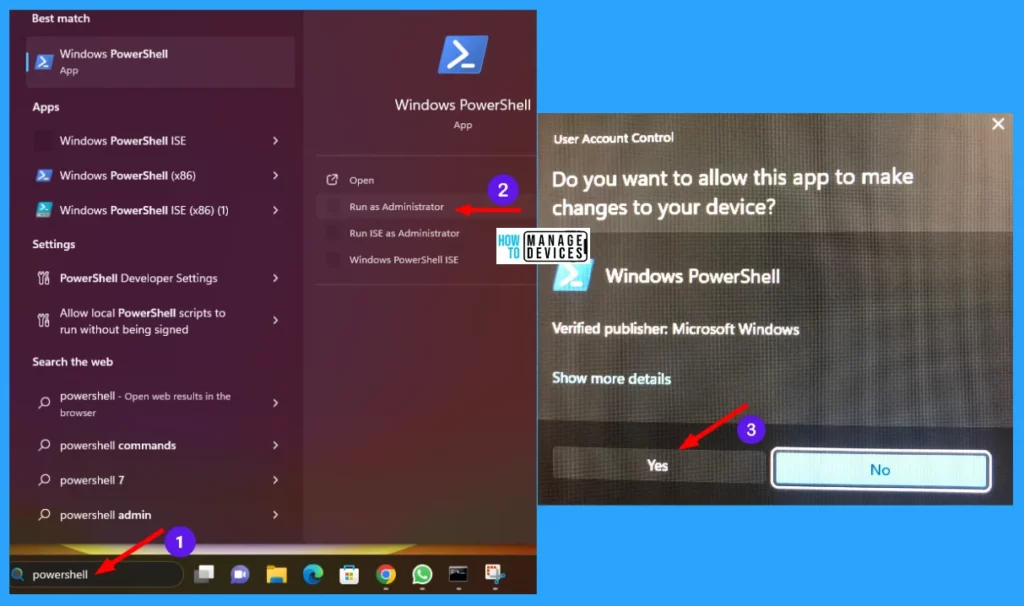
The Windows PowerShell opens in Administrator mode. Then type the command Get-MMAgent and press Enter to execute the command. Here the True value represents that the process is Enabled, and the False value represents that the process is Disabled.
NOTE: The commands in this post are not case-sensitive.
| Processes | Value |
|---|---|
| ApplicationLaunchPrefetching | True |
| ApplicationPreLaunch | True |
| MaxOperationAPIFiles | 512 |
| MemoryCompression | True |
| OperationAPI | True |
| PageCombining | True |
| PSComputerName |
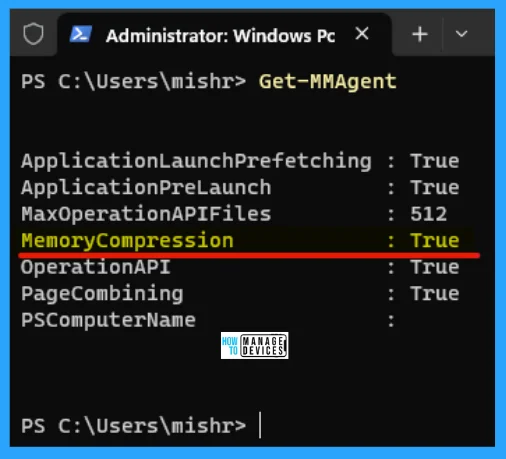
Enable Memory Compression on Windows 11
If it is not enabled, you can enable memory compression manually using PowerShell. Type PowerShell in the Search Box on the Taskbar, when the PowerShell option appears, click on Run as Administrator. A User Account Control window opens, which needs permission to make changes to your device, click on Yes, as shown above in Fig. 5.
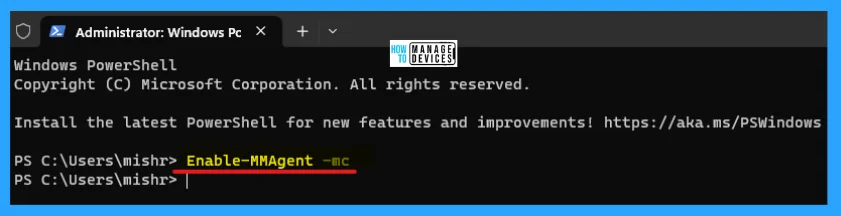
In the Administrator: Windows PowerShell, you need to execute the command for enablement of Memory Compression. Type Enable-MMAgent -mc and press Enter to execute. Now Restart your device to apply the changes.
Disable Memory Compression
If it is enabled, you can disable memory compression manually using PowerShell. Type PowerShell in the Search Box on the Taskbar, when the PowerShell option appears, click on Run as Administrator. A User Account Control window opens, which needs permission to make changes to your device, click on Yes, as shown above in Fig. 5.
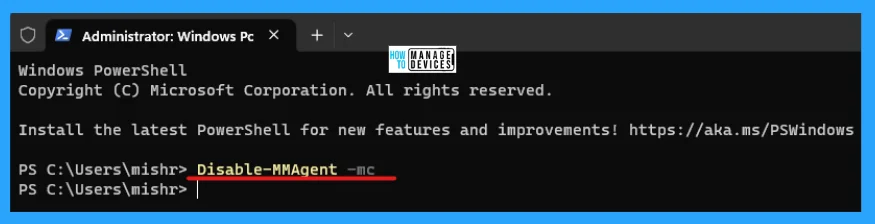
In the Administrator: Windows PowerShell, you need to execute the command for disablement of Memory Compression. Type Disable-MMAgent -mc and press Enter to execute. Now Restart your device to apply the changes.
NOTE: The memory compression feature is great because it optimizes the physical memory utilization, so it is not recommended to disable it.
Is Memory Compression Good or Bad
Memory Compression is much better than the alternative, which is paging that data out to disk. It is a faster process than using the paging file. No downside to compressed memory. Windows has the capacity to compress data in memory when it needs space automatically.
However, memory compression uses CPU resources. Your system is not performing faster if it does not need to compress data in memory at first. Whenever you see a lot of compressed memory, guess it is why your system is a little bit slow.
The only solution to avoid this situation is to install more physical memory, i.e., RAM, in your device. Furthermore, if your device does not have enough physical memory for the applications used by you, memory compression is better than the page file, otherwise, installing more physical memory is the best solution to it.
Conclusion
Memory Compression is not using more RAM. The more compressed memory is processed, the more data can be written on physical memory. In other words, a high level of memory compression translates into better memory utilization efficiency.
High RAM usage means many resource-hungry processes are running, and the application is usually available with high CPU usage. Closing some unused apps helps to restore your device to run smoothly.
I hope the information on the Enable Disable Memory Compression on Windows 11 is helpful. Please follow us on HTMD Community and visit our website HTMD Forum, if you like our content. Suggest improvements, if any, and we love to know which topic you want us to explore next.
Author
Alok is a Master of Computer Applications (MCA) graduate. He loves writing on Windows 11 and related technologies. He likes to share his knowledge, quick tips, and tricks with Windows 11 or Windows 10 with the community.



Thanks Alot , very useful tips and help me to understand what is it.