






Enable Autofill for Addresses in MS Edge Browser using Microsoft 365 Admin Center Policy
Hi, Today, I will explore how to Enable Autofill for Addresses in MS Edge Browser using Microsoft 365 Admin Center Policy. The latest version of Microsoft Edge contains several policies that allow you to configure how it operates within your organization.
AutofillAddressEnabled is a feature in Microsoft Edge that helps users fill in their address information automatically when they complete web forms. It suggests and fills in addresses using information that users have saved before.
We have a blog post that explains how to manage autofill inputs in the Microsoft Edge browser. Autofill suggests information you’ve entered before, like email addresses, when you fill out forms. You can turn this feature on or off based on your preference.
Autofill enhances the form-filling experience by simplifying the process, reducing cognitive load, and helping users stay engaged, encouraging them to complete the form. Users can manage AutoFill for addresses through the user interface if this policy is enabled or left unconfigured.

Table of Contents
What is the Group Policy (ADMX) Information of AutofillAddressEnabled Policy?
Group Policy (ADMX) in Windows helps administrators manage user and computer settings from one central location. It uses XML-based files to control different system parts across a network. Group Policy (ADMX) information of AutofillAddressEnabled Policy is given below:
GP unique name: AutofillAddressEnabled
GP name: Enable AutoFill for addresses
GP ADMX file name: MSEdge.admx
Mandatory GP path: Administrative Templates/Microsoft Edge/
Recommended GP path: Administrative Templates/Microsoft Edge – Default Settings (users can override)/
Enable Autofill for Addresses in MS Edge Browser
Enabling Autofill for Address in Microsoft Edge allows users to fill in address information on web forms automatically. Disabling this policy prevents AutoFill from saving or suggesting addresses in any web form except for payment and password forms.
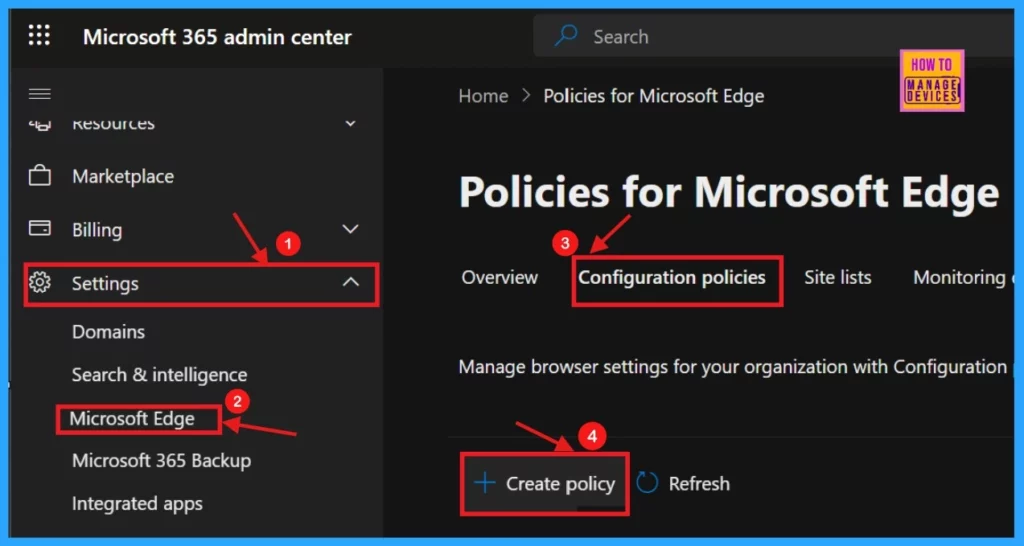
The AutofillAddressEnabled Policy in Microsoft Edge can be enabled from the Microsoft 365 admin center. First, select the Settings blade in the Microsoft 365 admin center.
- Settings > Microsoft Edge> Configuration Policies > + Create Policy
- Top 75 Latest Intune Interview Questions and Answers
- Configuration Profile For Edge Browser Extensions And Sidebar Management Using Microsoft 365 Admin Center
- Importance To Add Name For MS Edge Browser Windows
Basics
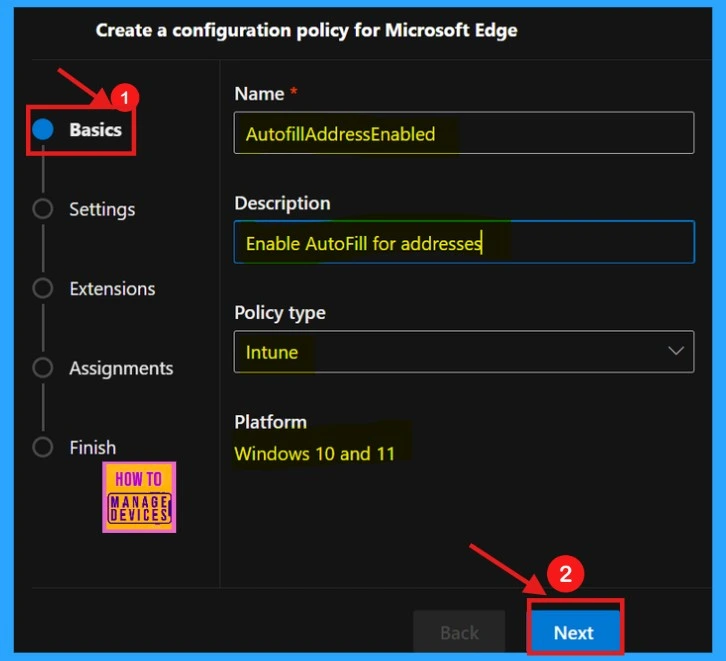
The Basics section includes a Name, Description, Policy Type, and Platform for your policy. A Name is compulsory. You can add a Description for the policy; it helps to identify it later. The following table will show you the Basics information about the AutofillAddressEnabled Policy.
| Name | Description | Policy Type | Platform |
|---|---|---|---|
| AutofillAddressEnabled | Enable Autofill Address in Microsoft Edge | Intune | Windows 10 and 11 |
- Click on the Next button
Settings
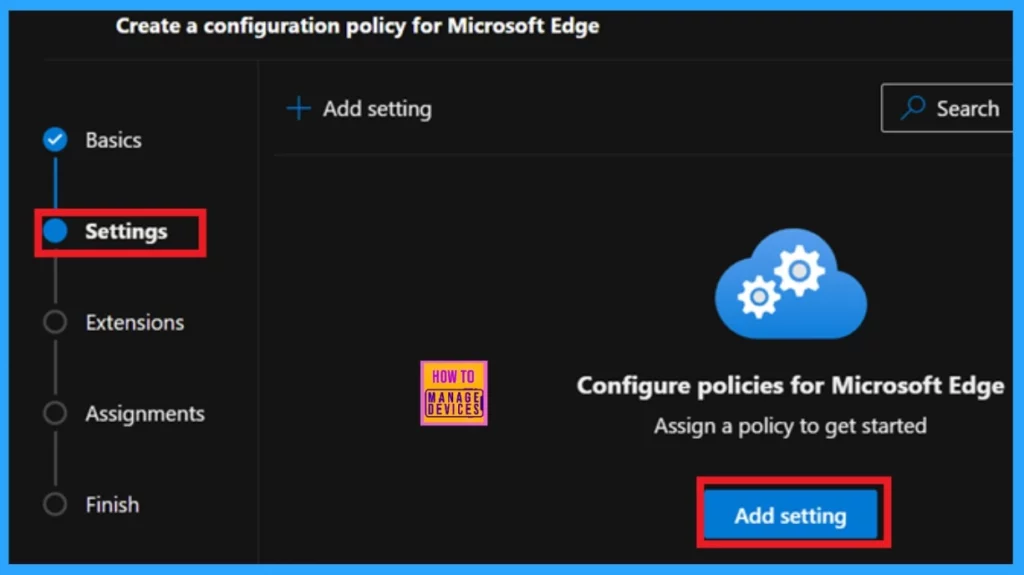
In Microsoft 365 Edge policies, + Settings lets you add new configurations to customize the Edge browser’s behaviour for your organization’s users. Here, you can select various settings (policies).
- Click the +Add Settings.
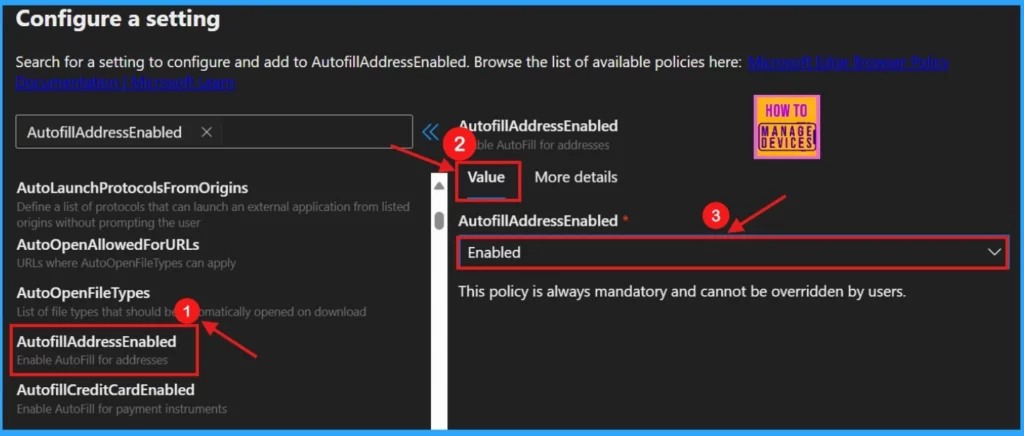
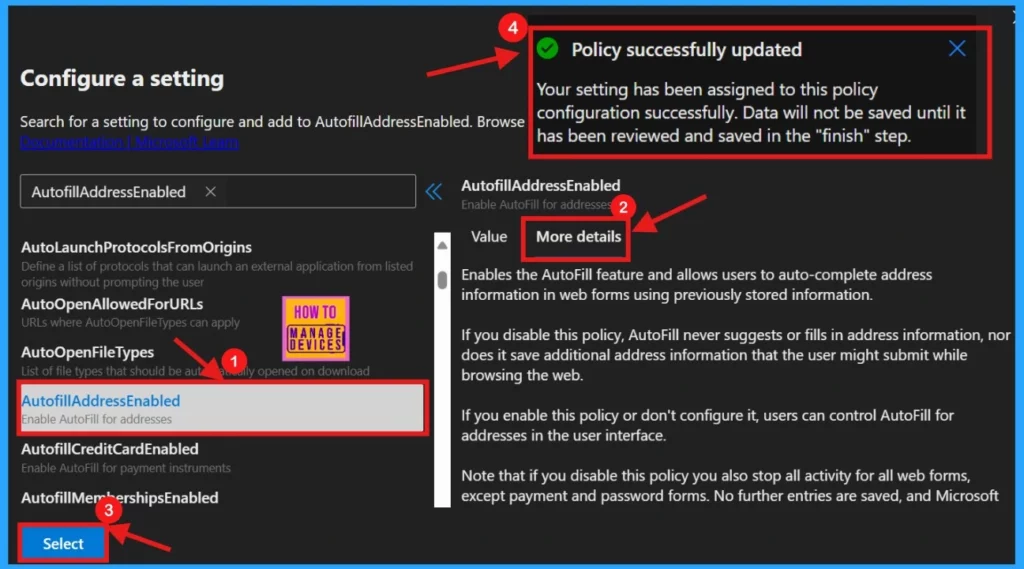
Add settings will navigate you to another window, Configure a Setting, which provides various settings categories. When I selected the AutofillAddressEnabled setting under Additional settings, a new pop-up window appeared, where the Value and More Details tabs were noticed.
On the Value tab, you can enable or disable the selected policy. I selected the Enabled option to Enable Autofill Address in Microsoft Edge.
The More Details tab provides in-depth information about the selected policy settings. When clicking the Select button, a notification confirms the policy’s successful update. The screenshot below demonstrates the details presented on the More Details tab.
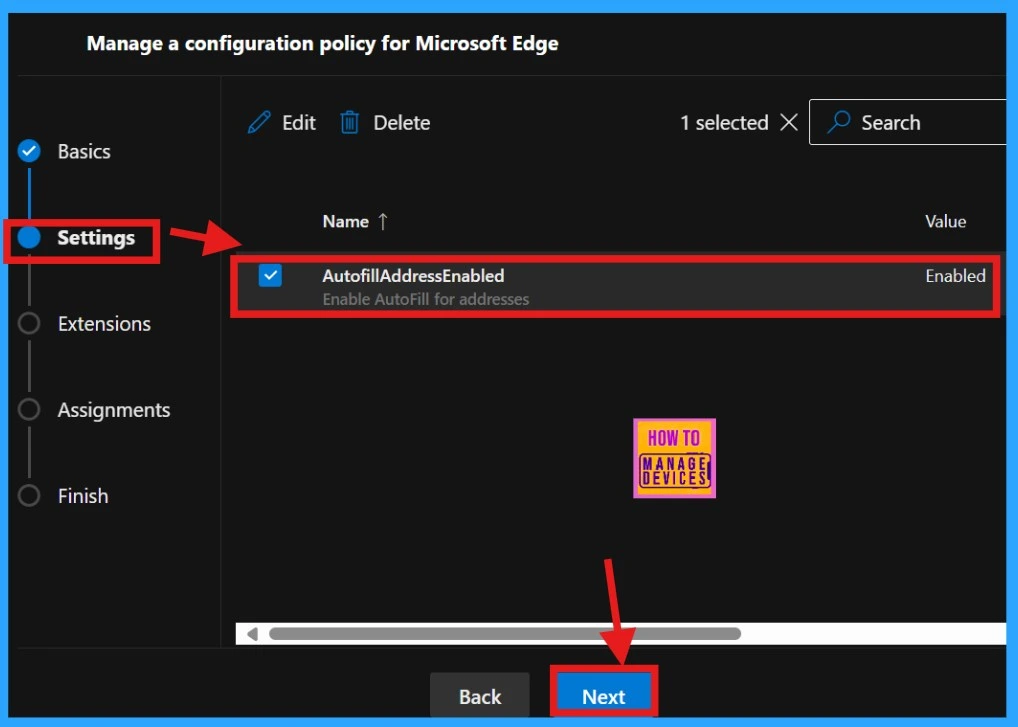
After selecting the policy, close the configuration settings page. Your settings, including the chosen policy name and value, will be displayed on the Settings page. Proceed by clicking Next.
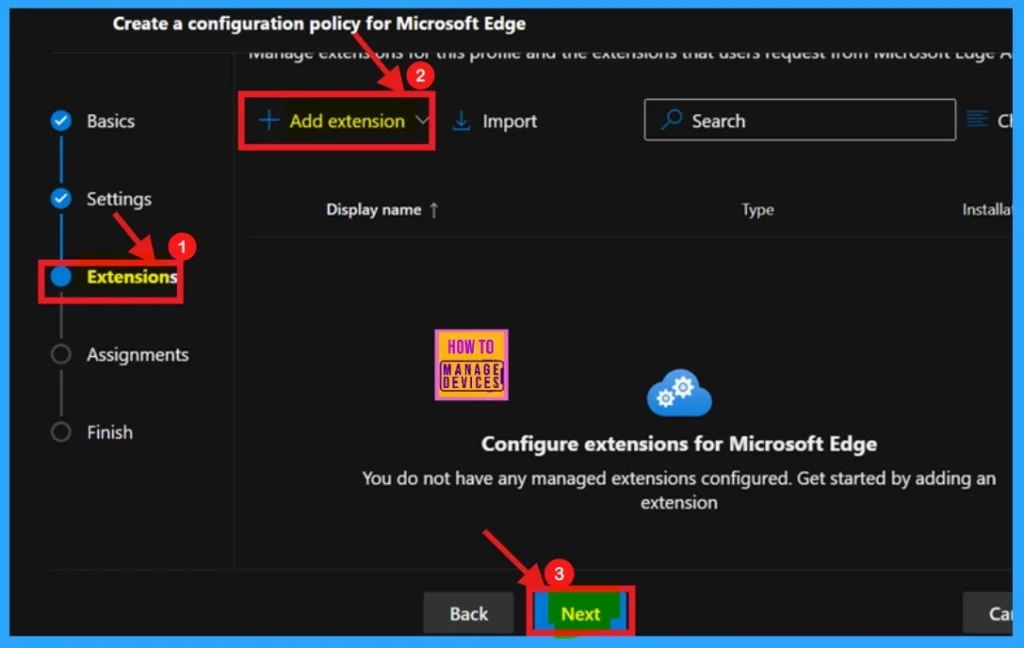
The details for default extensions are located on the Extensions page. Scroll down to find the +Add extension option and click to add an extension if desired. You can skip the Extensions section as it is not crucial for creating policies within the Microsoft 365 Admin Center.
- Click Next to proceed.
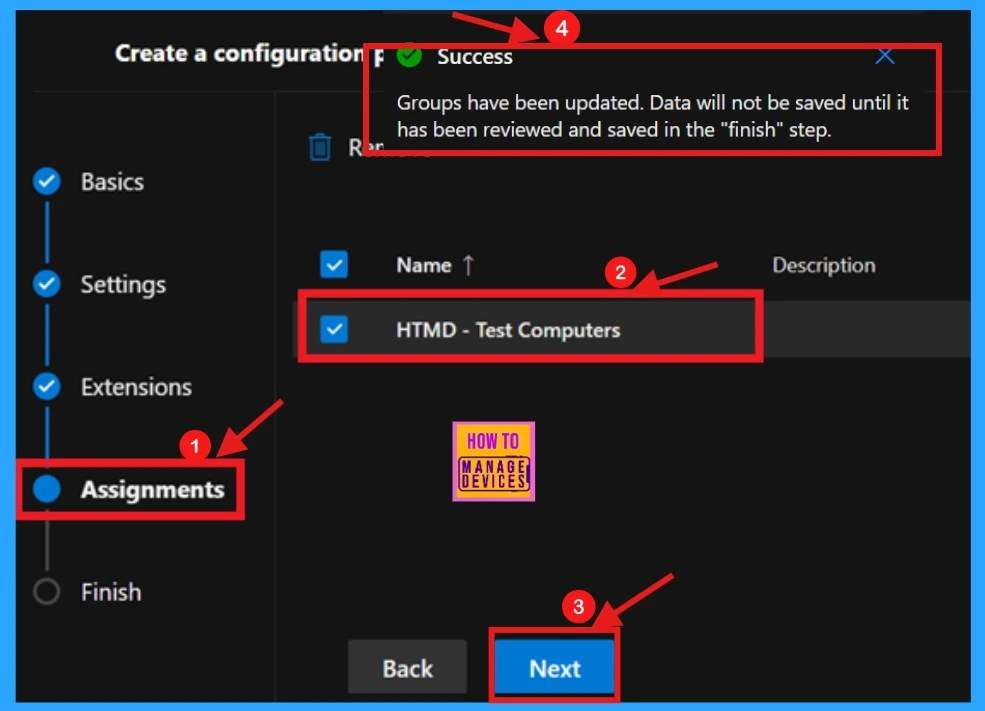
The Assignments section allows you to select groups for the settings you want to assign. Click +Select group, choose a group name from Microsoft Entra Group provided by default, and then click Select. This step is crucial for policy creation.
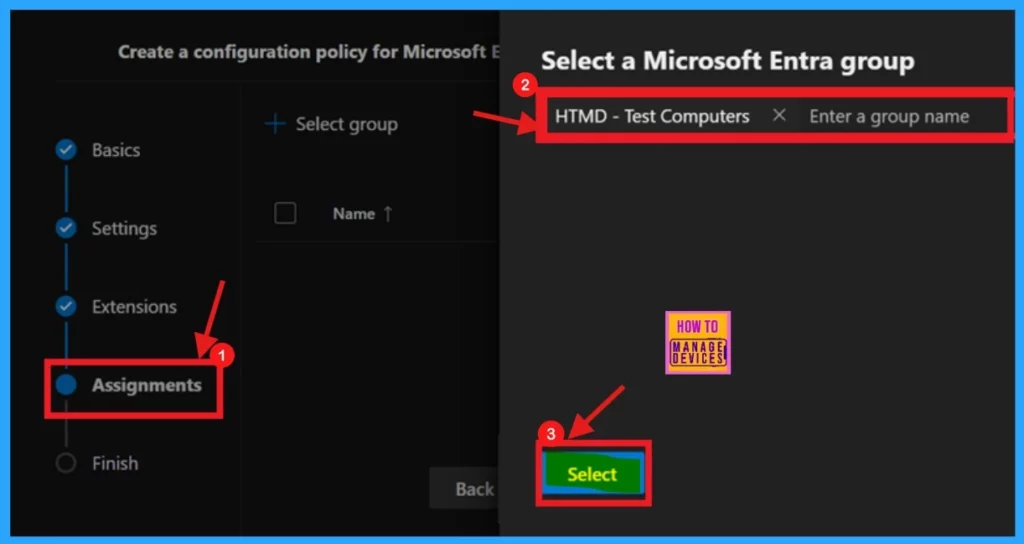
After you click Select, a notification will appear on the page confirming that the Group has been updated. However, the data will not be permanently saved until you review and save it in the Finish step.
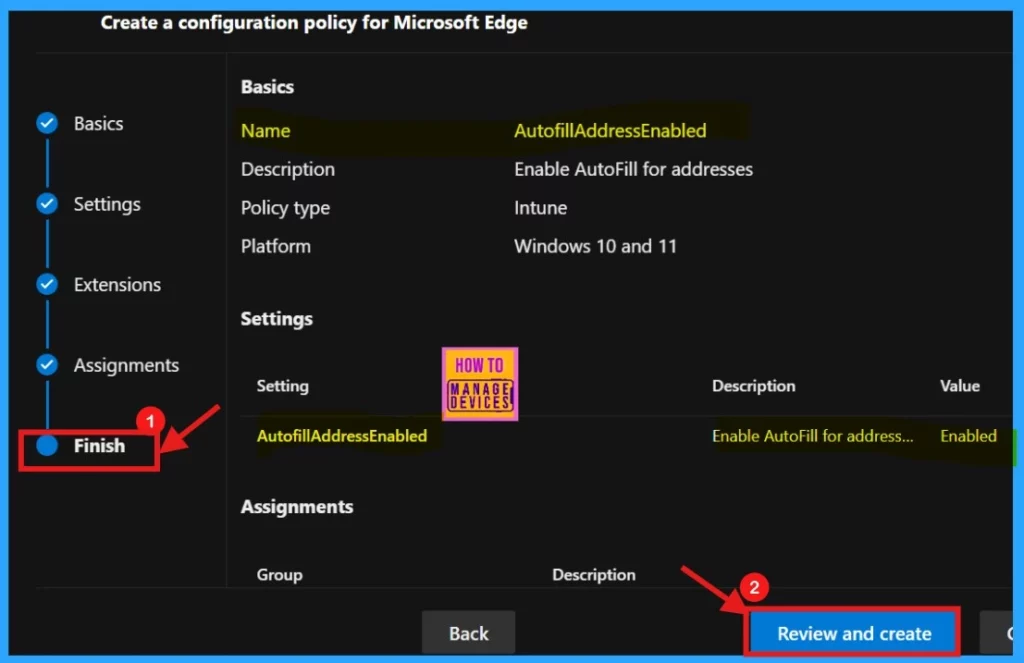
The Finish tab provides a summary of your policy details. Click Back to make any necessary changes. Once satisfied, click Review and Create to finalize the policy.
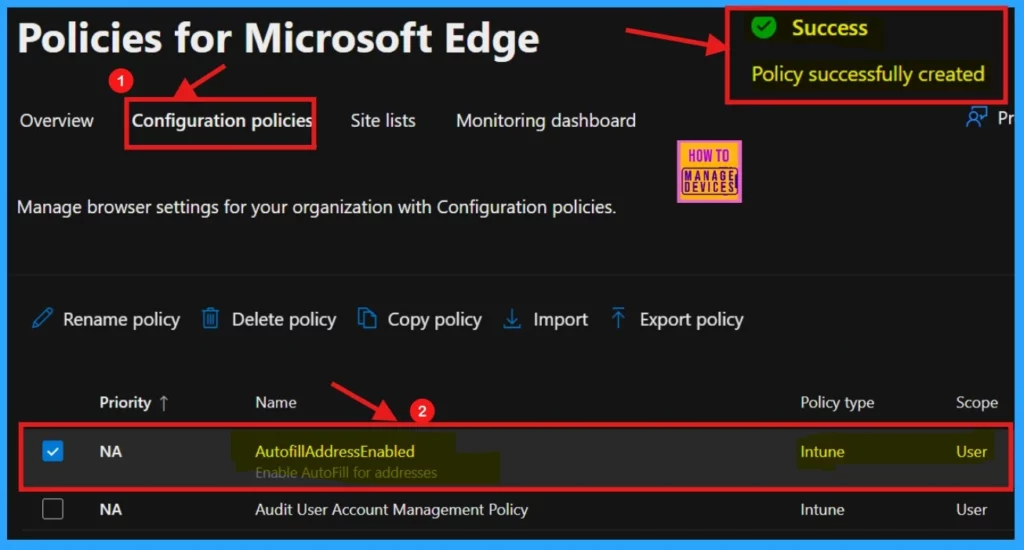
Upon clicking Review and Create, the portal will display a success message confirming the policy’s successful creation. The newly created policy will then be visible in the Configuration Policies section.
Device and User Check-in Status
To ensure faster policy deployment after creation, synchronize your device. Open the Company Portal and click the Sync button in the settings. This action will enable Autofill Address in Microsoft Edge.
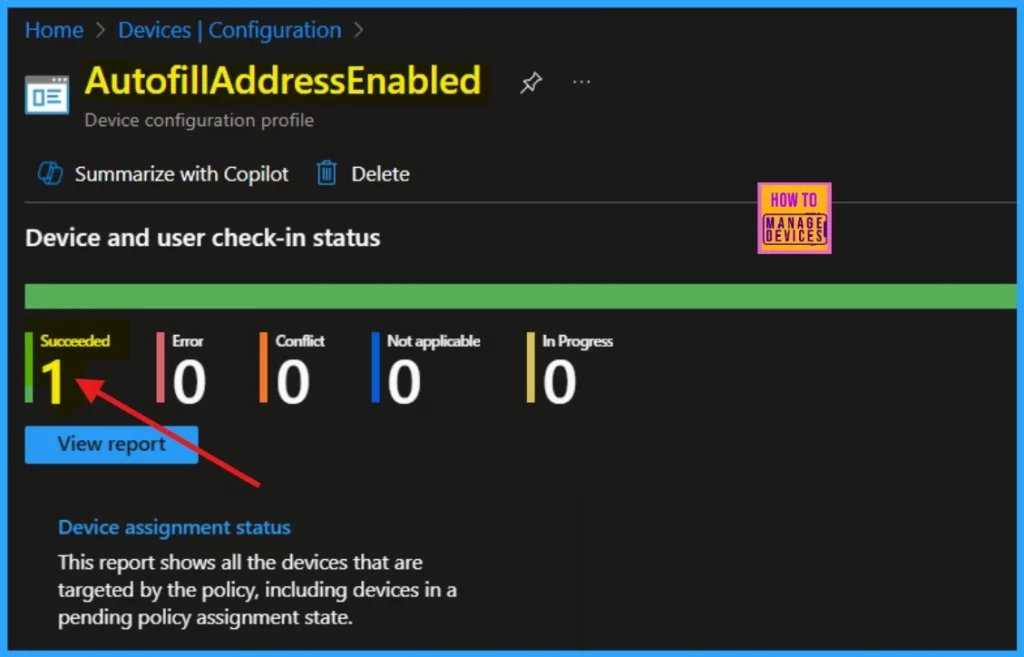
After syncing, verify the AutofillAddressEnabled Policy’s Device and User Check-in Status on the Intune Portal. Since the selected policy type is Intune, check the status on the Intune portal. A Succeeded result of 1 indicates successful policy deployment.
Client Side Verification
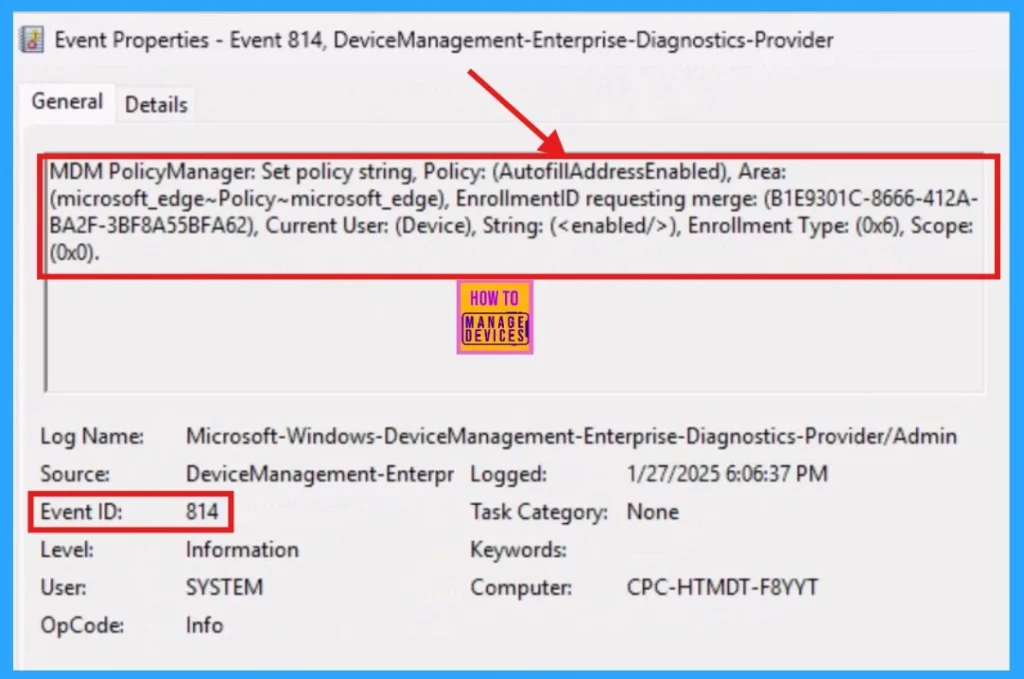
Client-side verification can be performed using the Event Viewer on the device where the policy is enabled. This log contains details about events, including date, time, severity, and the involved application or process. You can check for successful events with Event IDs 813 or 814.
- To access these Event IDs, navigate to Applications and Services Logs > Microsoft > Windows > Devicemanagement-Enterprise-Diagnostics-Provider > Admin.
- Here, the Success Event ID is 814
MDM PolicyManager: Set policy string, Policy: (AutofillAddressEnabled), Area: (microsoft_edge~Policy~microsoft_edge), EnrollmentID requesting merge: (B1E9301C-8666-412A-BA2F-3BF8A55BFA62), Current User: (Device), String: (), Enrollment Type: (0x6), Scope: (0x0).
End Result
The End result can be seen in the Microsoft Edge browser Settings. Open the Settings from the three dots (Settings and More option) in the upper right corner of the Edge browser. Select Profiles and click on Personal Info. This will take you to another window where you can see your saved information stored with Edge.

Need Further Assistance or Have Technical Questions?
Join the LinkedIn Page and Telegram group to get the latest step-by-step guides and news updates. Join our Meetup Page to participate in User group meetings. Also, Join the WhatsApp Community to get the latest news on Microsoft Technologies. We are there on Reddit as well.
Author
Anoop C Nair has been Microsoft MVP for 10 consecutive years from 2015 onwards. He is a Workplace Solution Architect with more than 22+ years of experience in Workplace technologies. He is a Blogger, Speaker, and Local User Group Community leader. His primary focus is on Device Management technologies like SCCM and Intune. He writes about technologies like Intune, SCCM, Windows, Cloud PC, Windows, Entra, Microsoft Security, Career, etc.


Discussion