






Enable the Linked Account Feature in MS Edge Using Intune Policy
Hi all, today we are discussing how to enable the Linked Account feature in Microsoft Edge using Intune policy. This feature allows administrators to manage and control account linking within the browser, ensuring a smooth and secure experience for users in the organization.
As you know, the Settings Catalog in Intune is a powerful tool that helps administrators deploy configuration policies. It provides a wide range of settings that can be applied across devices, making policy management more effective.
In this post, our focus is on the Microsoft Edge browser and its Linked Account feature. This feature allows a Microsoft Account (MSA) to be linked with an Azure Active Directory (Azure AD) account, providing users with enhanced sign-in and account management options.
By enabling this feature through Intune, administrators can ensure that users see the linked account information in the flyout. They will also have the option to add an account if one is not already linked. This configuration helps maintain flexibility and supports organizational requirements.

What Does the Linked Account Policy in Microsoft Edge Do?
The Linked Account policy in Microsoft Edge controls whether users can link a Microsoft Account (MSA) to their Azure Active Directory (Azure AD) account.
Enable the Linked Account Feature in MS Edge Using Intune Policy
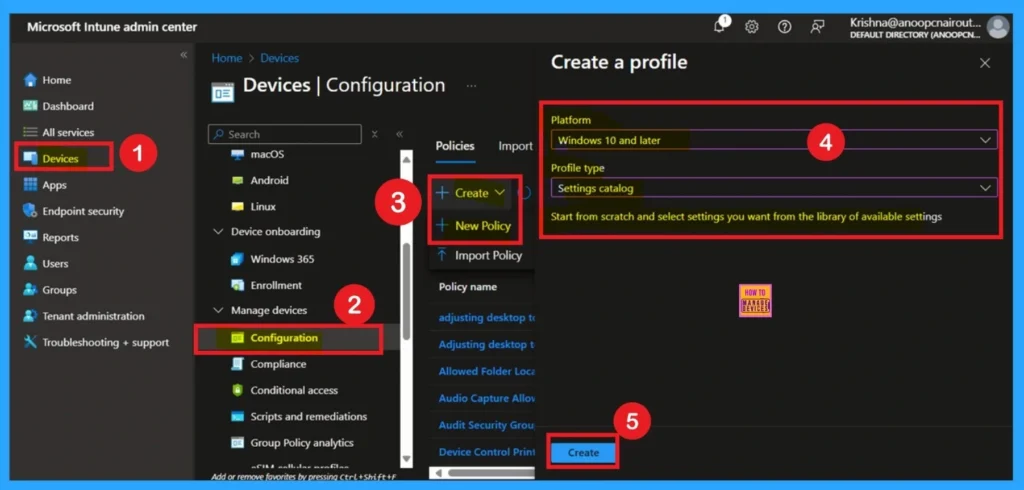
We have already discussed the key details of Web To Browser Sign-in Enabled Policy . Now, let’s look at how it can be deployed through the Microsoft Intune Admin Center. First, go to the Devices section in the Intune Admin Center. Next, click on Configuration and then select + Create profile. When creating the profile, you will need to provide the required details such as the Platform and Profile type.
- For the Platform, select Windows 10 and later.
- For the Profile type, choose Settings catalog.
- Finally, click on Create to complete the process. This will deploy the policy through Intune
- Enable Disable OneNote Audio Search for User Policy using Intune
- OneNote Text Prediction for user Policy Deployment using Intune
- Enable Disable Full Screen Mode in MS Edge Browser using Intune Policy
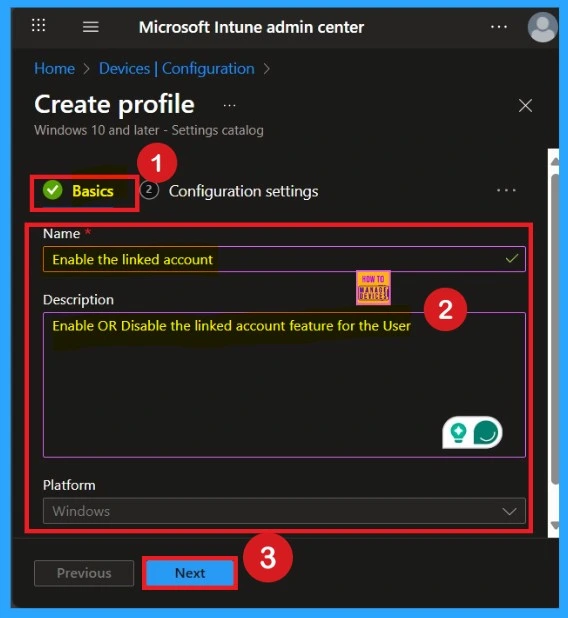
Start with Basic Step
You know, Naming the policy is the first step that help admins to identify the policy later. This is important and necessary step that allows you to know the purpose of the policy. Here is Name is important category, and description is optional in basics.
- After adding this click on the Next button.
How to Configure a Policy
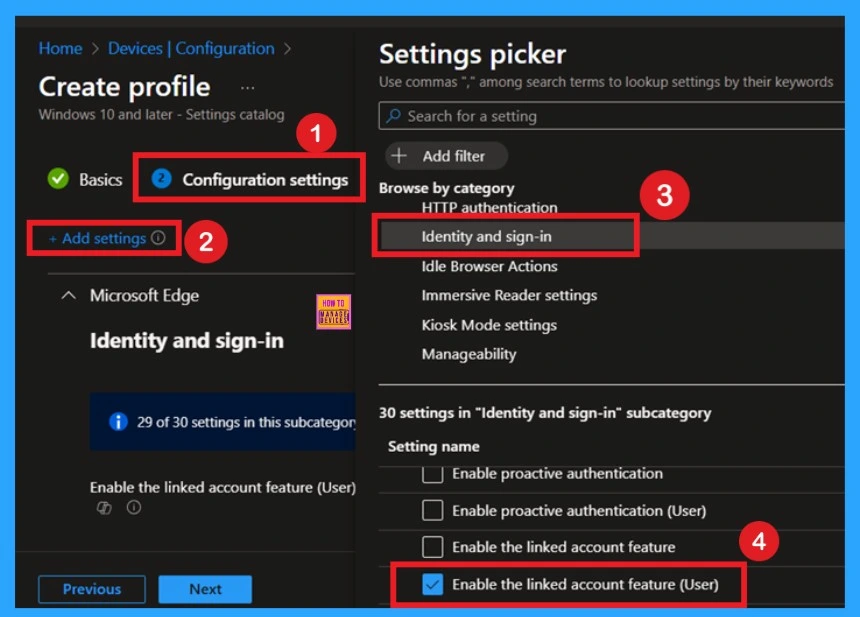
Configuration of the Enable Linked Account feature in Microsoft Edge is very easy. First, go to the Configuration Settings section. In this section, you will see the option for Add Settings. Click on this option, and a settings window will appear on your screen. Within this window, navigate to the Identity and Sign-in category.
- Under Identity and Sign-in, locate the option related to the Linked Account feature.
Disabled the Policy Mode
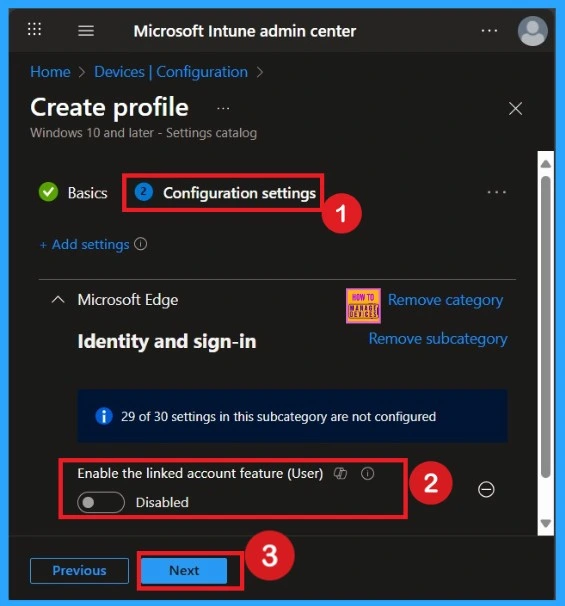
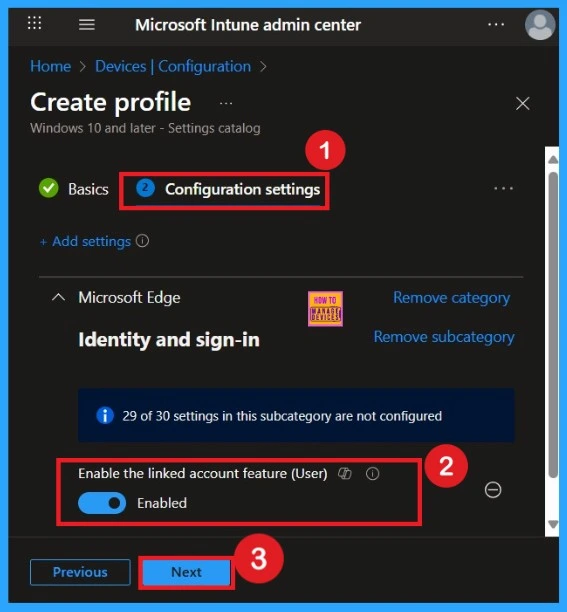
After selecting the configuration settings, you can now close the Settings picker window. Once it is closed, you will see the selected policy listed on the Configuration settings page. By default, the policy is set to Disabled. If you want to proceed with the current settings or make changes later, simply click Next to continue with the policy creation process.
How to Enable Linked Account Feature
Enabling this policy is very simple. You just need to move the toggle button from left to right, and it will turn blue, indicating that the Linked Account Feature Policy is enabled. After that, click on Next. You can proceed this policy in enabled mode.
What is Scope Tags
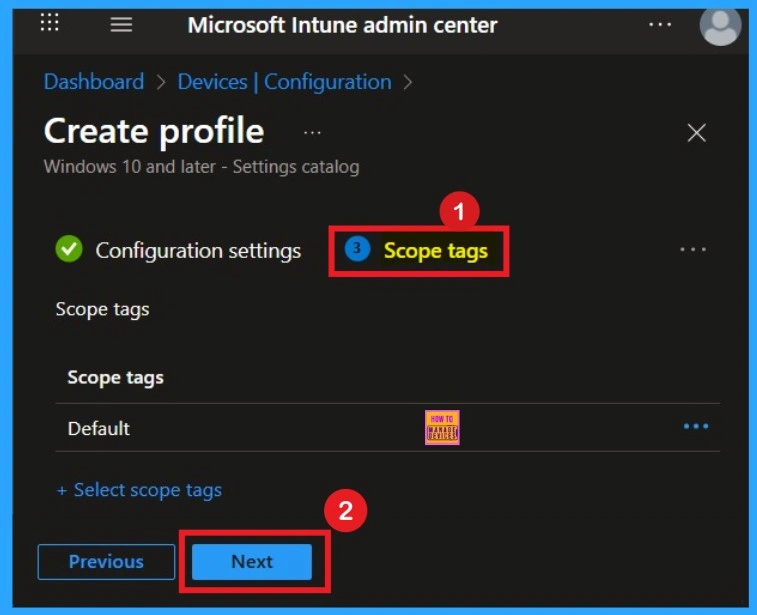
The aim of scope tags is to categorize and associate your policy with a specific scope, making it easier to manage assignments for particular environments. Here, you can add a scope tag for the policy, although it is not mandatory.
Importance of Assignments
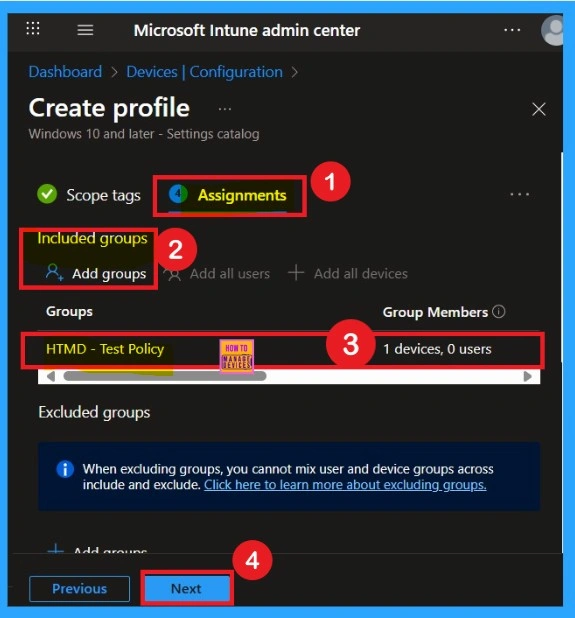
You know assign the policy to specific groups, you can use the Assignment Tab. Here I click, +Add groups option under Included groups. I choose a group from the list of groups and click on the Select button. Again, I click on the Select button to continue.
Last Step – Review + Create
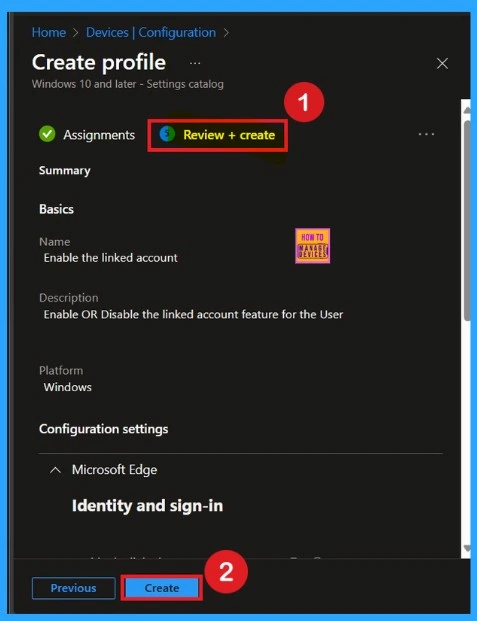
Before completing the policy creation, you can review each tab to avoid misconfiguration or policy failure. After verifying all the details, click on the Create Button. After creating the policy, you will get a success message.
Monitoring Status
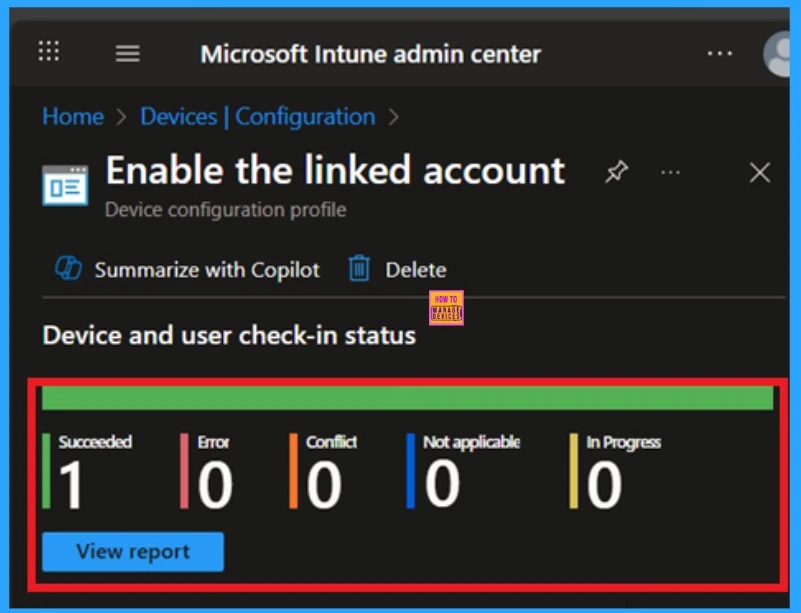
After creating the policy, administrators may want to confirm whether it has been successfully deployed and it is important too. To check this, go to Devices > Configurations and search for the policy name you created. Once you find the policy, click on it to open the Monitoring Status page. On this page, you can view the deployment details for both devices and users.
- The status will show if the policy has been applied successfully.
- If it is as Succeeded, it means the deployment worked as expected.
- You may see 1 or 2 under “Succeeded.” If there are no entries under Error, Conflict, Not Applicable, or In Progress, it indicates that the policy has been deployed without issues.
Client Side Verification
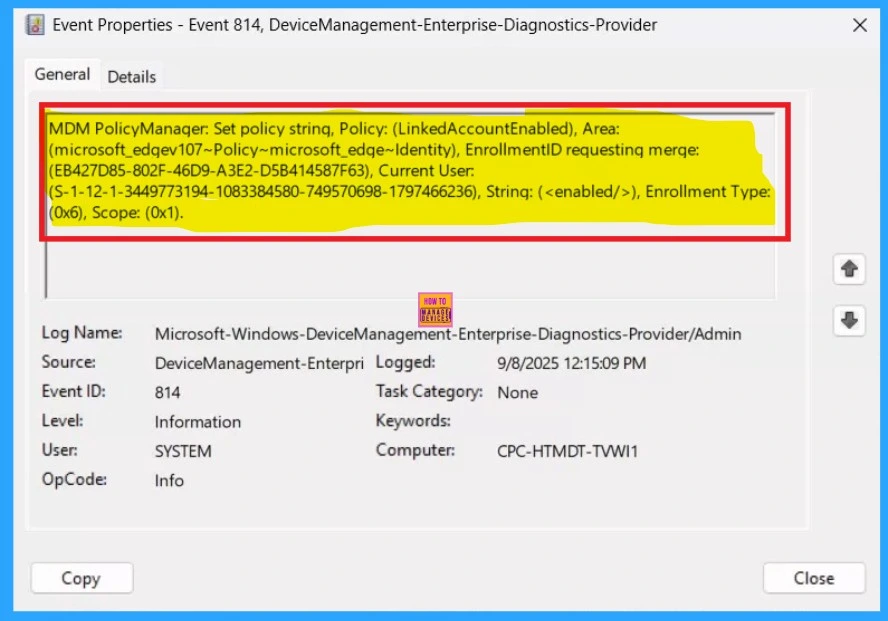
You can verify the confirmation in the Event Viewer by looking for Event ID 813 or 814. To access this, open Event Viewer and navigate to Applications and Services Logs > Microsoft > Windows >Device Management Enterprise Diagnostic Provider > Admin.
- I found the policy details in the Event ID 814.
Removing the Assigned Group from this Settings
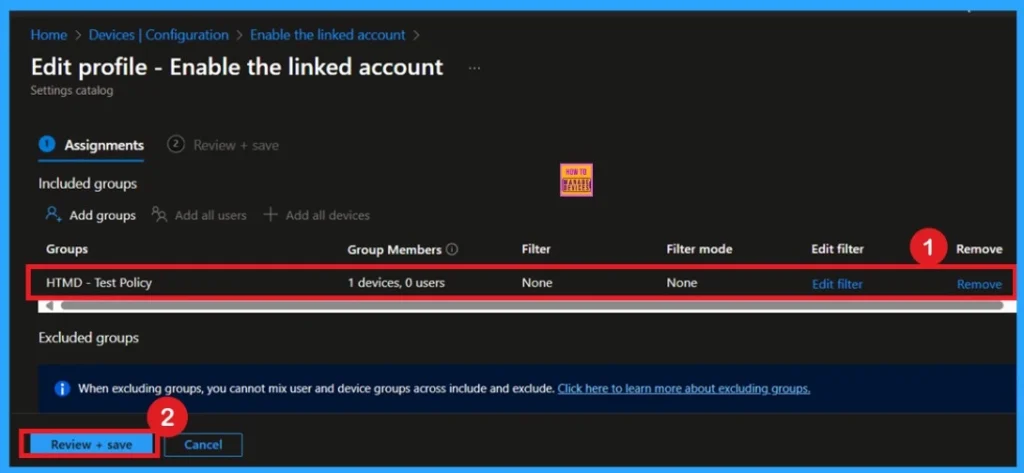
If you want to remove the Assigned group from the policy it is very easy for you. You know it is possible from the Intune Portal. To do this, open the Policy on Intune Portal Device check in status page and edit the Assignments tab and the Remove Policy.
To get more detailed information, you can refer to our previous post – Learn How to Delete or Remove App Assignment from Intune using by Step-by-Step Guide.
How to Delete Policy Permenently
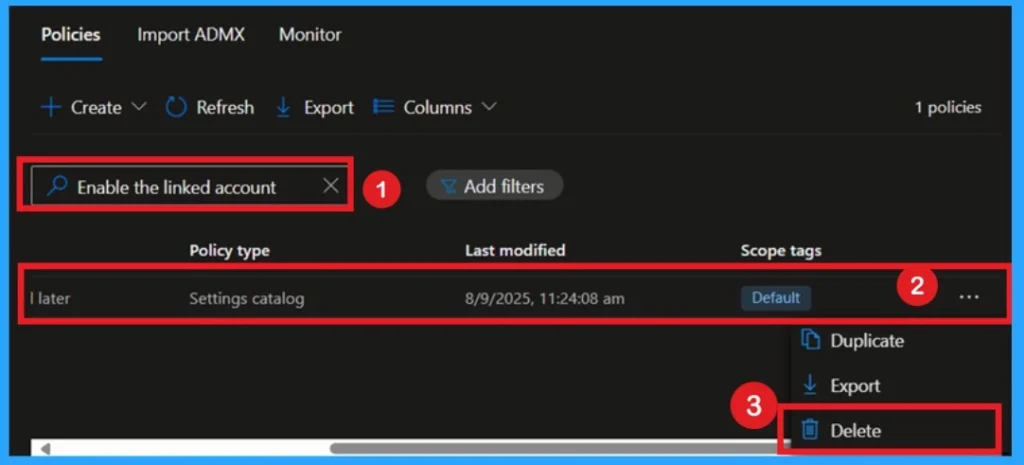
If you want to permanently delete a policy, search for the policy name in the Configuration search bar. Once the policy appears, click on the 3-dot menu next to it. You will see 3 options: Duplicate, Export, and Delete. Select Delete, and the policy will be permanently removed.
For detailed information, you can refer to our previous post – How to Delete Allow Clipboard History Policy in Intune Step by Step Guide.
Need Further Assistance or Have Technical Questions?
Join the LinkedIn Page and Telegram group to get the step-by-step guides and news updates. Join our Meetup Page to participate in User group meetings. Also, Join the WhatsApp Community to get the latest news on Microsoft Technologies. We are there on Reddit as well.
Author
Anoop C Nair has been Microsoft MVP for 10 consecutive years from 2015 onwards. He is a Workplace Solution Architect with more than 22+ years of experience in Workplace technologies. He is a Blogger, Speaker, and Local User Group Community leader. His primary focus is on Device Management technologies like SCCM and Intune. He writes about technologies like Intune, SCCM, Windows, Cloud PC, Windows, Entra, Microsoft Security, Career, etc.


Discussion