






How to Configure FSLogix Forced Unregister Cache Settings using Intune Policy
Today we are discussing How to Configure FSLogix Forced Unregister Cache Settings Using Intune Policy. As we all know that MS Intune helps the organization to deploy diffrent policies throughout the organizations for better environment and efficiency. FSLogix is an essential tool in the settings catalog, helping organizations manage user profiles and virtual desktop environments efficiently.
This policy ensures that cached data is handled properly when a user is unregistered, keeping virtual environments clean and organized. By enabling the Clear Cache On Forced Unregister setting, the local cache on a user’s machine is deleted automatically during a forced unregister.
This helps prevent data from causing conflicts or taking up unnecessary storage space. However, it’s important to understand that any unsaved data in the local cache will be lost during this process, so careful planning is required before enabling the setting.
If the desired behavior is for the local cache to be deleted, even if the data has not been trashed to a CCD Location, then Clear Cache On Forced Unregister should be set to Enabled. So le’s configure FSLogix Forced Unregister Cache Settings Using Intune Policy.

Why this Policy to be Enabled in the Organization?
Enable Clear Cache on Forced Unregister
Setting Clear Cache On Forced Unregister to Enabled may result in user data saved in the registry to be lost during the current session. It is important to understand that this data isn’t recoverable if the local cache is cleared in this scenario.
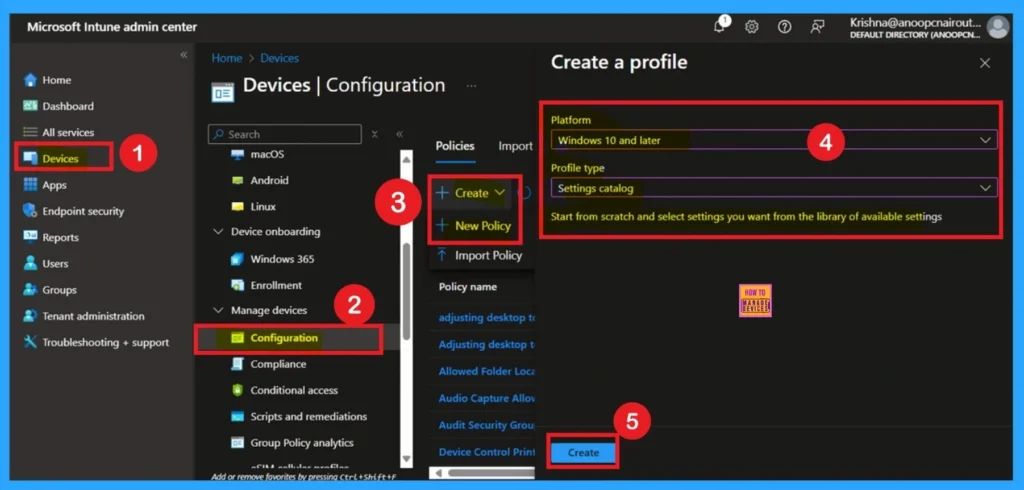
First, log in to Microsoft Intune with your credentials. Then, go to Device >Configurations and click on the + Create >New Policy option. A new window called Create a Profile will appear. Here, you need to select the Platform and Profile Type, and then click on the Create button.
| Create a Profile | Info |
|---|---|
| Platform | Windows 10 and later |
| Profile Type | Setting Catalog |
- FIX Teams Icon is Missing from the Start Menu FSLogix Issue
- TeamsTfwStartupTask Registry Key is not Roamed with FSLogix ODFC Containers
- How to Block App Location Access in Windows using Intune Policy
How to Deal with Basics
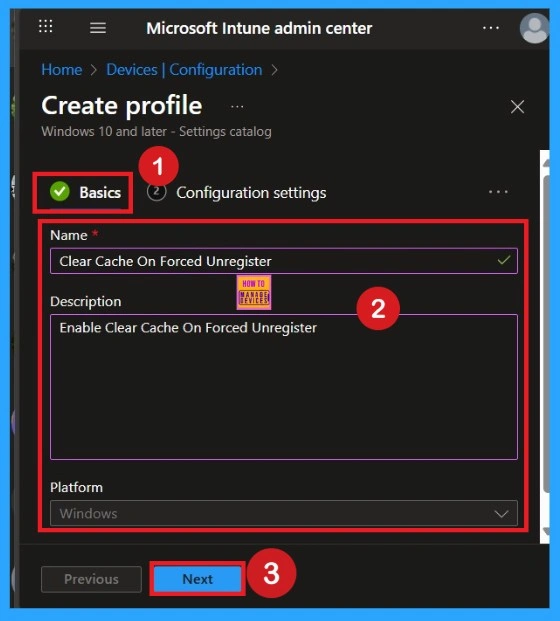
Now, you are on the Basics tab. Here, the only mandatory field is the Name. You need to enter a name for the policy. The Description field is optional, but adding a description can help you understand the purpose of the policy later. Select the Platform as Windows, and then click Next.
- The name you provide will help you identify and search for the policy later, so make sure to choose a simple and clear name.
What is Configuration Tab
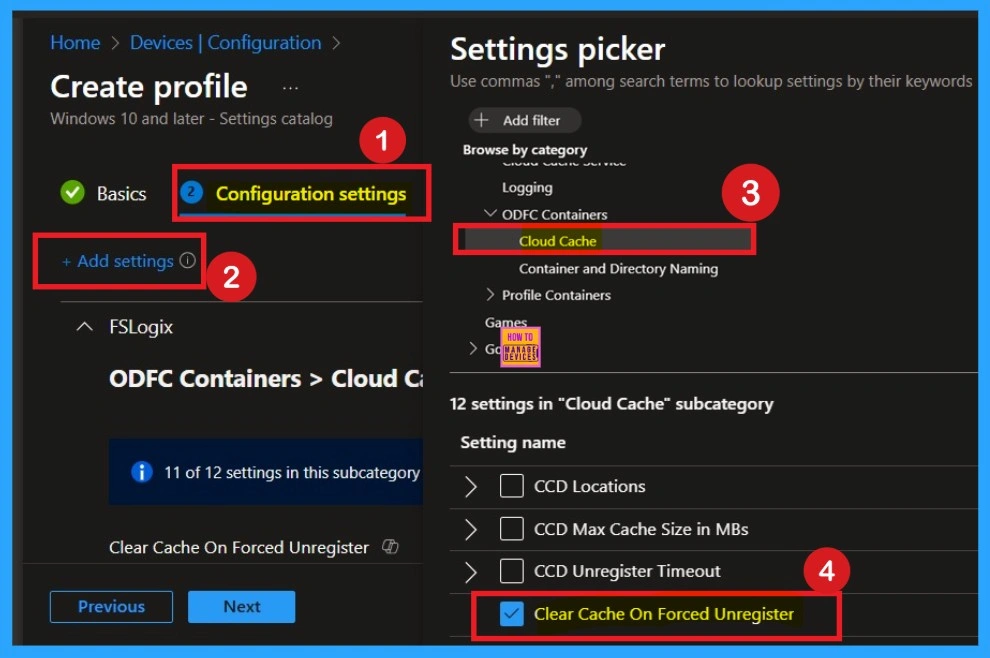
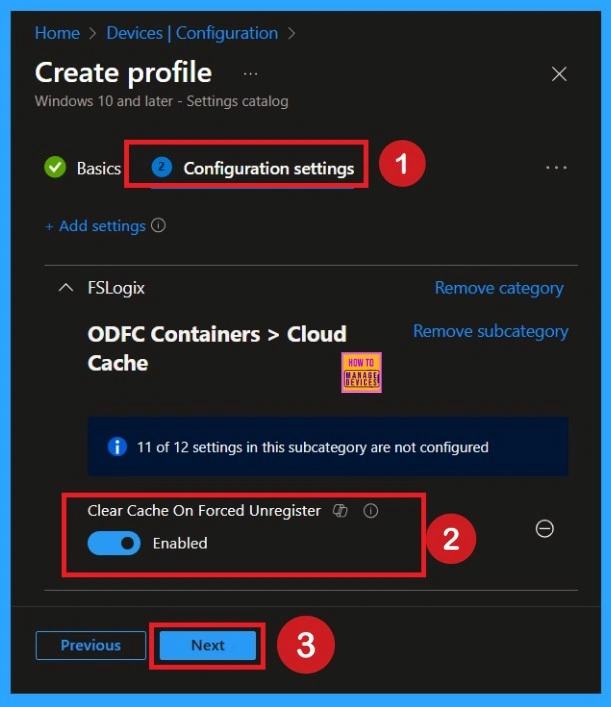
After completing the Basics tab, you will move to the Configuration Settings. To add a setting, click on the Add Setting hyperlink. A Settings Picker window will appear. Here, select the FSLogix category, and then click on the dropdown arrow. From the dropdown, choose ODFC Containers, and another dropdown will appear with Cloud Cache options. In the Cloud Cache options, you will see different policies. Select the Clear Cache On Forced Unregister policy.
Settings Disabled
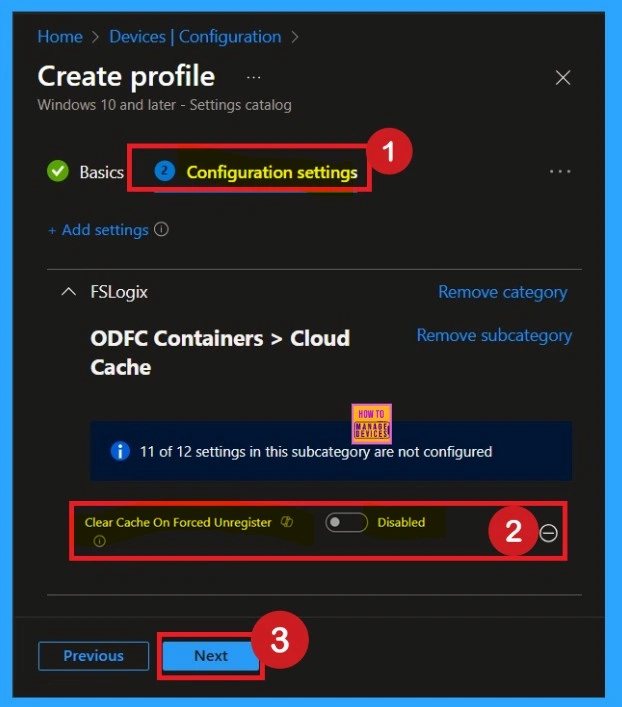
By default, the Clear Cache On Forced Unregister setting is turned off. This means if a user is forcibly removed from the system, the local cache stays on the device, even if it hasn’t been saved to the central location (CCD). This helps prevent accidental loss of data, especially if the user was still working or had unsaved information.
- If you want to keep it disabled that means, you do not want to Configure FSLogix Forced Unregister Cache Settings enabled in your organization, so you can just click Next to continue.
Enable the Policy
If you want to enable this policy and your organization needs the moving known folders to Onedrive is On. To do this, toggle the switch from left to right. Once enabled, the toggle will turn blue, indicating that the setting is now Enabled.
- After enabling it, click Next to continue with the setup.
Note: It’s important to remember that Enable this policy can cause data in the current session to be lost. Any information in the cache that hasn’t been saved to the central location will be deleted permanently.
Know the Scope Tags
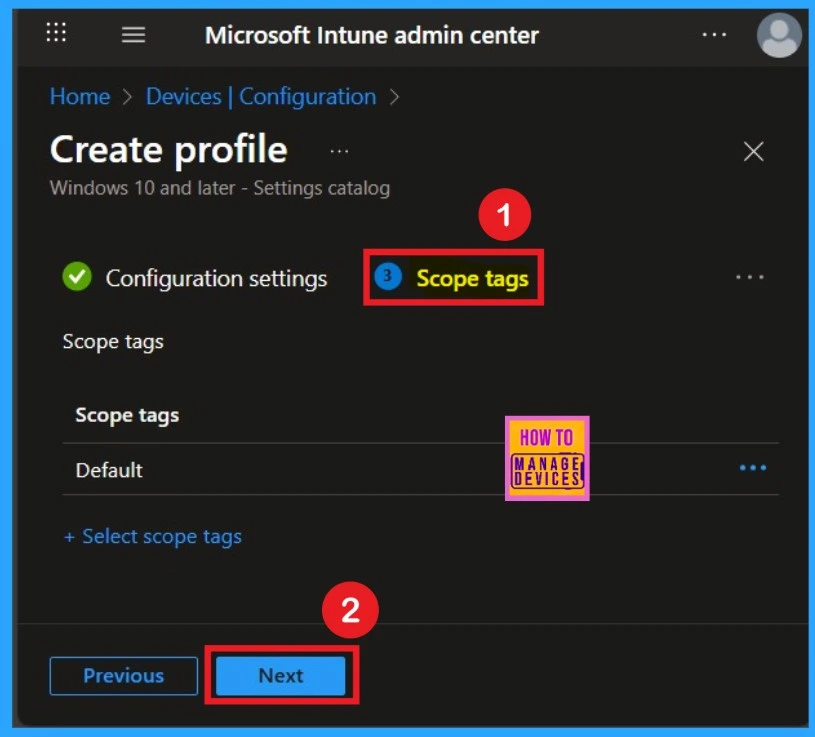
Now you are on the Scope Tags page. Scope tags can be important in certain cases for policy deployment. In this example, I have chosen to skip this section. However, if you want to add a scope tag to the policy, you can select the “Add scope tag” option, which is highlighted in blue.
- I’m skipping this step, So, I click Next to continue.
What is Assignments Section in a Deployment
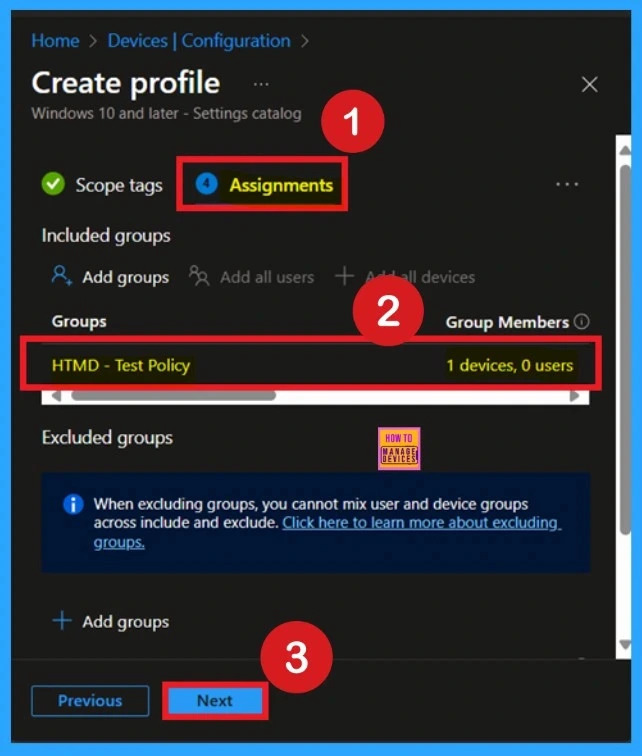
Next, you’ll reach the Assignments section, which is a very important step that you have to do. This is where you decide which user or device groups should receive the policy. In this case, I selected the specific group I wanted to apply the policy to. After selecting the group, click Next to continue.
Know about the Review + Create Tab
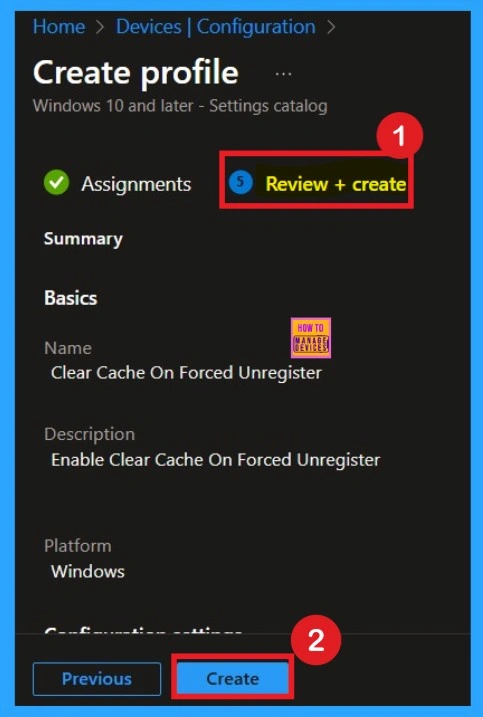
Review + Create Tab helps you recheck all the details of the policy you entered on all the tabs. After verifying all the details, click on the Create Button. After creating the policy, you will get a success message.
Monitoring Status
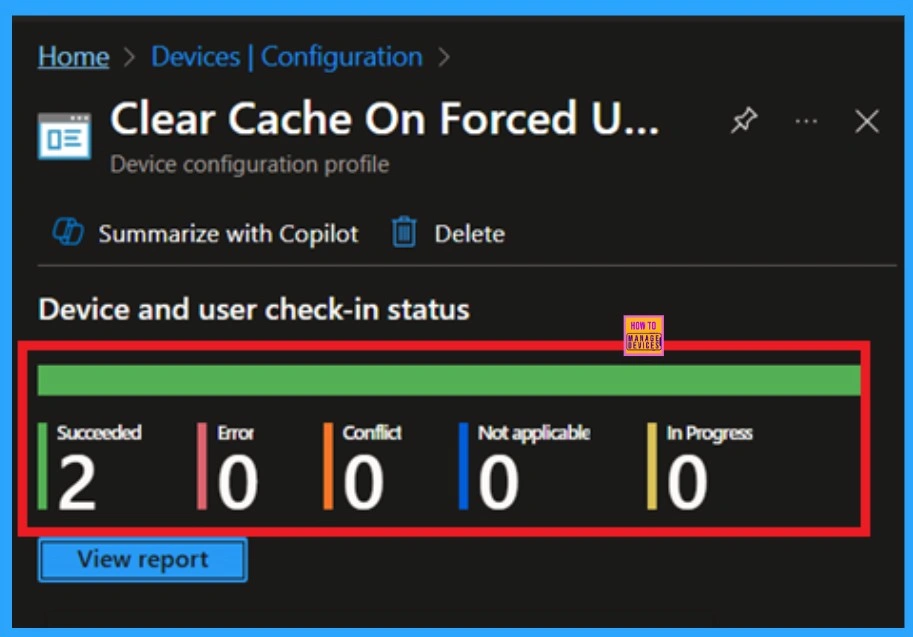
After creating the policy, the next step is to check if it was applied successfully. Always remember that it can take up to 8 hours for the policy to be fully deployed. If you’ve synced the policy through the Company Portal, you can check its status easily. Just go to Devices > Configuration, then search for the name of your policy in the list.
- In the screenshot below, you’ll see it says “Succeeded: 1” this means the policy was deployed successfully.
- Click on the policy to see the Device check-in status for both devices and users.
Client Side Verifications
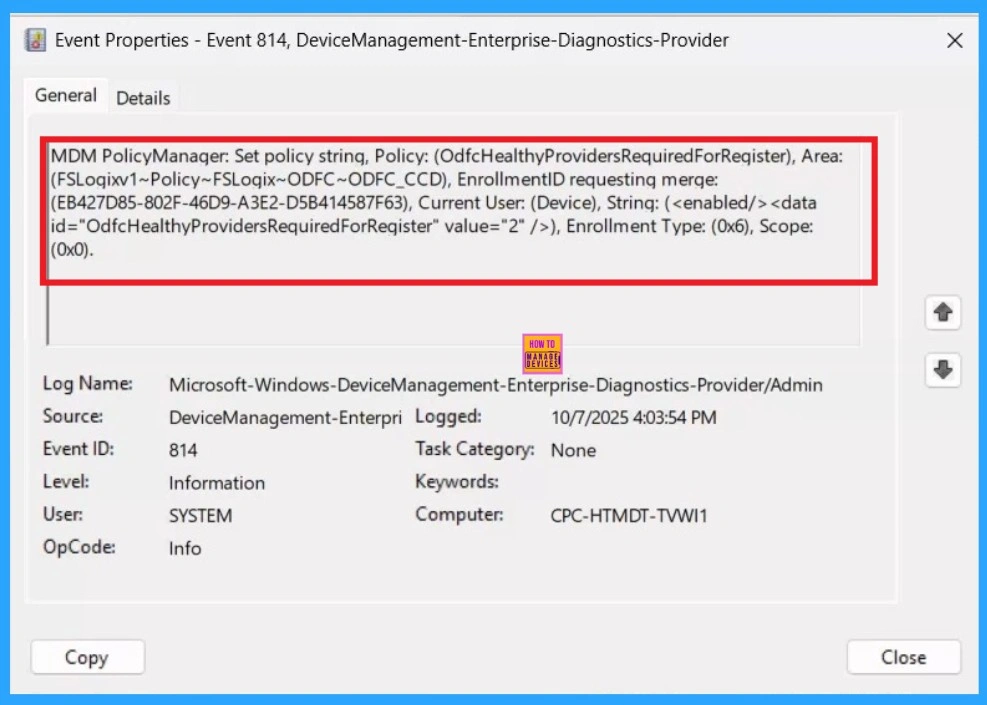
You can verify the confirmation in the Event Viewer by looking for Event ID 813 or 814. To access this, open Event Viewer and navigate to Applications and Services Logs > Microsoft > Windows >Device Management Enterprise Diagnostic Provider > Admin.
- You can see a list of policy-related events now.
- I found the policy details in the Event ID 814
Delete the Policy from Intune Portal
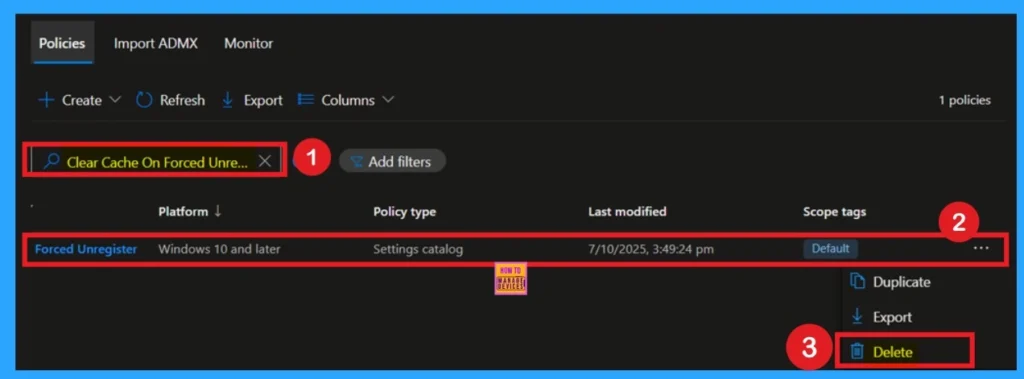
If you want to delete the policy of Moving their Windows Known Folders to OneDrive that you created, you can easily do that. First go to the Device Configuration then search the policy name and now you get the policy here click on the 3-dot menu of the policy then clicks on the Delete and the policy Deleted permanently.
How to Remove a Group From Policy
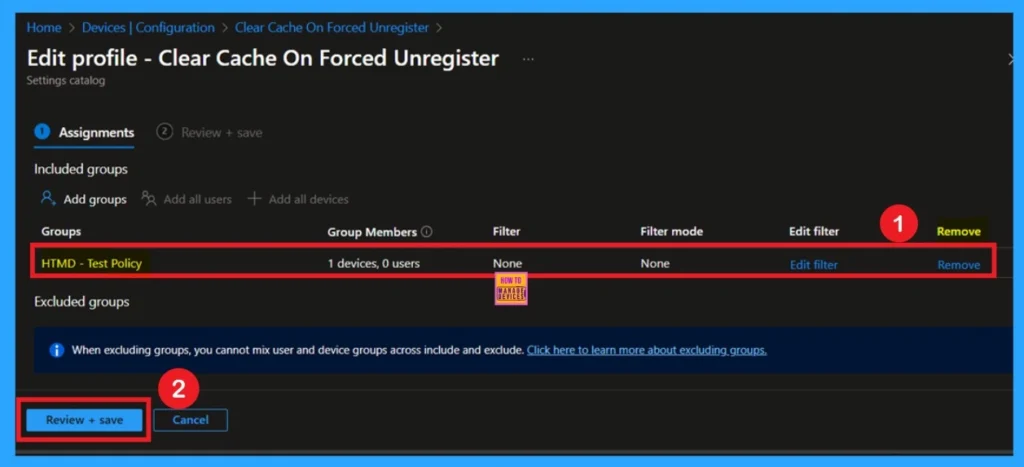
Start by navigating to the Monitoring status page via Devices > Configuration. Search for the policy by name and click on it to open its monitoring details. Scroll down to the Assignments section and click Edit. This will take you back to the policy’s assignment settings. From here, you can remove the group you no longer want the policy to apply to.
- For a view of the process, refer to the screenshot below.
Need Further Assistance or Have Technical Questions?
Join the LinkedIn Page and Telegram group to get the step-by-step guides and news updates. Join our Meetup Page to participate in User group meetings. Also, Join the WhatsApp Community to get the latest news on Microsoft Technologies. We are there on Reddit as well.
Author
Anoop C Nair has been Microsoft MVP for 10 consecutive years from 2015 onwards. He is a Workplace Solution Architect with more than 22+ years of experience in Workplace technologies. He is a Blogger, Speaker, and Local User Group Community leader. His primary focus is on Device Management technologies like SCCM and Intune. He writes about technologies like Intune, SCCM, Windows, Cloud PC, Windows, Entra, Microsoft Security, Career, etc.


Discussion