






How To Export Windows 365 Cloud PC Names
In this post, you will learn how to export Windows 365 Cloud PC Names. You can manually export all Cloud PCs from an Intune portal to a CSV file if you are looking for a simple way to export your Cloud PC details.
You also have an option to export the Cloud PC name of every Cloud PC on your tenant using the PowerShell method. The ability allows you to collect details in a simplified way and improve the report.
Windows 365 makes provisioning dedicated, always available cloud PC’s in your organization easy. You have an option to upload custom Windows images or use optimized Windows 365 gallery images to enable your users to work from anywhere, on any device.
Renaming Hybrid Azure AD Cloud PCs is not supported. The remote action to rename Cloud PCs that are Azure AD joined is also disabled in the MEM admin center (Intune) portal. You can check the post detailed Best Methods to Rename Windows 11 PC and Cloud PC.

- Remotely Manage Windows 365 Cloud PC Business Edition
- Purchase Windows 365 Cloud PC License | Real World Scenario
- How to Backup and Restore Windows 365 Cloud PC | Point-in-time Restore Option
Export Windows 365 Cloud PC Names
Let’s follow the steps below to export all Cloud PC details from Intune Portal –
- Sign in to the Microsoft Endpoint Manager admin center https://endpoint.microsoft.com/.
- Under Provisioning, Select Devices > Windows 365.
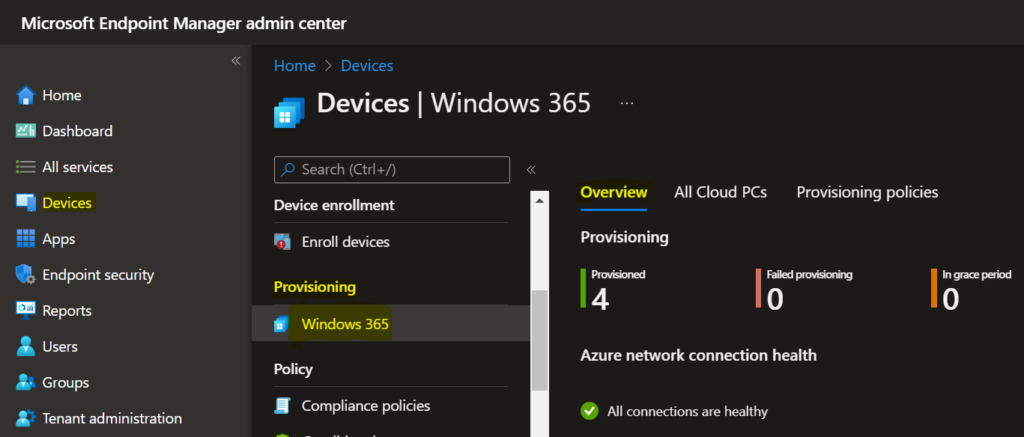
On the All Cloud PCs tab, the bar displays the total number of Cloud PCs across all your tenants. The All Cloud PCs tab also includes the following options:
- Export: Select to export Cloud PC data to an Excel comma-separated values (.csv) file.
- Refresh: Select to retrieve the most current Cloud PC data.
- Search: Enter keywords to quickly locate a specific Cloud PC in the list.
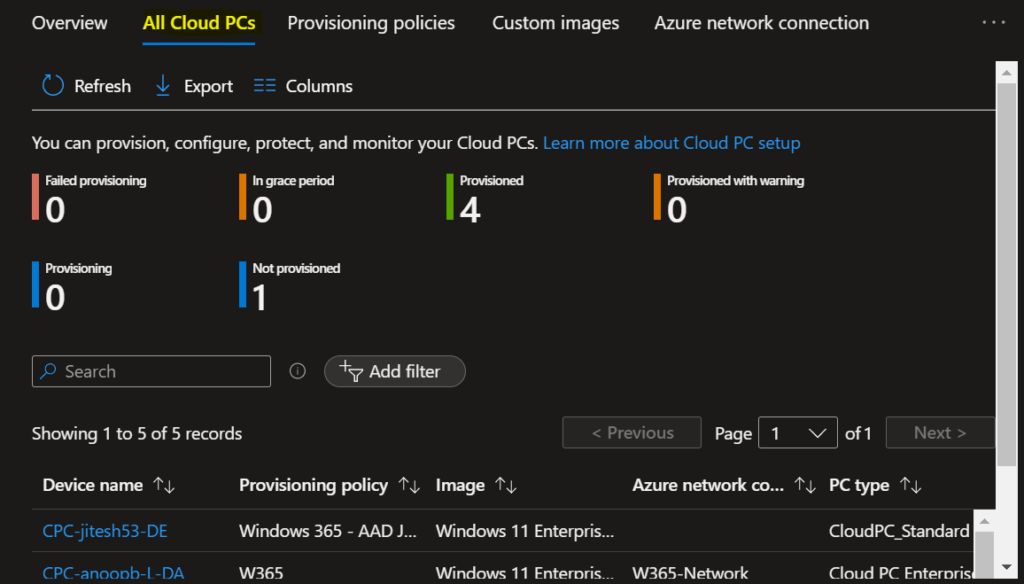
You can view all Cloud PCs and detailed status in the list. You will get the following information –
- Device name
- Provisioning policy
- Image
- Azure network connection
- PC type
- Status
- Grace period expiry
- User
- Date modified
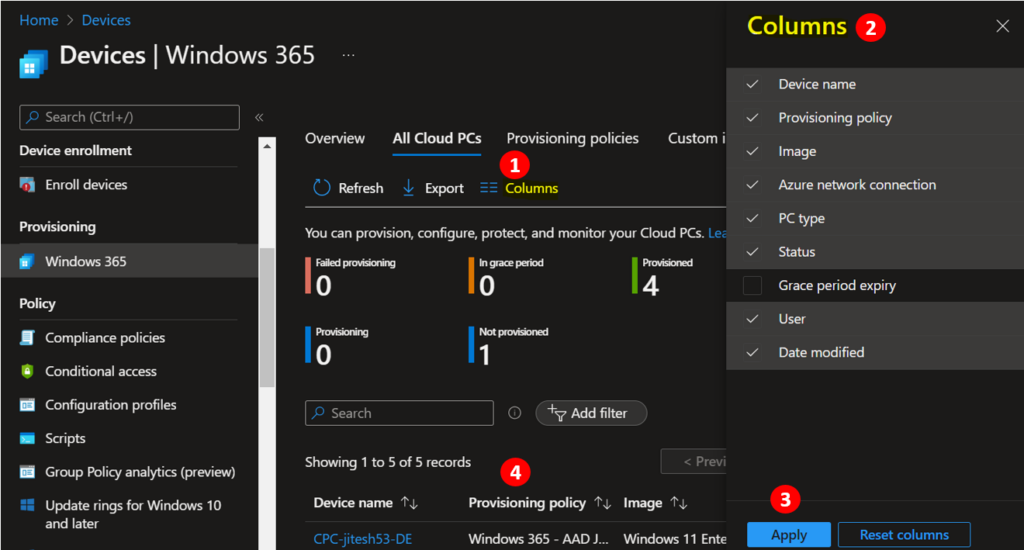
You can use the Columns property to add or remove columns. Click on the Columns. With a flyout display, you can Check or Uncheck the columns you want to include. Select Apply to update.
Let’s use the Filter for your report. Clicking on Add filter prompts you to select the options you want to include/exclude. Select Apply to update.
Select the key, operator, and value. In value, you can filter to show the following statuses: Provisioned, Provisioned, Failed Provisioning, In grace period, Provisioned with warning, Not provisioned, Pending, Resizing, and De-provisioning.
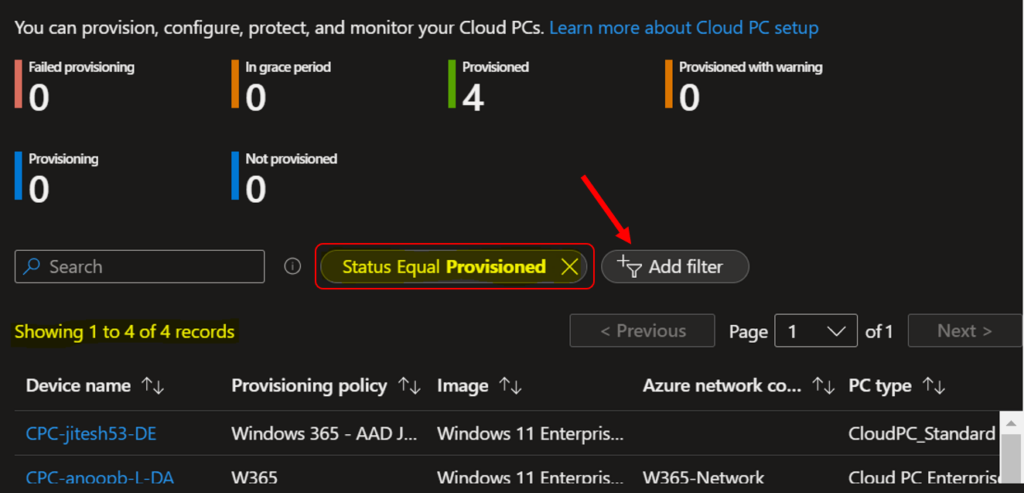
Select Export, click Download to export all data, or filter data based on your selection.
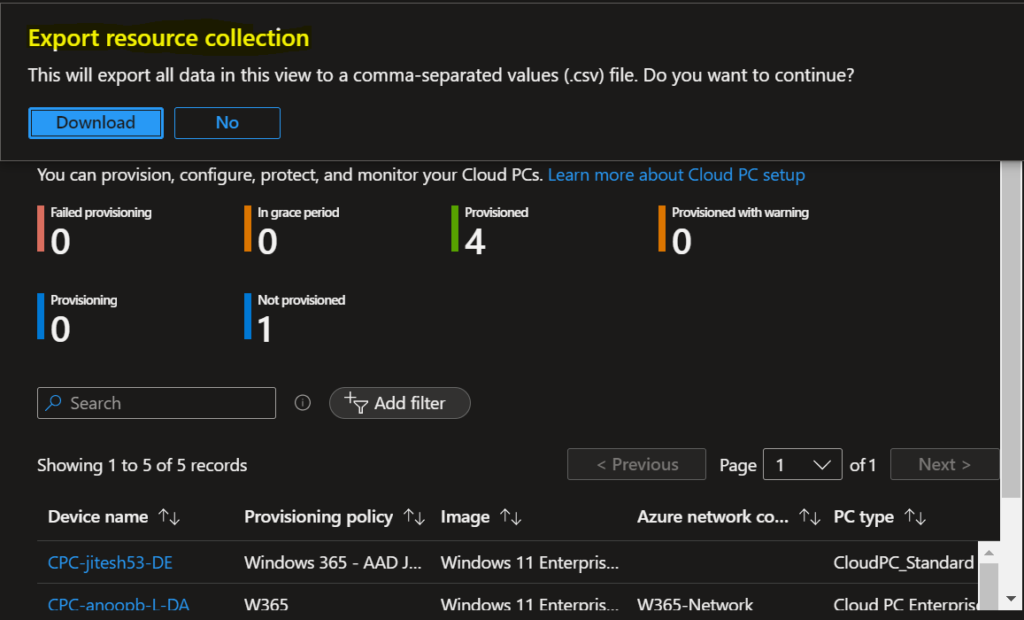
A notification will appear automatically in the top right-hand corner with the message Export is in progress. You can also see the status by selecting the notification icon.
All exported data will be automatically downloaded in a .csv file to your browsers, and a notification message will appear Export completed (Exporting Cloud PCs)
Export Windows 365 Cloud PC Names Using PowerShell
You can export the Cloud PC name of every Cloud PC on your tenant, Let’s follow the steps below to export cloud PC names.
Use the Cloud PC URL – https://windows365.microsoft.com/ to launch Windows 365 service and start working on a personalized desktop in the cloud.
👉Let’s check more details about Windows 365 cloud PC web client end-user experience walkthrough – Windows 365 Cloud PC Web Client End User Experience.
- Sign in to Windows 365 Cloud PC with a user who is assigned the Azure Active Directory (Azure AD) Global Administrator role.
- Open PowerShell and type the following command, press Enter.
Install-Module Microsoft.Graph -Scope CurrentUser
You will be prompted to confirm the installation and import of the NuGet provider. Enter Y in all confirmation dialogs.
NuGet provider is required to continue PowerShellGet requires NuGet provider version '2.8.5.201' or newer to interact with NuGet-based repositories. The NuGet provider must be available in 'C:\Program Files\PackageManagement\ProviderAssemblies' or 'C:\Users\jitesh\AppData\Local\PackageManagement\ProviderAssemblies'. You can also install the
NuGet provider by running 'Install-PackageProvider -Name NuGet -MinimumVersion 2.8.5.201 -Force'.
Do you want PowerShellGet to install and import the NuGet provider now?
[Y] Yes [N] No [S] Suspend [?] Help (default is "Y"): Y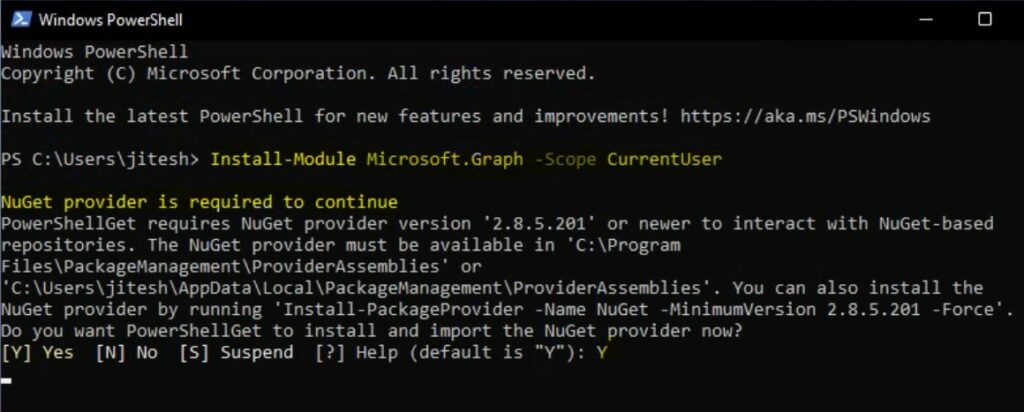
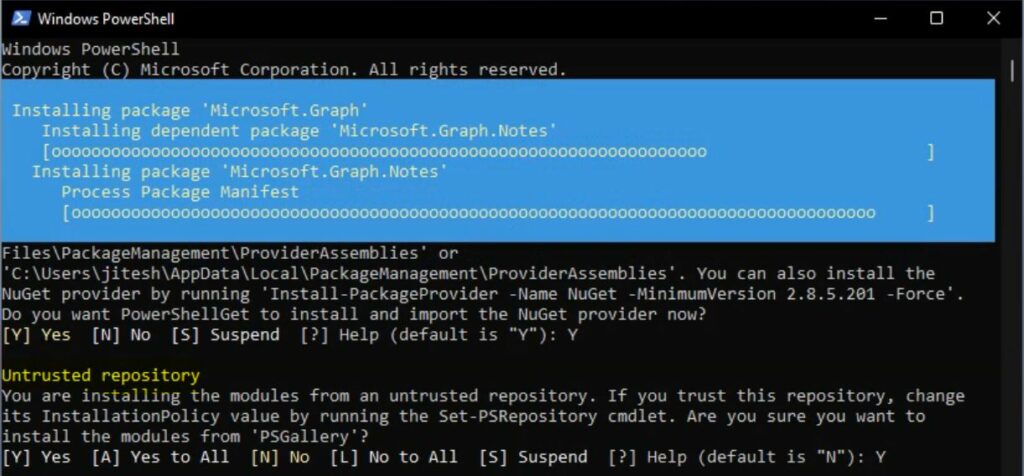
When installing a module from the PowerShell Gallery is set as an “untrusted repository” by default to prevent users from installing any module or script from this open gallery without first verifying that they are sure they want to install the given module or script.
Enter Y in confirmation dialogs to install the modules from ‘PSGallery.
Untrusted repository
You are installing the modules from an untrusted repository. If you trust this repository, change
its InstallationPolicy value by running the Set-PSRepository cmdlet. Are you sure you want to
install the modules from 'PSGallery'?
[Y] Yes [A] Yes to All [N] No [L] No to All [S] Suspend [?] Help (default is "N"): Y
The package installation will take a few minutes, wait for the installation to finish, then close the PowerShell window.
Open Notepad, Copy and paste the command value below into the text editor. Note– All credit for the script is to Microsoft.
param(
    [Parameter(Mandatory)]
    [string]$Output
)

Select-MgProfile -Name "beta"
Connect-MgGraph -Scopes "CloudPC.Read.All"
$CloudPCs = Get-MgDeviceManagementVirtualEndpointCloudPC -Property "DisplayName"
$DisplayNames = $CloudPCs | Select -ExpandProperty DisplayName
Write-Output $DisplayNames

$Outarray = @()

foreach ( $Name in $DisplayNames )
{
    $Outarray += New-Object PsObject -property @{
    'DisplayName' = $Name
     }
}
$Outarray | Export-Csv -Path $Output -NoTypeInformation
Disconnect-MgGraph
In the File menu, select Save As and click Browse to your preferred folder or location. In the File name box, provide the appropriate name GetCloudPCNames.ps1 with the .ps1 extension and Choose to Save as type “All” from the drop-down list. Click Save.
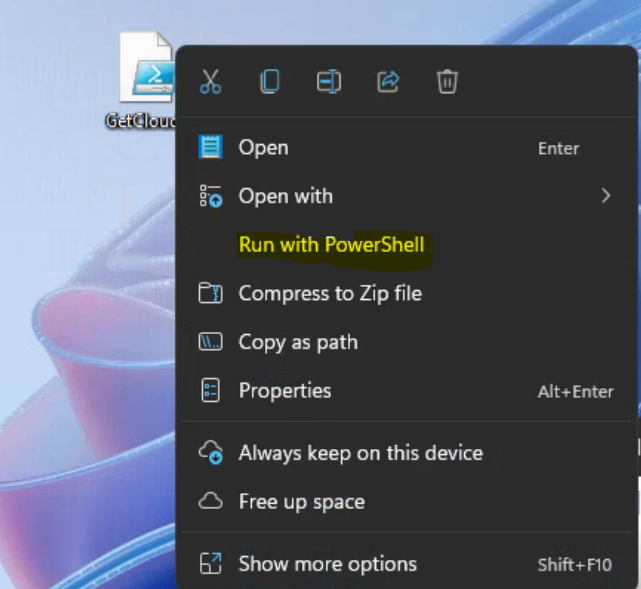
Next is to navigate to your file location, For Example, C:\Users\Jitesh\GetCloudPCNames.ps1. Right-click on the file and select Run with PowerShell.
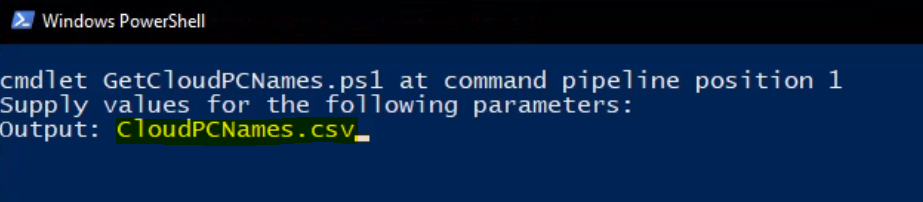
A PowerShell window will pop up. Specify the Output file, type “CloudPCNames.csv” and press Enter in the window.
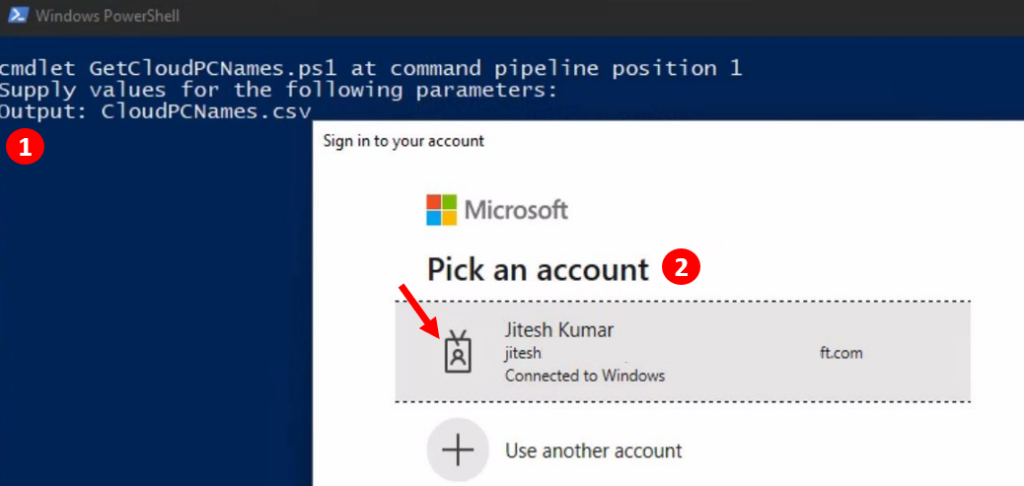
When the authentication window pops up, log in with the same account you used to access the Cloud PC.
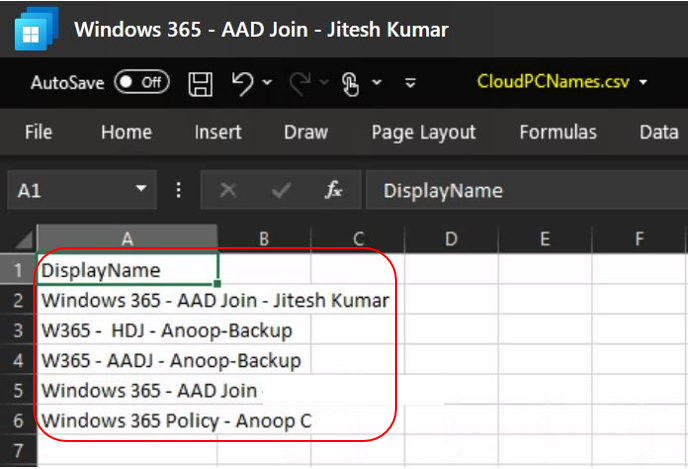
When the PowerShell window closes, the script has finished running. Navigate to the location of your script, and you will see the output file “CloudPCNames.csv” which includes the list of all Cloud PC names on your tenant.

Discussion