






Hide or Show Filmstrip in Photos App in Windows 11
Let’s learn how to hide or show a filmstrip in Photos App in Windows 11. Photos are closely related to today’s life. Photos app allows you to connect to your Microsoft OneDrive account and back up all your photos and videos to the cloud.
Different methods are used to hide or show filmstrip in the Photos app in Windows 11. The filmstrip is a new feature in Windows 11. This feature enables you to see multiple photo previews at the same time.
The new feature, Filmstrip, enables users to see previews of other photos in the same folder. It is used for comparison and review because of its unique ability to select multiple images simultaneously.
This new feature is straightforward to learn and understand. It is disabled in the photos app by default. If you enable this, you can quickly jump to the desired image.

The Photos app in Windows 11 is a tool for your pictures and videos. It helps you keep, share, look at, and even edit your photos and videos. It brings together all your pictures from your computer, phone, and other gadgets, putting them neatly in one spot.
- Windows 11 Photos App Features and User Guide
- How to Remove and Replace Background using Windows Photos
- How to Add iCloud Photos in Windows 11 Photos App
What are the Advantages of Hide or Show Filmstrip in Photos App in Windows 11?
1. It helps to get a quick preview of other photos in the same folder
2. It allows you to select multiple photos for comparison, and the Photos app
Hide or Show Filmstrip in Photos App in Windows 1
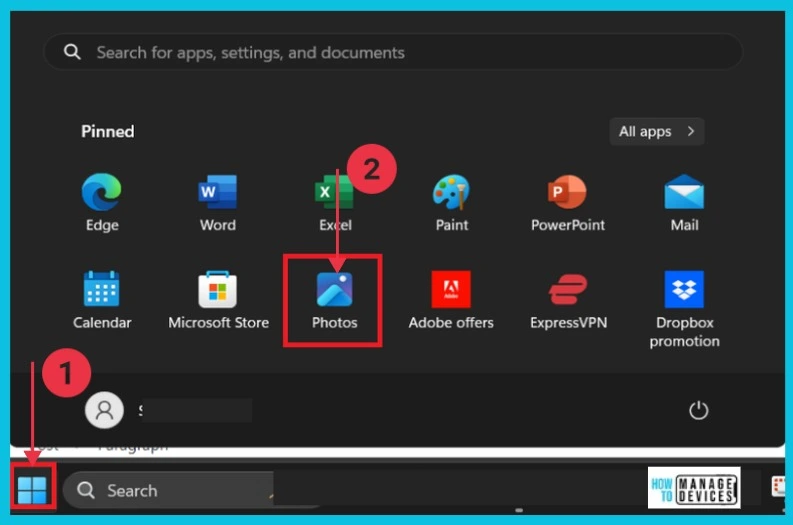
Photos App can be easily accessed on your Windows 11 PC. Click on the Start button on your PC. Select the Photos App from the Start button.
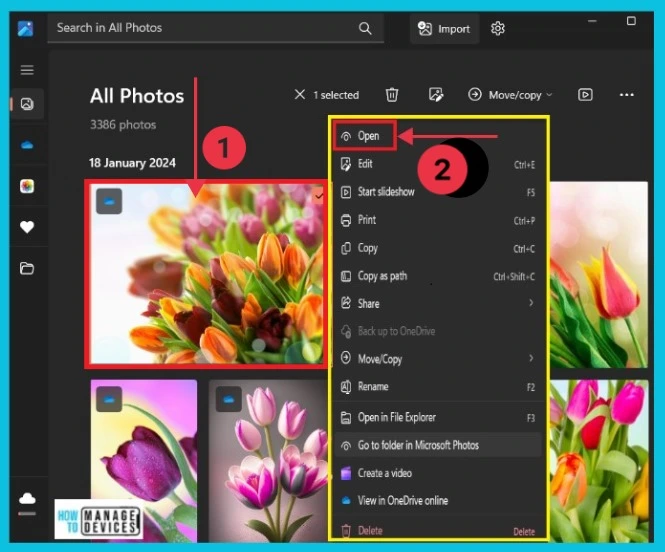
You can see the app’s home page while open the Photos app. It includes the All Photos option. You can see all the photos (saved on your PC) here.
- Select one image and right-click on it
- Click Open from it
- Windows 11 Photos App Background Blur and Latest Features Explained
- Adobe Photoshop Express | Complete Feature Review
Different Methods for Hide and Show Filmstrip in the Photos App
There are 3 ways to hide and show Filmstrip in the Photos app. You can follow any method of your preference. The table below shows the different methods.
| Different methods used to Hide and Show filmstrips |
|---|
| Use Keyboard Shortcut |
| Use Toolbar |
| Use the Context menu |
| Use App Settings |
1. Use Keyboard Shortcut
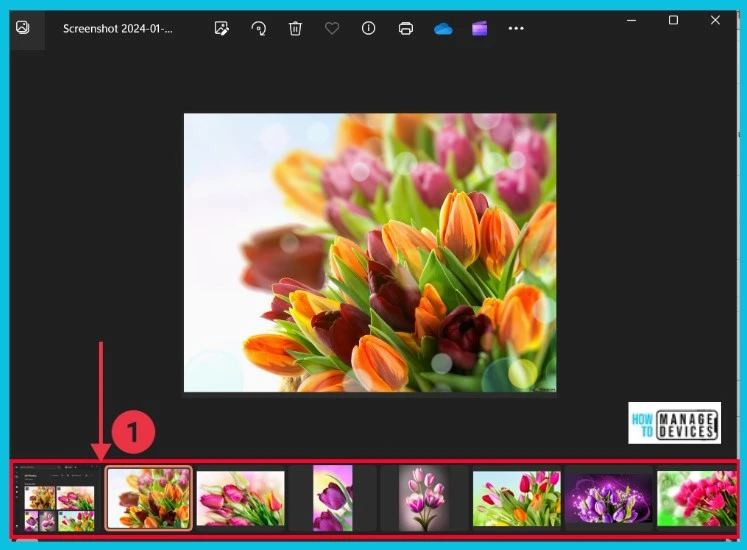
Using the Keyboard Shortcut is the first method for hiding and showing the Filmstrip in the Photos App. First, you have to open an image in the Photos app.
- Press the F key to hide or show Filmstrip.
Now, you can see all the images at the bottom of the screen. The screenshot below shows the details of the filmstrip when you press the F button. Press the F key again, and the feature is disabled.
2. Use Toolbar
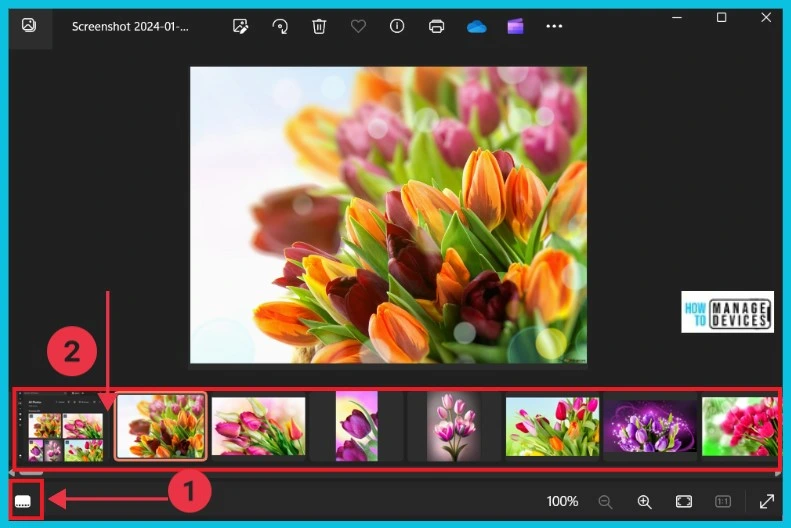
Using Toolbar is the second method to hide and show filmstrip in the photos app. It is also easy to hide and show Filmstrip in the Photos App. Firstly, open an image or video in the Photos app
- Look for the dedicated Show/Hide Filmstrip button.
- It’s situated in the toolbar at the bottom of the Image Viewer.
- You can easily show or hide the filmstrip feature easily.
The below screenshot shows the resulting image after clicking the icon. Here, you can see all the images one after another. It is like a slideshow where you can scroll through the pictures.
3. Use the Context menu
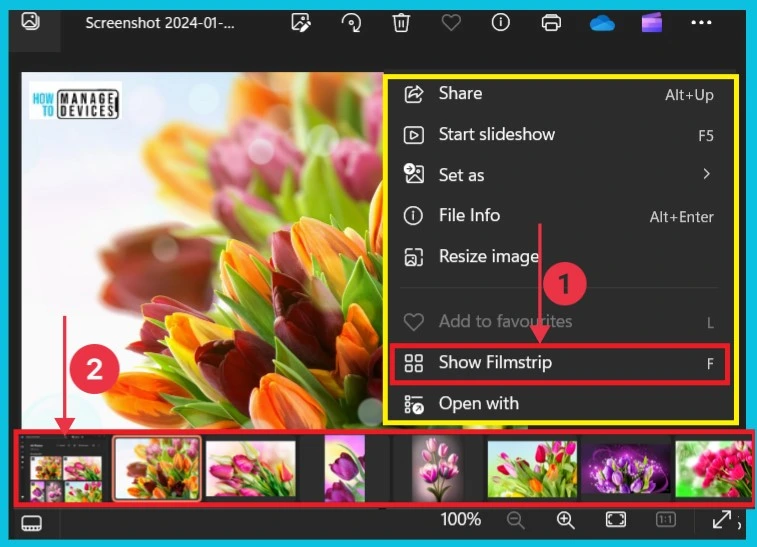
You can easily hide or show the Filmstrip feature in the photos app using the Context menu. Firstly, open an image or video in the photos app and right-click on it. After right click a context menu will appear. You can see the option “Show Filmstrip” in the context menu and Click on it.
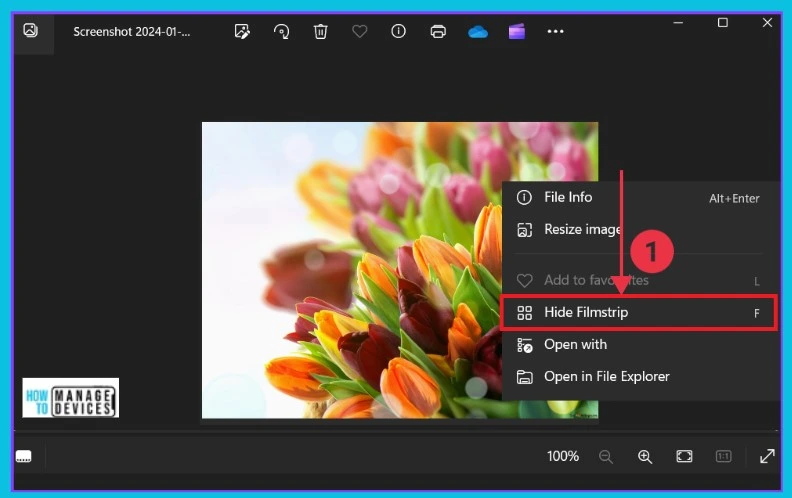
The picture below has an option to hide the “filmstrip.” To do this, you just need to right-click on the image. After right-clicking, a menu will appear, showing the “Hide Filmstrip.” option. If you choose this option and click on it, the image will disappear from view.
4. Use App Settings
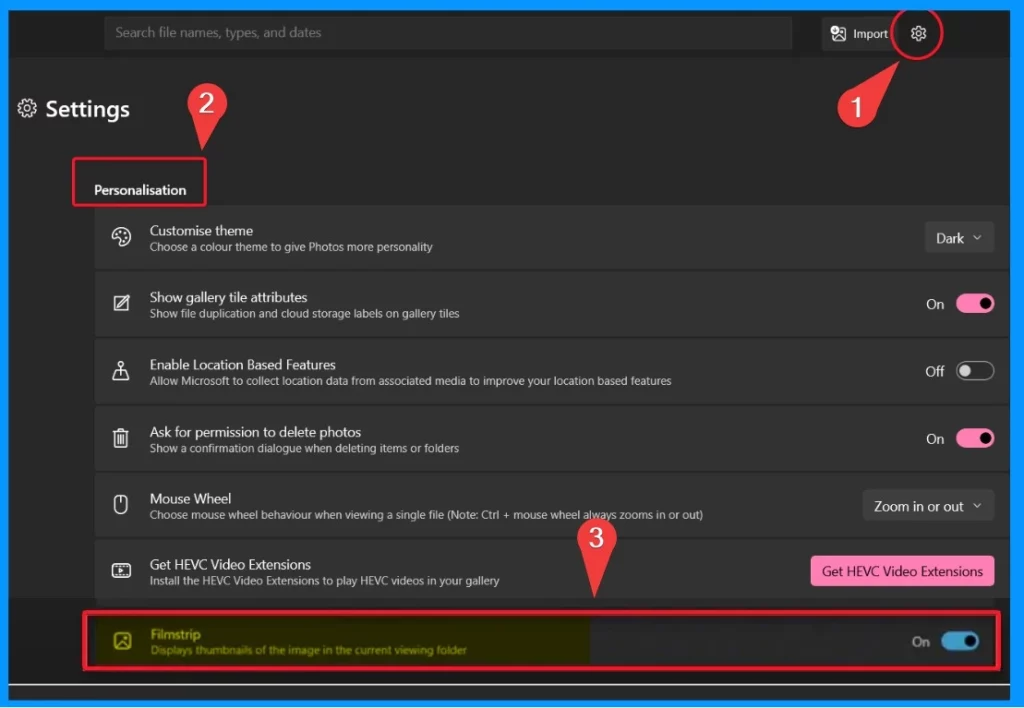
You can easily show or hide Filmstrip through the Use app Settings in the Photos App. Click Settings from the Photos App. Choose Personalisation from Settings. Here you can toggle on or off the Filmstrip option.
If you turn on this option, the filmstrip appears at the bottom of the photos app page, It disappears when you turn off the option.
We are on WhatsApp now. To get the latest step-by-step guides, news, and updates, Join our Channel. Click here. HTMD WhatsApp.
Author
Sumitha was introduced to the world of computers when she was very young. She loves to help users with their Windows 11 and related queries. She is here to share quick news, tips and tricks with Windows security.




Discussion