






Different Methods for Deleting Files in Windows 11
Hi, in this post, we’ll discuss Different Methods for Deleting Files in Windows 11. With long-term use, the System’s memory space gradually fills with unnecessary data and files, cache, junk files, temporary files, large archives, and download files. That causes your computer’s free drive space to decrease.
Sometimes, we encounter sluggish system speed when working on our system. Deleting files is a common method of managing our computer’s storage. It also lets you retrieve valuable space for other files or new downloads.
Deleting files securely can help you free up space on your computer, organize your files, and protect sensitive information. It’s an important skill for any computer user to know how to delete files from Windows 11.
This post will provide a detailed overview of deleting files in Windows 11. I will explain the various methods for deleting a file or folder from the PC. The highlight of this post is how to delete files for space management, organization, and privacy.

- 3 Best Ways to Enable Disable User Accounts in Windows 11
- How to Repair Reset Microsoft Edge in Windows
What are the Encounter Situations for Forcefully Deleting Files From Your System?
1. File in Use: Sometimes, a file is used by another program or application, the Windows locks it to prevent accidental deletion.
2. Recycle Bin issues: If your Recycle Bin is full or corrupted, it might prevent you from deleting files.
3. System file: Some files are essential for the operating system’s smooth functioning. So Windows prevent to deleting these files by default.
4. Read-only or corrupted files: If a file or folder is marked as read-only or corrupted, you cannot delete it. Ensure that the file properties allow modifications.
5. Incomplete unlock process: Rarely, a file’s unlock process is not completed successfully for various reasons, such as an application crash or an abrupt system shutdown. As a result, the file remains locked, and you can’t delete it.
Different Methods Deleting Files in Windows 11
Once we delete a file or folder from the internal drive is moved to the Recycle Bin by default. Removable drives such as USB flash drives and memory cards do not have a Recycle Bin, so when files are deleted from them, they are permanently deleted without being sent to the Recycle Bin.
However, you can enable the Recycle Bin for removable drives to ensure that deleted files are sent to the Recycle Bin. Avoid accidental file deletions from your internal drive by enabling the “Display delete confirmation dialogue”.
- This feature prompts you with “Are you sure you want to move this file to the Recycle Bin?” whenever you try to delete a file.
- If you delete a file larger than your recycle bin’s capacity, you will receive the message: “This file is too big to recycle. Do you want to delete it permanently?”
- When you delete a file permanently, it bypasses the Recycle Bin and prompts a confirmation dialog: Are you sure you want to delete this file permanently?
| Different Methods for Deleting Files |
|---|
| Delete files using the Keyboard shortcuts |
| Delete files from the File Explorer Command Bar |
| Delete File from Context Menu Toolbar |
| Delete File from “Show more options” Context Menu |
| Delete File with PowerShell |
| Delete File with Command Prompt |
1. Delete files using the Keyboard shortcuts
The keyboard shortcut is the easiest method for deleting a file or folder in Windows 11. To delete a file on Windows, select it and press the Del key. To delete multiple files, hold Ctrl while selecting them.
However, if you want to permanently erase a file without sending it to the Recycle Bin, you can use the Shift + Del keys. To do this, select the file you want to delete, then press Shift + Del simultaneously. A confirmation dialogue box will appear, asking you to confirm the deletion. Click Yes to permanently delete the file.
| Keyboard Shortcuts | Used to |
|---|---|
| Delete | Delete to Recycle Bin |
| Ctrl + D | Delete to Recycle Bin |
| Shift + Delete | Permanently Delete |
2. Delete files from the File Explorer Command Bar
File Explorer is a vital part of Windows 11 that helps you manage your files. To launch it quickly, right-click the Start button and select “File Explorer” from the list. You can also press Win + “E” to open File Explorer.
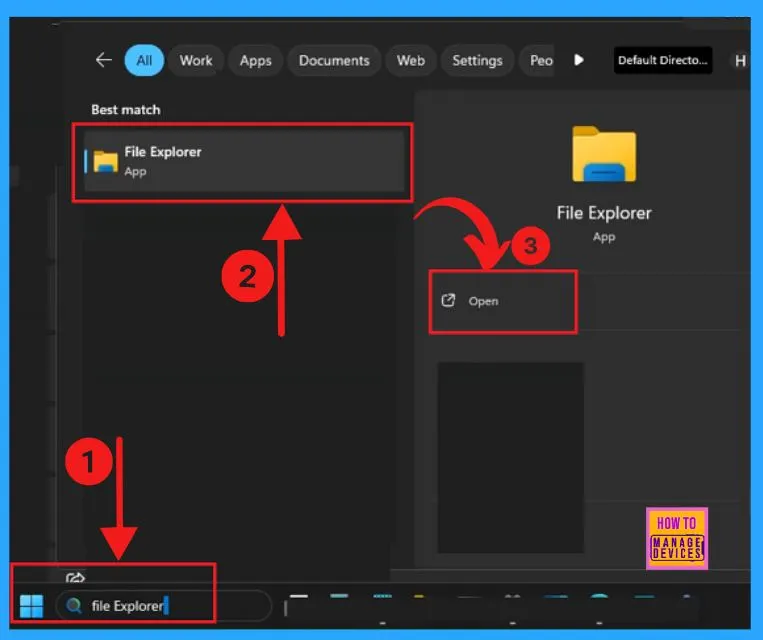
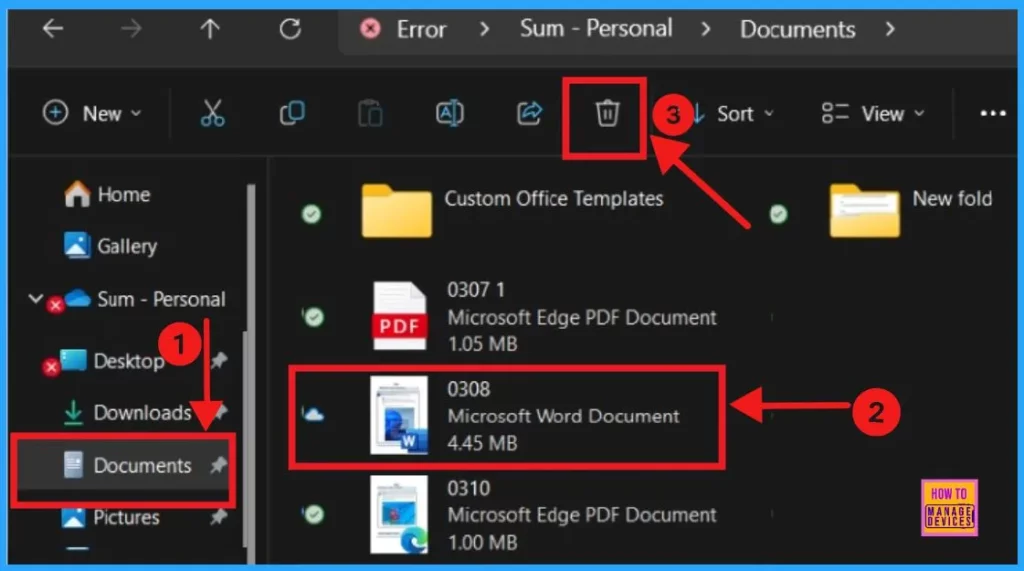
When you open File Explorer, you will see the Command Bar located at the top. It provides fast access to some of the essential tools, including the ‘Delete‘ icon. To remove a file using the ‘Delete‘ icon, select it first. Once you have selected it, click on the ‘Delete’ icon in the Command Bar to initiate the deletion process.
Please note that this action will permanently delete the file from your computer, so it is important to make sure that you have selected the correct file before proceeding.
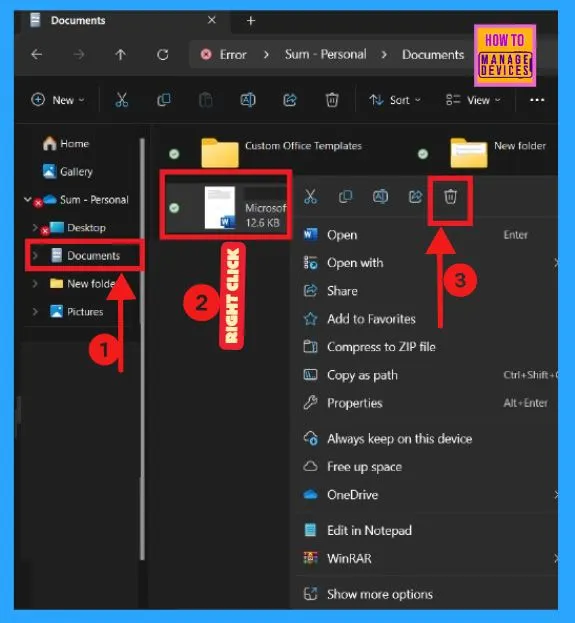
3. Delete the File from the Context Menu Toolbar
We can also delete a file from the context menu in File Explorer. First, right-click on the file you wish to delete. Then, click or tap the Delete button on the toolbar at the top. This will move the file to the Recycle Bin.
However, to delete the file permanently, press the Shift key while clicking or tapping the Delete button on the toolbar.
4. Delete the File from “Show More Options” Context Menu
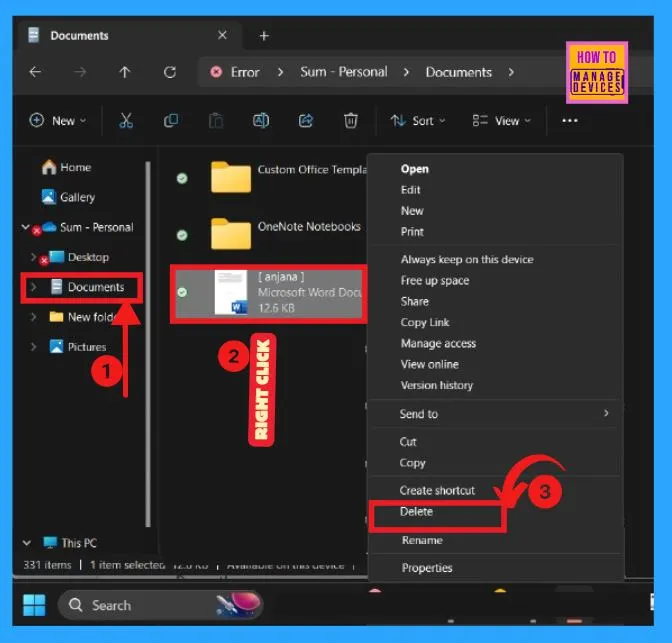
If you want to see more options, you can select the ‘Show more options’ button on the context menu and click it. Here I select the Documents folder and select a file from it. Then right-click on the selected file and click on the Show More options.
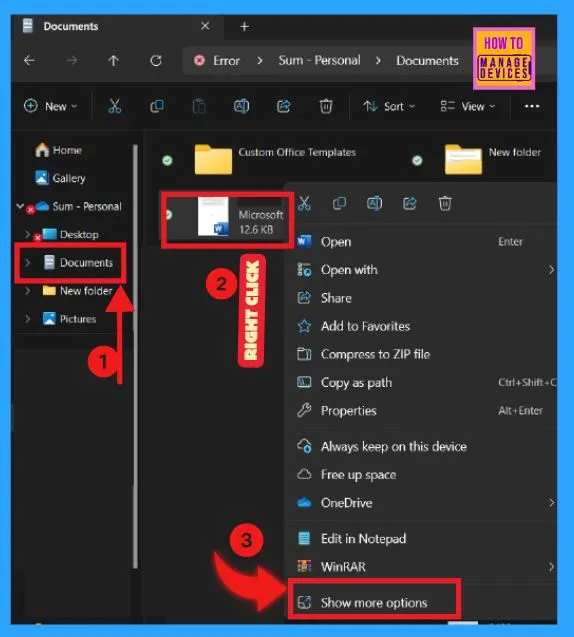
Then click the ‘Delete‘ option on the full context menu. Alternatively, hold down the SHIFT key on your keyboard while right-clicking the file to show the full context menu.
5. Delete File with PowerShell & Command Prompt
Windows Terminal app includes two command-line shells, PowerShell and Command Prompt. Both shells use the “del” command to permanently delete files without moving them to the Recycle Bin.
You can easily delete Windows Terminal files with either PowerShell or Command Prompt. Here, I will explain each step for your reference.
A) Delete File with PowerShell
You can easily delete a file with PowerShell by following the steps shown in the list below.
- Right-click the Start button and select Windows Terminal (Admin).
- Choose Windows PowerShell
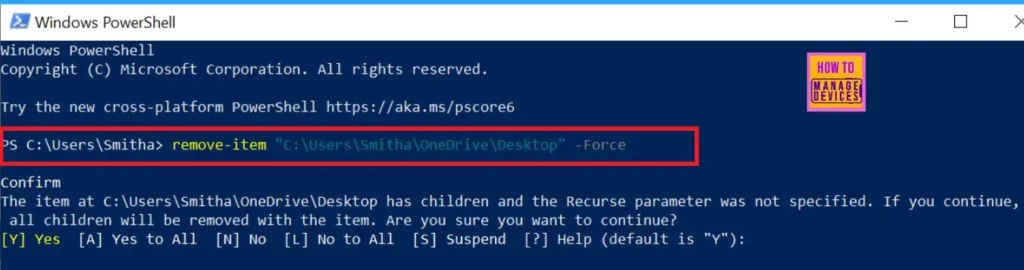
- Type the command followed by the full file path of the file you wish to delete.
Permanently delete file: Remove-Item -Path “Full path of file” -Force
For Example : PS C:\Users\Smitha> remove-item “C:\Users\Smitha\OneDrive\Desktop” -Force
B) Delete File with Command Prompt
To delete files with the command prompt, type the command below you want to use into the command prompt and press Enter.
- Right-click the Start button and select Windows Terminal (Admin).
- Choose Windows Command Prompt
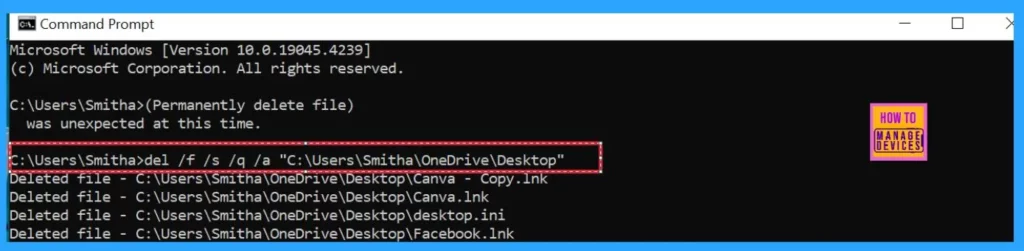
- Type the command below followed by the full file path of the file you wish to delete.
Permanently delete file: del /f /s /q /a "Full path of file"
For example C:\Users\Smitha>del /f /s /q /a “C:\Users\Smitha\OneDrive\Desktop”
We are on WhatsApp. To get the latest step-by-step guides and news updates, Join our Channel. Click here –HTMD WhatsApp.
Author
Smitha Madathil is a computer enthusiast. She loves writing about Windows 11 and Intune-related technologies and sharing her knowledge, quick tips, and tricks about Windows 11 or 10 with the community.




All of this is great advice and a great overall guide. I’d also like to suggest because sometimes filenames can be too long and pose a problem when deleting that you can use Long Path Tool to solve these issues.