






Block Network Printing Restrictions using Intune Settings Device Control Printing Restrictions
Hi, let’s discuss the Block Network Printing Restrictions using Intune Settings Device Control Printing Restrictions. As you all know that setting up get log is one of the features in Microsoft, in tune that can be deployed, with different types of policies for the organisation. This printing policy setting is very useful for an organisation because with the settings to manage how shared printers are listed in Active Directory.
The Printers that can be published are part of the Administrative Templates under the Printers section in Windows configuration. This policy controls whether users are allowed to publish shared printers to Active Directory.
When enabled or left unconfigured, users can manually select the List in the directory under the Sharing tab of a printer’s properties. If this policy setting is enabled, users will retain access to the List in the directory option when configuring printer properties.
That means shared printers can be published. If the setting is disabled, users cannot make printers visible in Active Directory. The List in directory option will be hidden or not available. So, in this post, let’s look at how this policy to be deployed in Intune.

Table of Contents
When should you Disable this Policy?
Block Network Printing Restrictions using Intune Settings Device Control Printing Restrictions – CSP Details
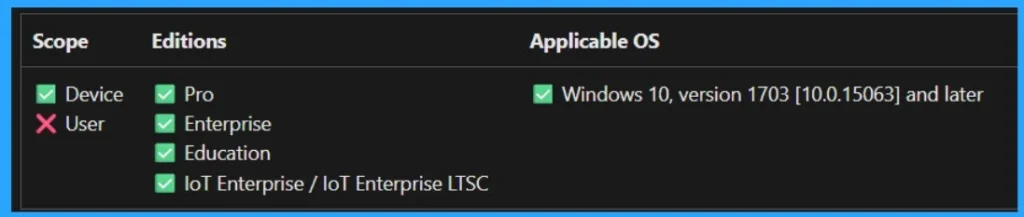
Above, we discussed an overview of the Allow, Block, and Printers to be Published Policy using the Intune Setting Catalog. Before deploying this policy, it is essential to understand the CSP (Configuration Service Provider) details.
- This setting is only a placeholder and should not be used in a production environment.
- Enable or Disable Physical Computer Location Support for Printers using Intune Policy.
- Prevent Users From Installing Printer Drivers Using Intune
- How to Create Intune Settings Catalog Policy
Create a Profile
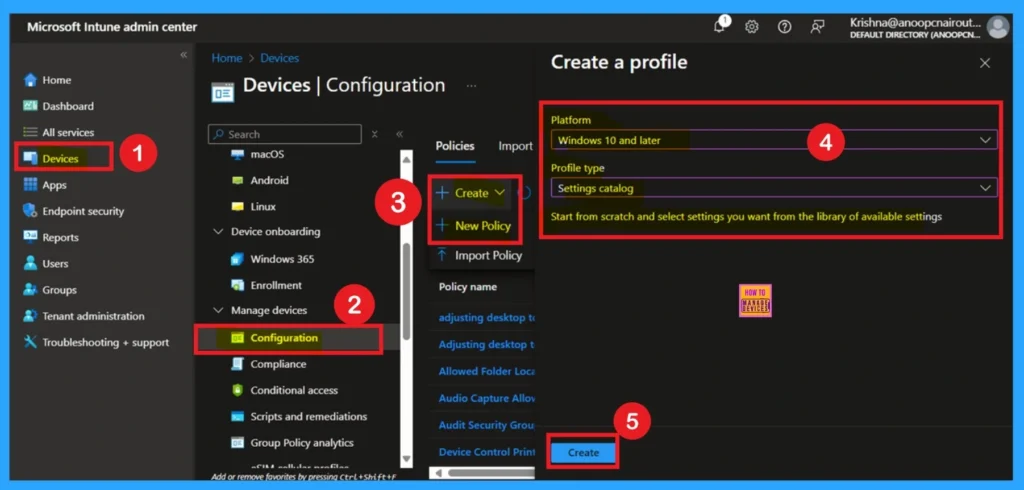
First, you need to configure this policy. Start by signing in to the Microsoft Intune Admin Center. Then, click on Devices. Under the Devices section, go to the Configuration tab, where you will find a + Create option. Click on it, and you will see 2 options, such as the new policy and the Import policy.
- Select New policy, and this will open a new window titled Create a profile.
- Here, you need to enter the Platform and Profile type details.
- After that, click Create.
Basics
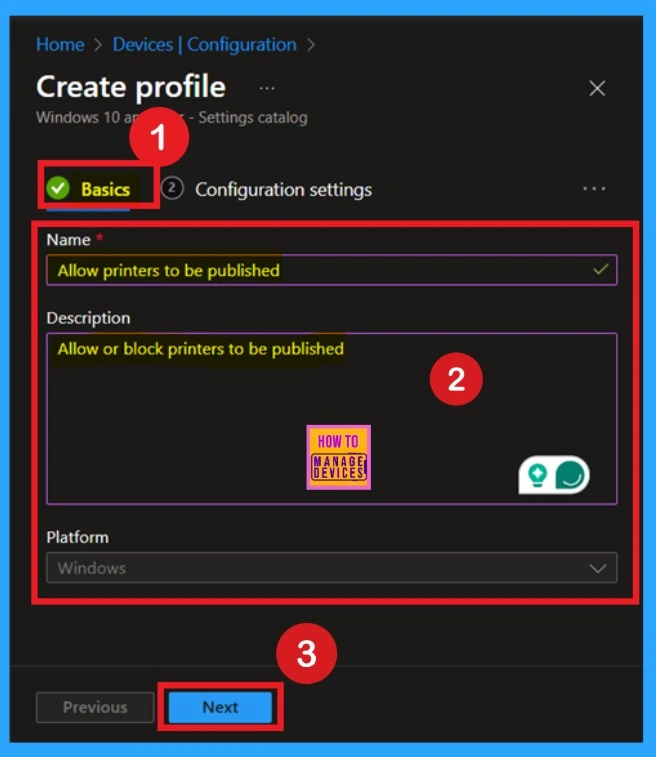
The first step is Basics, in this section, you need to enter the basic details of the policy. First, provide an appropriate name for the policy. In this example, I named it Allow or Block Printers to Be Published. You should also enter a description for better clarity. I added Allow or Block Printers to Be Published as the description. Then, set the Platform as Windows and click Next.
Configuration Settings
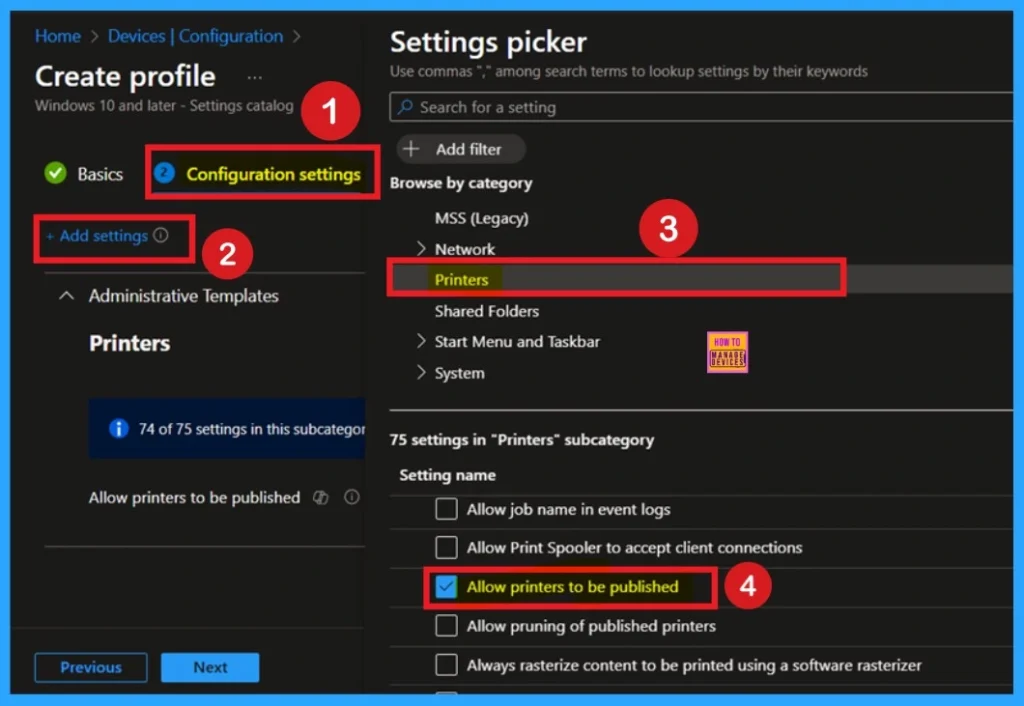
After completing the Basics tab, you will move to the Configuration settings. Here, click on the blue + Add settings button. This will open a Settings picker window. In this window, expand Administrative Templates. Under Administrative Templates, navigate to the Printer section. In the Printer section, you will see various settings.
- From these, select the Printers to be published setting.
Allow Printers to be Published
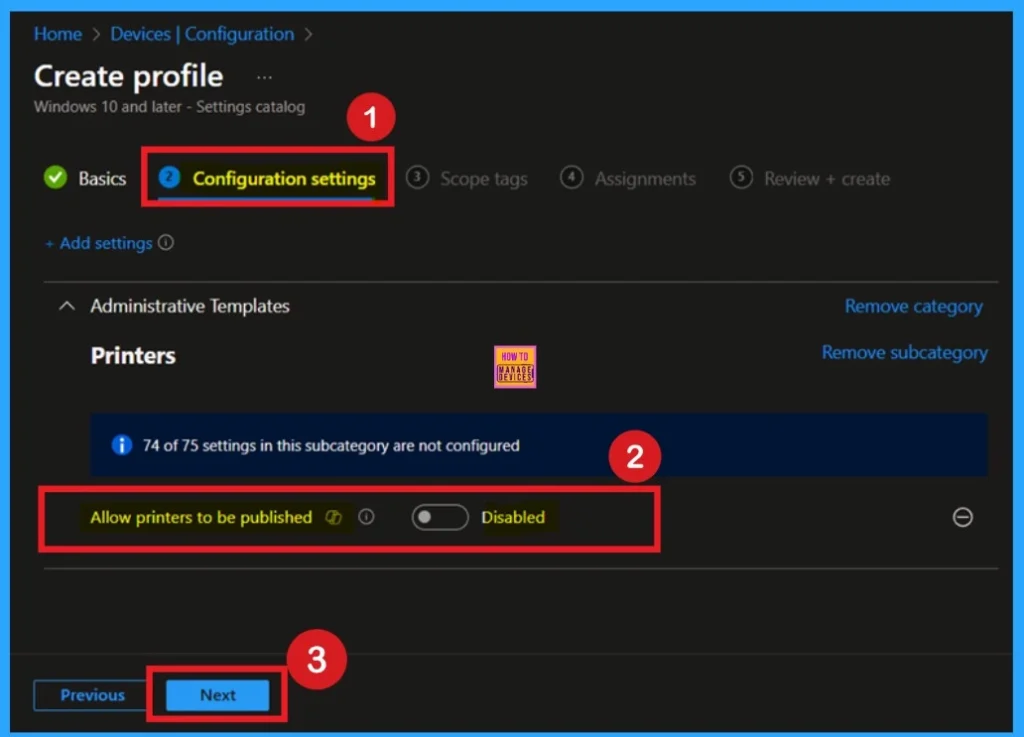
After selecting the settings, close the settings picker window. Now you are on the Configuration Settings main page. You will see that the policy has appeared on your screen. By default, this policy is disabled. If you want to continue with this default setting, you can click Next.
Policy Enabled
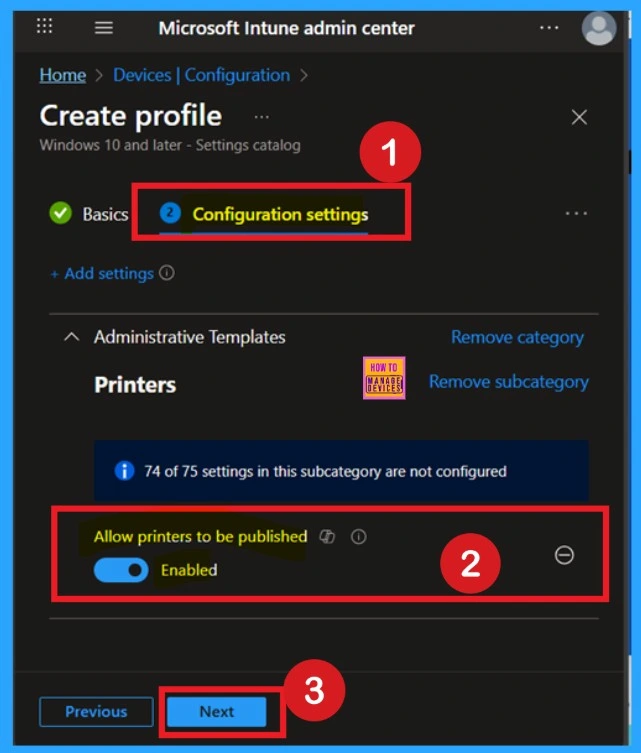
To enable this policy, locate the toggle switch next to the “Printers to be Published Policy” setting. By default, this toggle is set to Disabled. To activate the policy, you just drag the toggle from left to right. Once enabled, the toggle will turn blue and change to Enabled.
Scope Tags
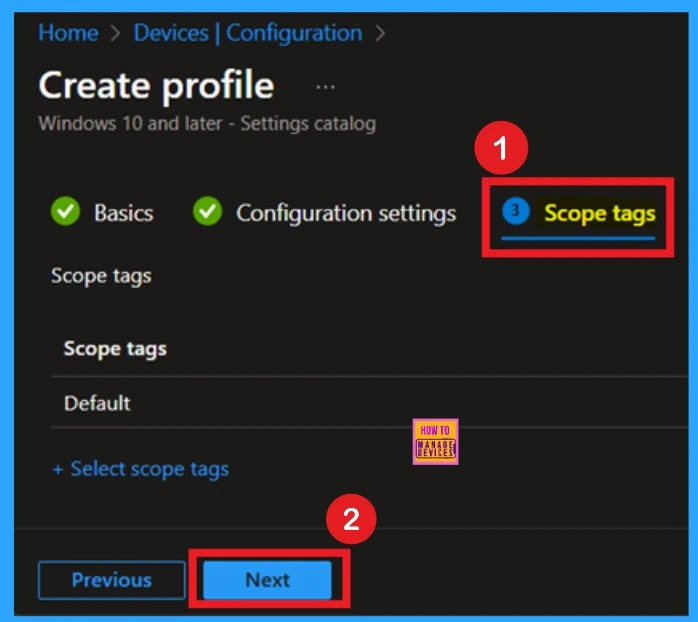
The next step is the Scope tag. While adding a scope tag to your policy is useful for the organization, it is not a required step. If you choose not to use a scope tag, you can skip this step and proceed by clicking Next to move forward with the policy deployment process.
Assignments
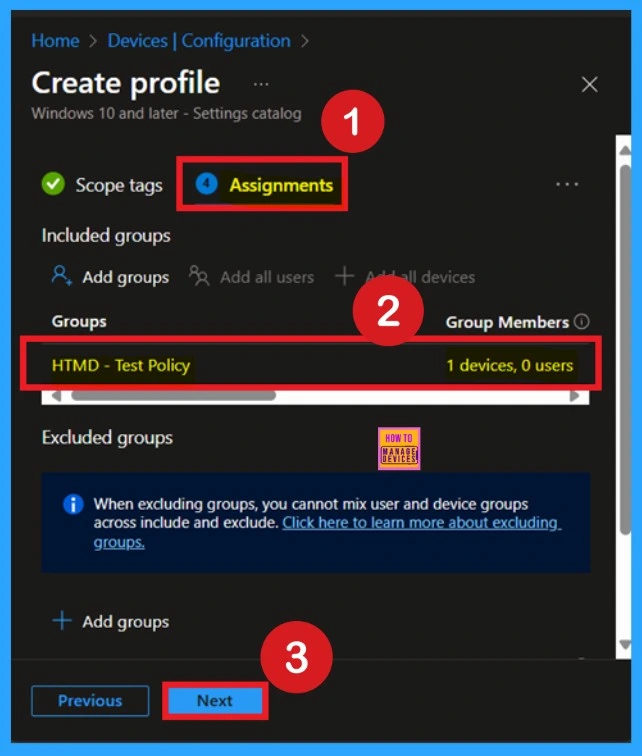
The next step is Assignments. In this section, you can specify which group the policy should be applied to. Our aim is to deploy this policy to a specific group; this step is essential. Look for the Add Groups option under the Include Groups section and click on it.
- A list of available groups will appear and select the group you want to target.
- After selecting the group, click Next to proceed to the next step.
What is the Role of Review + Create in Policy Creation
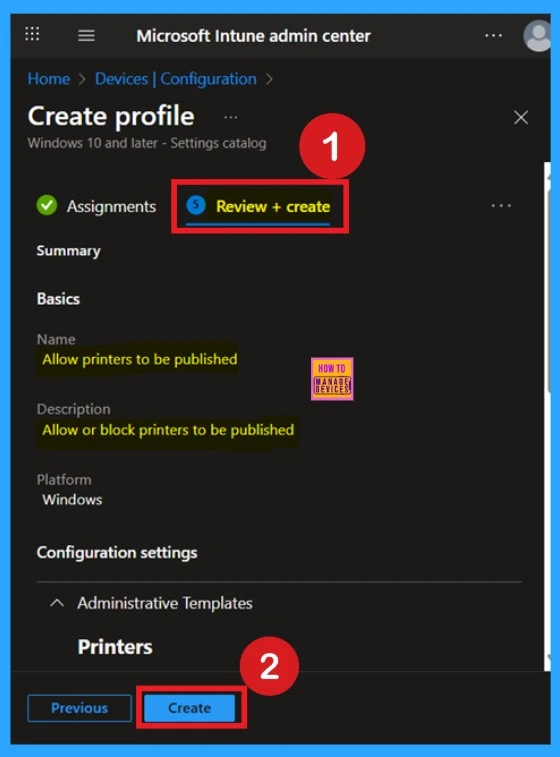
After the Assignments step, you’ll reach the final tab called Review + Create. In this section, you can see a summary of everything you enter in the previous steps such as details configuration assignment details etc. If you don’t need to change anything, just click on the Review + Create.
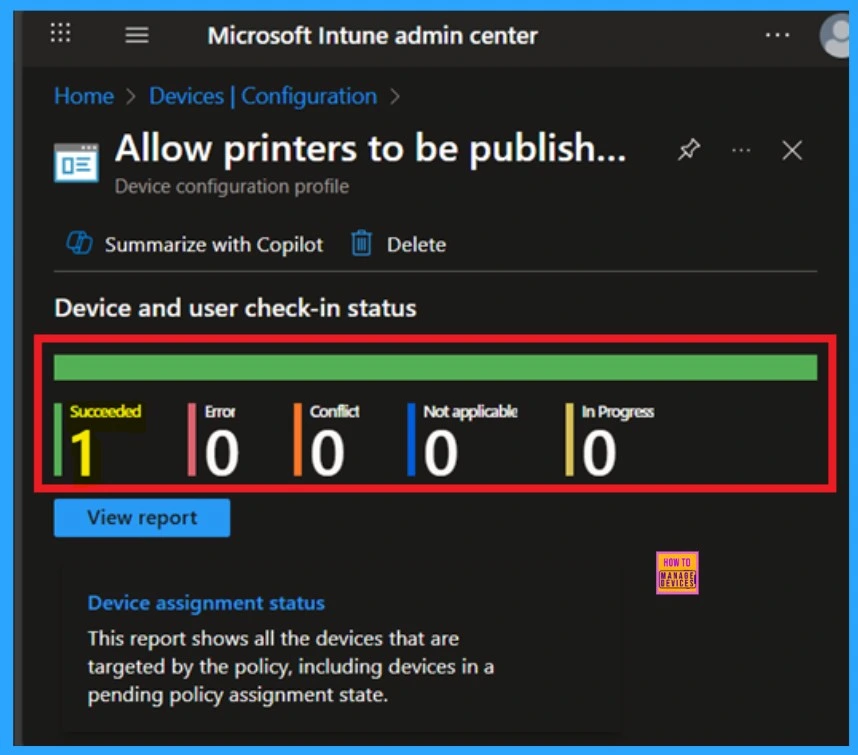
Device and User Check in Status
After creating a policy, we have to monitor that whether the policy was created successfully or not. To check this, you can either wait for up to 8 hours for the policy to apply automatically, or you can reduce the waiting time by manually syncing the policy through the Company Portal.
- After syncing, you can check the policy’s status through the Intune Portal.
- To do this, go to Devices > Configuration Profiles.
- In the Configuration policy section, search for the name of the policy you created.
- Then you can get the details below from that Policy
- It will show is this error successfully deployed or not.
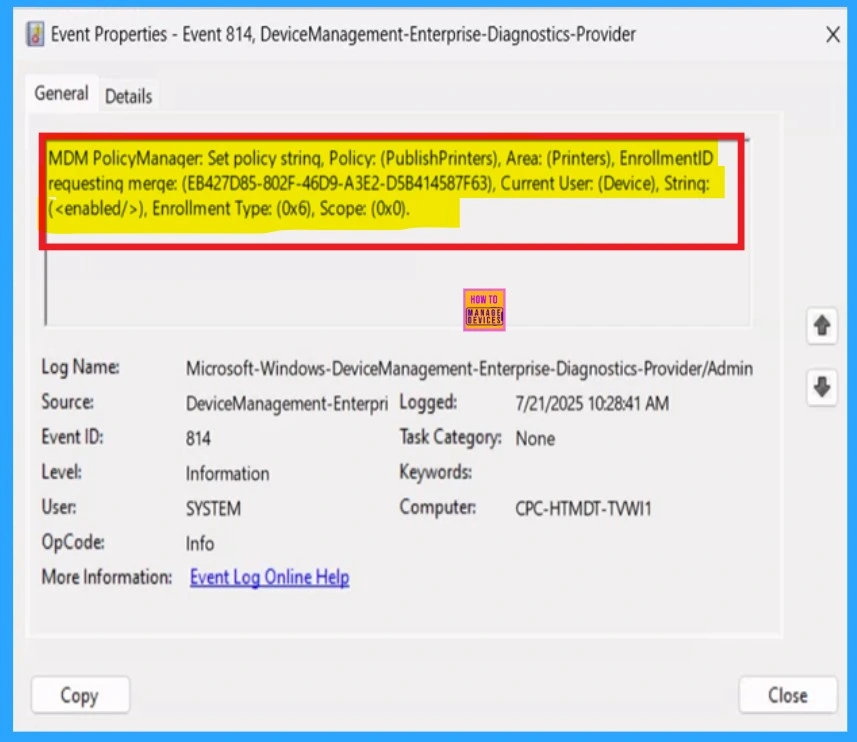
Client-Side Verification
To confirm the policy is successful or not, you can use the Event Viewer. First, open Event Viewer and navigate to Applications and Services Logs > Microsoft > Windows > Device Management > Enterprise Diagnostic Provider > Admin. Look for Event IDs 813 or 814, as these typically contain policy-related information.
| Policy Details |
|---|
| MDM PolicyManaqer: Set policy string, Policy: (PublishPrinters), Area: (Printers), EnrollmentID requestinq merqe: (EB427D85-802F-46D9-A3E2-D5B414587F63), Current User: (Device), Strinq: (), Enrollment Type: (0x6), Scope: (0x0). |
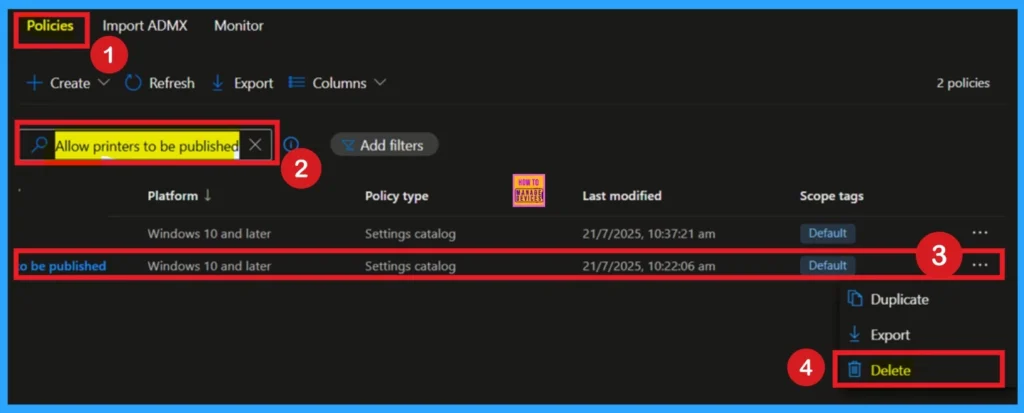
Delete Printers to be Published Policy
If you want to delete this policy, you can easily do that. First, search for the policy name in the configuration section. When you find the policy name, you will see a 3-dot menu next to it. Click on the 3 dots to open a menu with 3options such as Duplicate, Export, and Delete.
- Here you have to click on the Delete option.
Remove Printers to be Published Policy
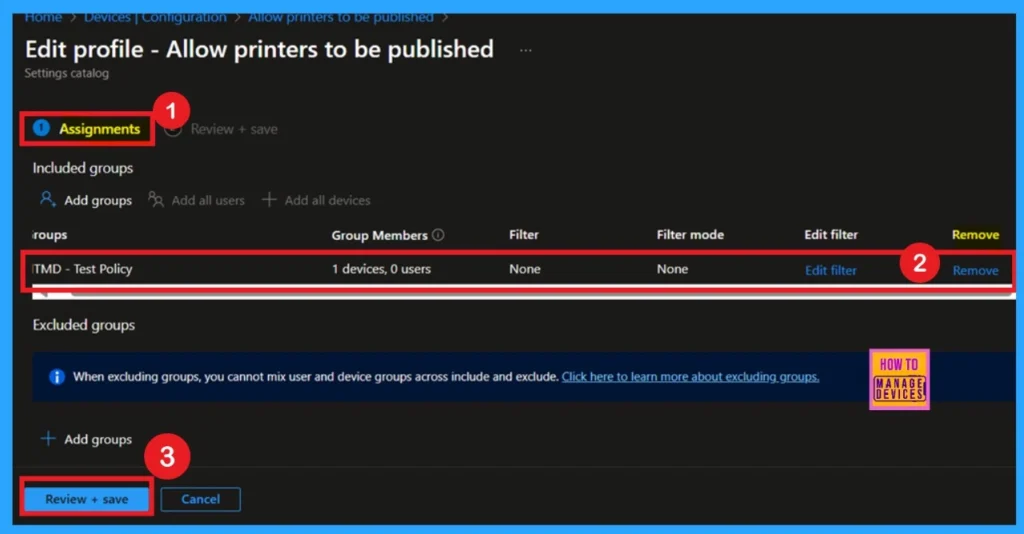
After creating the policy, if you want to remove the group that you previously selected, you can easily do that. First, go to Devices > Configuration policies. In the Configuration policy section, search for the policy, In the policy section When you Scroll down the page, and you will see sections like Basic Details and Assignment Details.
- In the Assignment section, you will find an Edit option and click on it.
- When you click Edit, you will enter the Assignment page.
- Click on Remove, then proceed by clicking Review + Save.
OMA-URI Settings
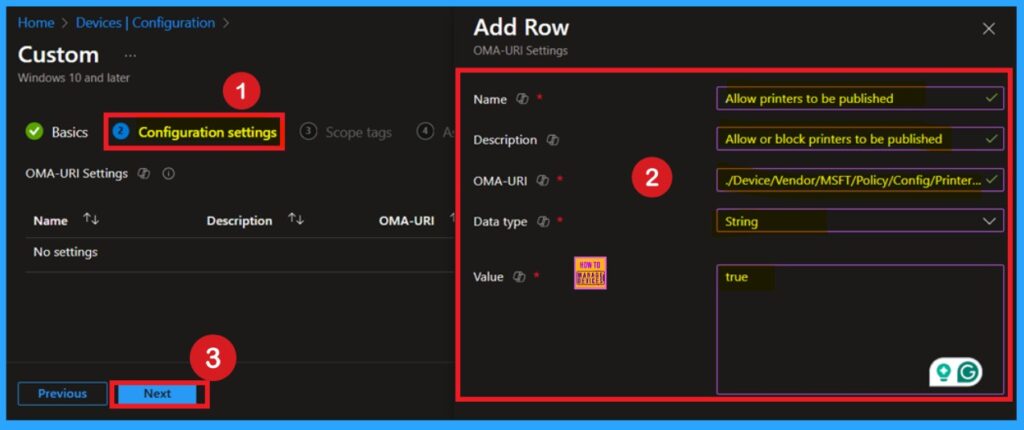
You can easily enable or disable the Printers to be Published Policy using Microsoft Intune or configure a custom OMA-URI setting. But for a policy deployment we prefer to use Setting catalog because it is very easy to deploy a policy other than Use OMA-URI Setting. Below is a step-by-step guide to help you set this up in Microsoft Intune.
- Sign in to Microsoft Intune
- Go to Devices > Configuration
- Click Create and then New policy
- Choose the platform as Windows 10 and later
- For Profile type, select Templates and then select Custom
- Click on + Add under OMA-URI Settings to configure the specific setting.
- To Configure the OMA-URI Setting, do the following
- Enter a name for this setting, such as Allow Printers to Be Published.
- Briefly describe the setting, e.g., “Allow or Block Printers to Be Published.”
- Enter the following OMA-URI path
. /Device/Vendor/MSFT/Policy/Config/Printers/PublishPrinters
- Set the Data type to string.
- Enter the value
- false for Disable the Policy
- true for Enable the Policy
- After entering the above details, click Save.
Need Further Assistance or Have Technical Questions?
Join the LinkedIn Page and Telegram group to get the latest step-by-step guides and news updates. Join our Meetup Page to participate in User group meetings. Also, Join the WhatsApp Community to get the latest news on Microsoft Technologies. We are there on Reddit as well.
Author
Anoop C Nair has been a Microsoft MVP for 10 consecutive years from 2015 onwards. He is a Workplace Solution Architect with more than 22+ years of experience in Workplace technologies. He is a Blogger, Speaker, and Local User Group Community leader. His primary focus is on Device Management technologies like SCCM and Intune. He writes about technologies like Intune, SCCM, Windows, Cloud PC, Windows, Entra, Microsoft Security, Career, etc.


Discussion