






Control System Lock Screen Policy for Users with Intune
Hi, today we are discussing Control system Lock Screen Policy for Users with Intune Microsoft Intune is a cloud-based service that enables organisations to manage devices and apps securely. One of the key features of Intune is its ability to deploy configuration policies to user devices.
In this setting, the policy is to be a part of Administrative Templates, and with this policy, prevent locking of the system in Windows environments to manage whether or not users are allowed to lock their systems. The Remove Lock Computer policy helps organisations decide if users should be allowed to lock their computers
As we all know that it is very essential to locking device that hides the desktop and requires authentication to resume access. This feature is particularly useful in shared or public environments where preventing unauthorized access. When this policy is enabled, users are prevented from locking their computers manually, including by pressing the Ctrl+Alt+Del keyboard shortcut.
If you disable or don’t configure this policy setting, users will be able to lock the computer from the keyboard using Ctrl+Alt+Del. So, in this post, let’s discuss how this policy to be deployed for organisations. Also, this guide will explain the step-by-step configuration procedures.

Table of Contents
What is the Purpose of this Policy in Organisation?
The purpose of the Remove Lock Computer policy in an organisation is to control whether users can lock their computers. This is useful in shared or public environments where the system should always be accessible.
Control System Lock Screen Policy for Users with Intune – CSP Details
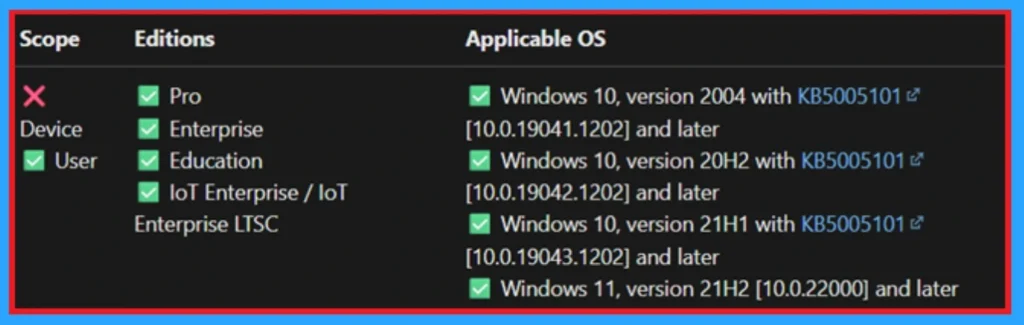
Above we discussed a lot of things about how to enable disable remove lock a computer for user. When we start to deploy a setting, we have to understand the CSP details. Here in the image below you can check the CSP details of the policy.
| Scope | Editions | Applicable OS |
|---|---|---|
| Not applicable for Device | Pro | Windows 10, version 2004 with KB5005101 [10.0.19041.1202] and later |
| Applicable for user | Enterprise | Windows 10, version 20H2 with KB5005101 [10.0.19042.1202] and later |
| Education | Windows 10, version 21H1 with KB5005101 [10.0.19043.1202] and later | |
| loT Enterprise / loT Enterprise LTSC | Windows 11, version 21H2 [10.0.22000] and later |
- Top 75 Latest Intune Interview Questions And Answers
- Allow Manual Start of Microsoft Account Sign In Assistant Using Intune Settings Catalog
- Enable Or Disable Storage Locations In File Explorer Using Intune Policy
Create Profile in MS Intune
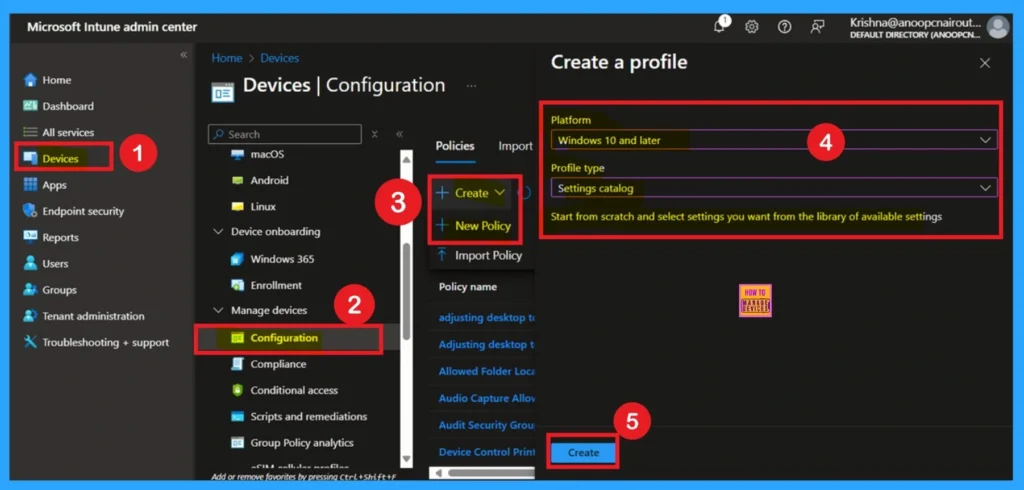
The first thing we have to do for a Policy creations that we have to log into the MS Intune admin center then navigate through Devices > Configurations> Create > new policy. When you click on the new policy you will get a window called Create a profile there you have to set the platform as Windows 10 and Later and profile type as Setting catalog then click on the create option.
How to Fill Basic Details
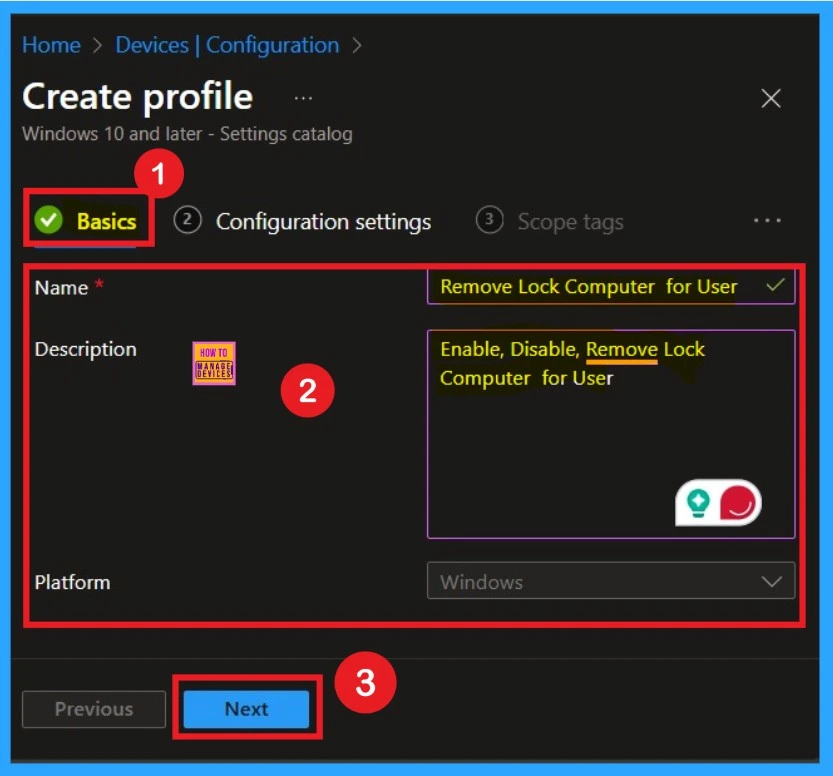
The next step is Basic Details. This section is very important for policy creation. It includes only the basic information such as the name, description, and platform details. Here, you can provide an appropriate name and description for the policy.
- The platform section is already filled, so you don’t need to make any changes there.
- Once completed, click Next to continue with the policy creation.
How to Add Settings for Policy
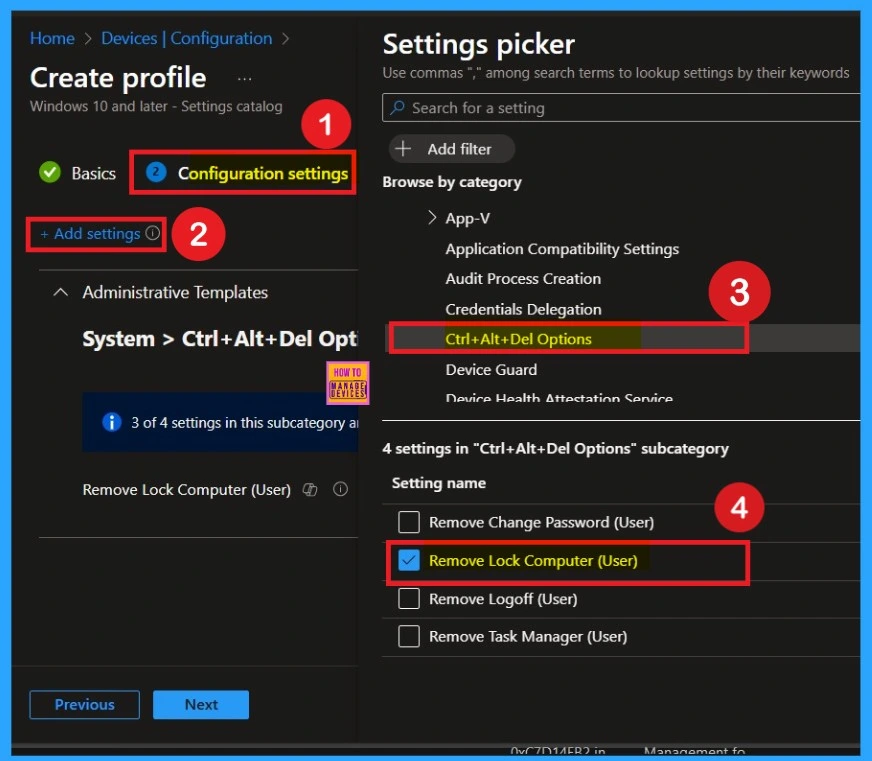
The next step is Configuration Settings.In the Configuration Settings section, you will see a setting option, as shown in the image. Click on that option. When you click it, a window called Settings Picker will appear. In the Settings Picker window, you will find different categories. Here, I selected a category from Administrative Templates. When I expanded it, I navigated to the System category.
- Under the System category, I selected Ctrl+Alt+Del Options.
- Within that, I chose the setting called Remove Lock Computer for User Policy. After selecting the setting, I closed the Settings Picker window.
Disable Remove Lock Computer Policy
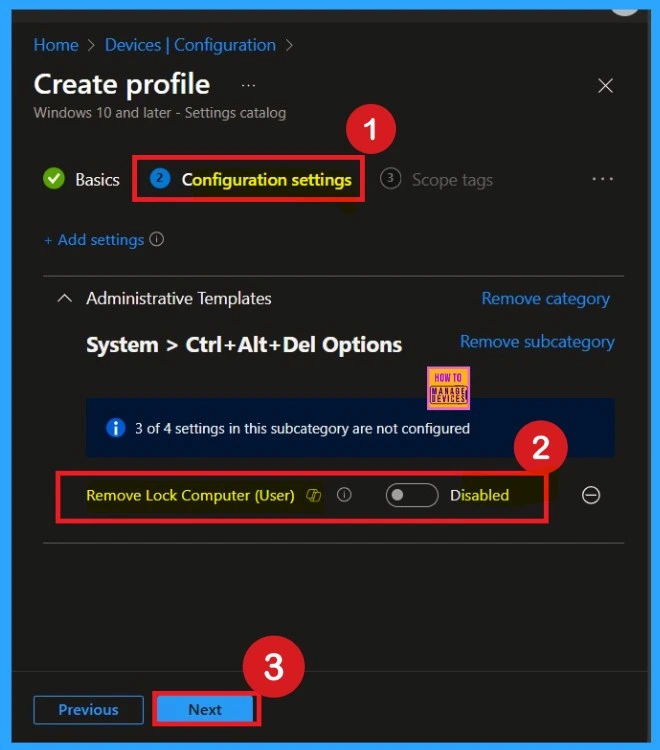
After selecting the policy setting, such as “ Lock Computer Policy”, you can close the Settings Picker window. Once you close it, you’ll return to the Configuration Settings page. Here, you’ll notice that the policy is set to Disabled or Not Allowed by default.
- If you want to continue with this setting, click Next to proceed.
- While locked, the desktop is hidden, and the system can’t be used.
- Only the user who locked the system or the system administrator can unlock it.
Enable Remove Lock Computer for Policy
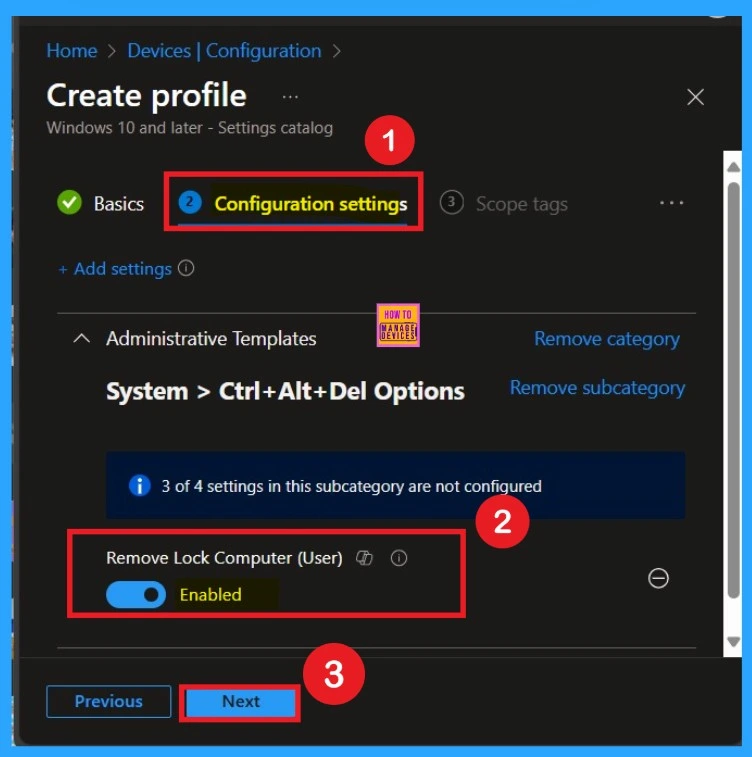
To enable this policy, locate the toggle switch next to the “Remove Lock Computer” setting. By default, this toggle is set to Disabled. To activate the policy, simply move the toggle from left to right. Once enabled, the toggle will turn blue and change to Enabled.
Know About the Scope Tags
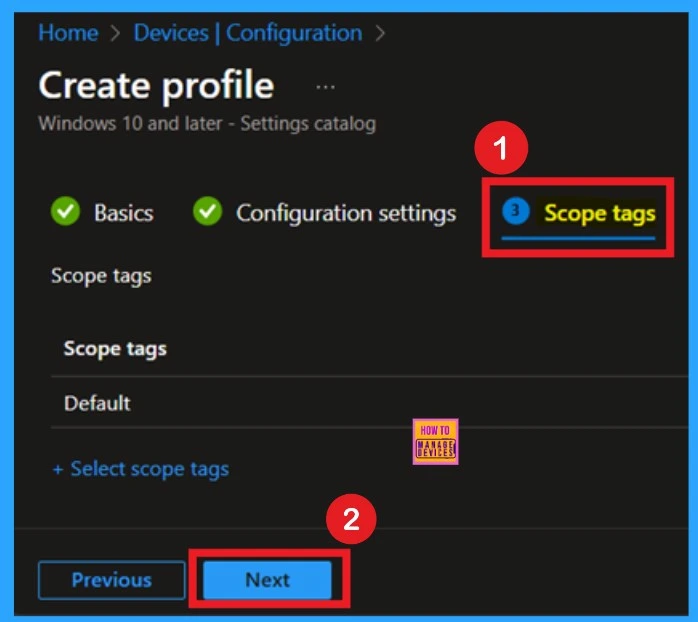
Now you are on the next step called Scope Tags. A scope tag is used to assign policies to specific groups within an organization. In this step, you can select a scope tag for the policy. However, I suggest skipping this section because it is not needed for this policy. So, I clicked Next to continue.
Assign groups for Policy throuh Assignments Section
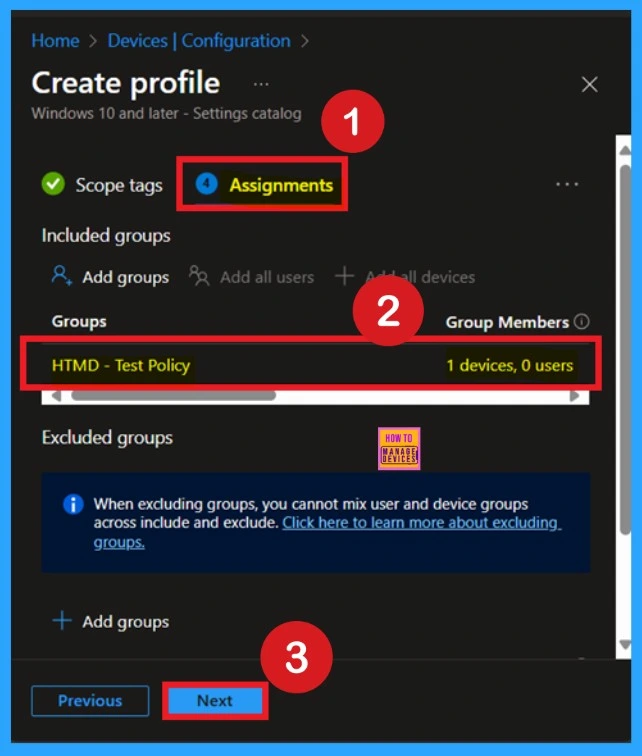
The next step is Assignments. In this section, you can specify which group the policy should be applied to. Our aim is to deploy this policy to a specific group, this step is essential. Look for the Add Groups option under the Include Groups section and click on it. A list of available groups will appear and use the search bar to find and select the group you want to target.
The Final Stage of OPolicy Deployment – Review + Create
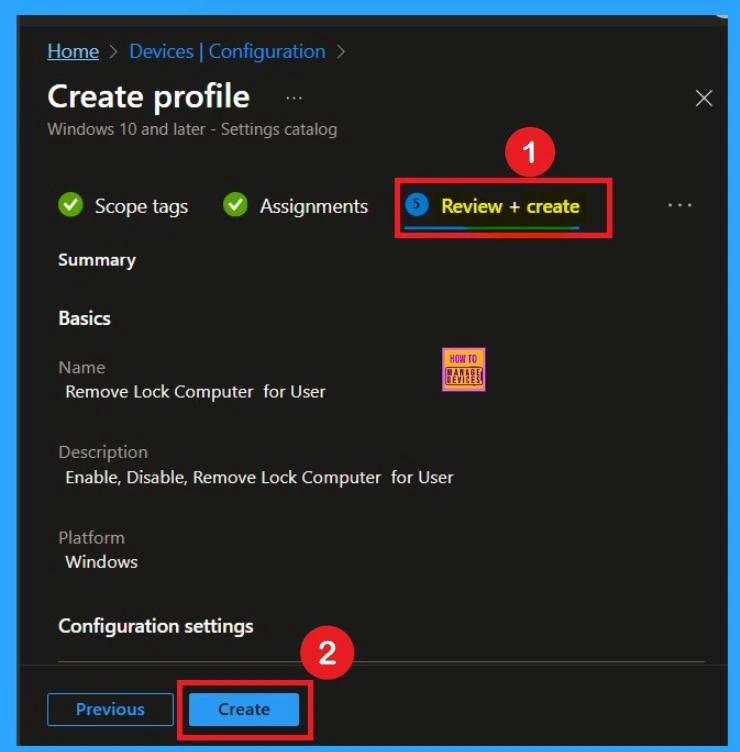
Now you are on the Review + Create. In this section, you can see a summary of everything you enterd in the previous steps such as basic details, configuration settings, assignment details read them carefully and when everything is ok Click on the Review and Create.
Monitoring Status – To Confirming Policy Created Successfully
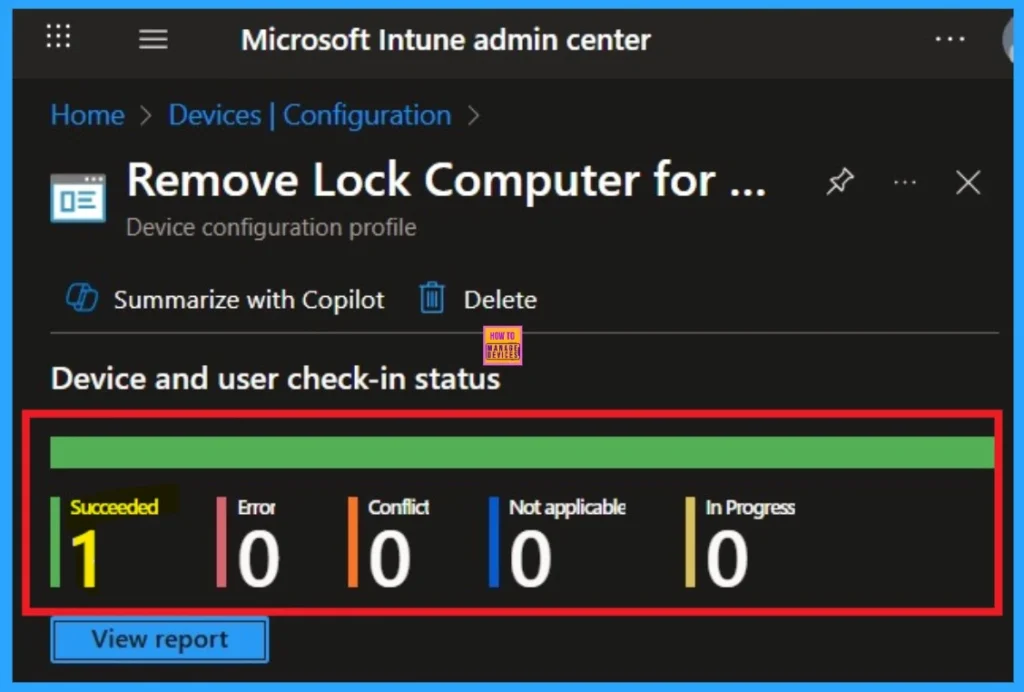
After creating a policy we have to monitor that whether the policy was created successfully or not. To check this, you can either wait for up to 8 hours for the policy to apply automatically, or you can reduce the waiting time by manually syncing the policy through the Company Portal. After syncing, you can check the policy’s status through the Intune Portal.
- To do this, go to Devices > Configuration Profiles.
- In the Configuration policy section, search for the name of the policy you created.
- So, I searched that name and, clicked on it, and then I get the status below.
Client Side Verification through Event Viewer
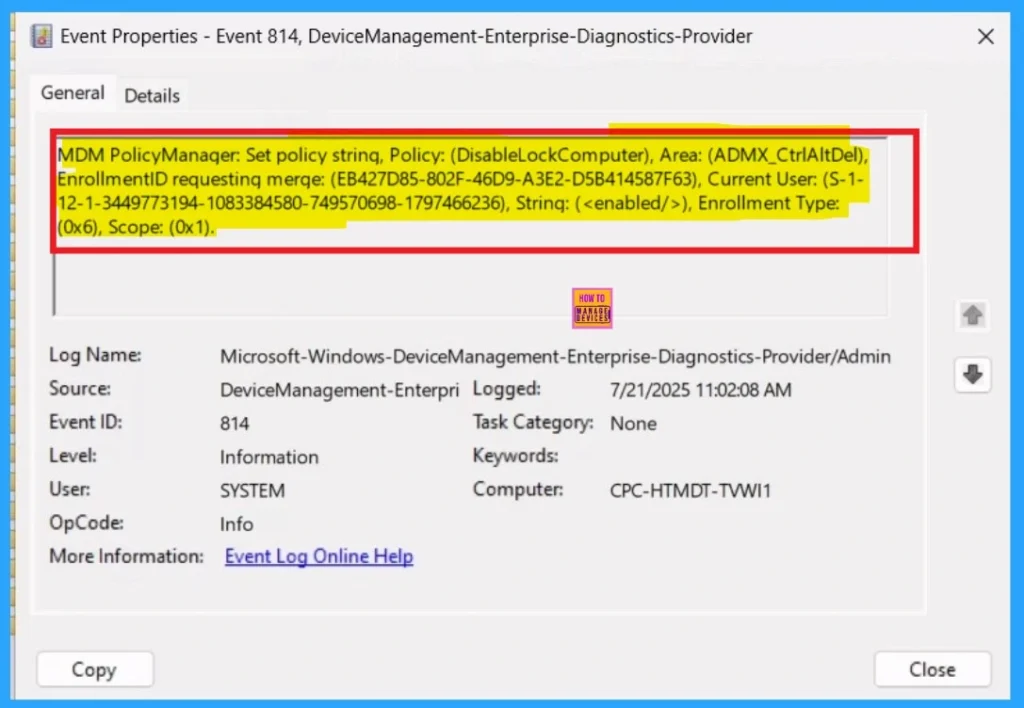
To confirm the policy is successful or not, you can use the Event Viewer. First, open Event Viewer and navigate to Applications and Services Logs > Microsoft > Windows > Device Management > Enterprise Diagnostic Provider > Admin. Look for Event IDs 813 or 814, as these typically contain policy-related information.
- In the below screenshot the policy details were found under Event ID 814.
| Policy Details |
|---|
| MDM PolicyManager: Set policy string, Policy: (DisableLockComputer), Area: (ADMX_CtrlAltDel), EnrollmentID requestinq merqe: (EB427D85-802F-46D9-A3E2-D5B414587F63), Current User: (S-1- 12-1-3449773194-1083384580-749570698-1797466236), Strinq: (), Enrollment Type: (0x6), Scope: (0x1). |
Delete the Remove Lock Computer for user Policy
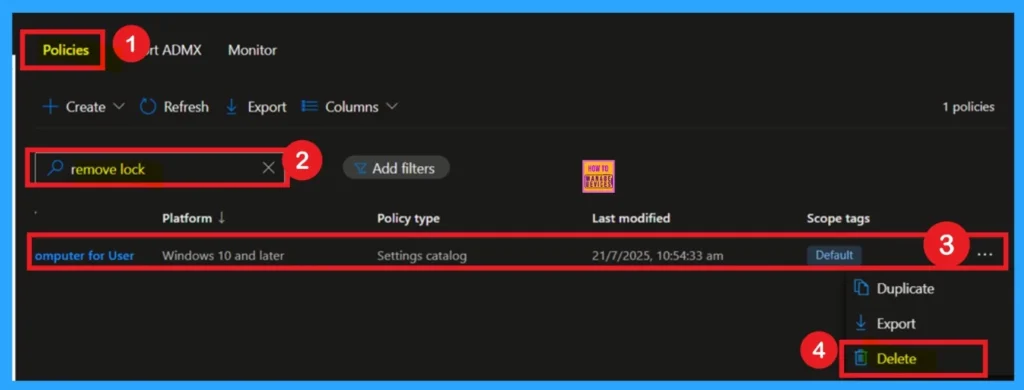
If you want to delete this policy Remove Lock Computer, you can easily do so. First, search for the policy name in the configuration section. When you find the policy name, you will see a 3 dot menu next to it. Click on the 3 dots to open a menu with 3options such as Duplicate, Export, and Delete. Click on the Delete option and the policy deleted for Permanently.
For detailed information, you can refer to our previous post – How to Delete Allow Clipboard History Policy in Intune Step by Step Guide.
Remove Assigned Groups of Remove Lock Computer for user Policy
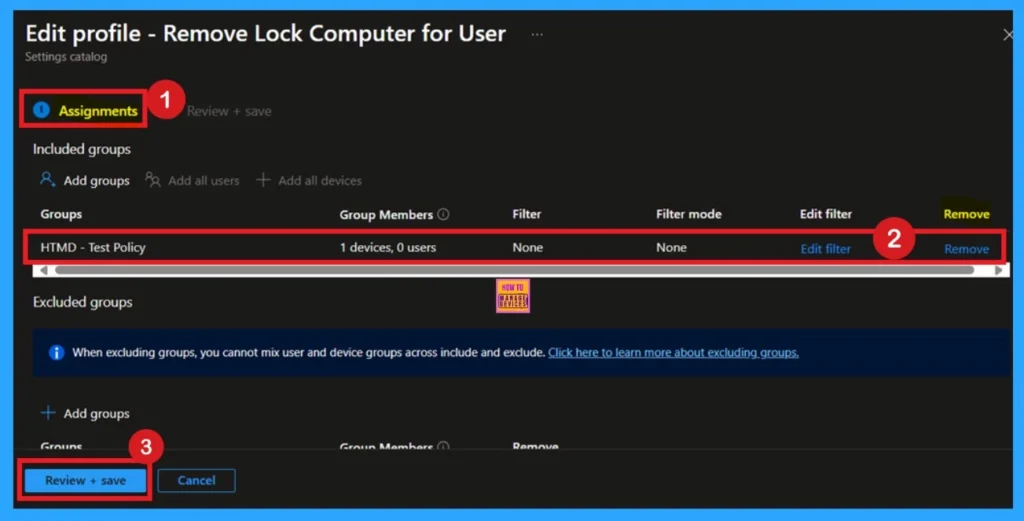
After creating the policy, if you want to remove the group that you previously selected, you can easily do that. First, go to Devices > Configuration policies. In the Configuration policy section, search for the policy name for example, Remove Lock Computer for user Policy. Once the result appears, click on the policy.
When you Scroll down the page, and you will see sections like Basic Details and Assignment Details. In the Assignment section, you will find an Edit option and click on it. When you click Edit, you will enter the Assignment page.
- Click on Remove, then proceed by clicking Review + Save.
For detailed information, you can refer to our previous post – Learn How to Delete or Remove App Assignment from Intune using by Step-by-Step Guide.
Use OMA-URI Settings
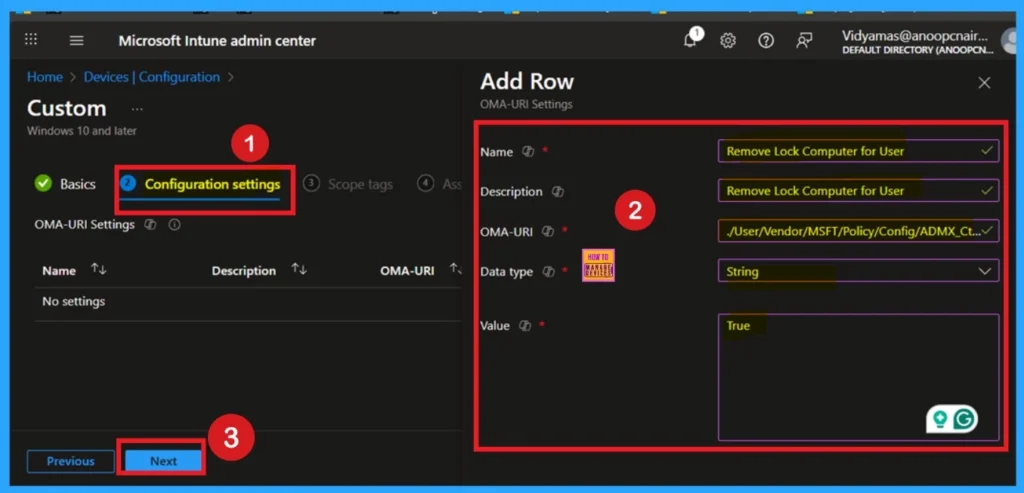
You can easily enable or disable the Remove Lock Computer in the starts using Microsoft Intune or configure a custom OMA-URI setting. But for a policy deployment I prefer to use Setting catalog because it is very easy to deploy a policy other than Use OMA-URI Setting. Below is a step-by-step guide to help you set this up.
- Sign in to Microsoft Intune
- Go to Devices > Configuration
- Click Create and then New policy
- Choose the platform as Windows 10 and later
- For Profile type, select Templates and then select Custom
- Provide a Name – e.g. “Remove Lock Computer.”
- Add a Description if needed
- Click on + Add under OMA-URI Settings to configure the specific setting.
- To Configure the OMA-URI Setting, do the following
- Enter a name for this setting, such as Remove Lock Computer for User.
- Briefly describe the setting, e.g., “Remove Lock Computer for User.”
- Enter the following OMA-URI path
- ./User/Vendor/MSFT/Policy/Config/ADMX_CtrlAltDel/DisableLockComputer
- Set the Data type to string.
- Enter the value
- True used for Enable
- False for the Disable
- After entering the above details, click Save.
Need Further Assistance or Have Technical Questions?
Join the LinkedIn Page and Telegram group to get the latest step-by-step guides and news updates. Join our Meetup Page to participate in User group meetings. Also, Join the WhatsApp Community to get the latest news on Microsoft Technologies. We are there on Reddit as well.
Author
Anoop C Nair has been a Microsoft MVP for 10 consecutive years from 2015 onwards. He is a Workplace Solution Architect with more than 22+ years of experience in Workplace technologies. He is a Blogger, Speaker, and Local User Group Community leader. His primary focus is on Device Management technologies like SCCM and Intune. He writes about technologies like Intune, SCCM, Windows, Cloud PC, Windows, Entra, Microsoft Security, Career, etc.


Discussion