






Improve Data Security with FSLogix Cache Clearing using Intune Policy
Today we are discussing a new topic Improve Data Security with FSLogix Cache Clearing using Intune Policy. As we all know, FSLogix remains a key component within the Microsoft Intune. It plays an important role in managing user profile containers, optimizing Office containers, and handling cache data efficiently.
FSLogix helps provide a smoother user experience in virtual environments by storing temporary data and reducing login times. However, proper cache management is essential to maintain both performance and data security. By using Intune policies, administrators can configure FSLogix to automatically clear cache data when users sign out, ensuring that no sensitive information remains on the device.
This approach enhances data protection and keeps organizational systems clean, secure, and optimized. This cache temporarily stores user data on the local system to speed up future logins. By default, this Local Cache file is not removed when a user signs out.
It remains on the device to ensure faster access the next time the user logs in. FSLogix provides an important setting called Clear Cache on Logoff. This setting gives administrators control over whether the Local Cache file should be deleted automatically each time a user logs off.

Table of Contents
How this Policy Helpful into the Organizations?
How to Enable Clear Cloud Cache on Logoff using Intune Policy
Earlier, we discussed several important points about enabling Clear Cache On Logoff using individual policies. As we know, this policy can be configured through Group Policy or directly in the Windows Registry. Today, we will focus on how to deploy this policy through Microsoft Intune.
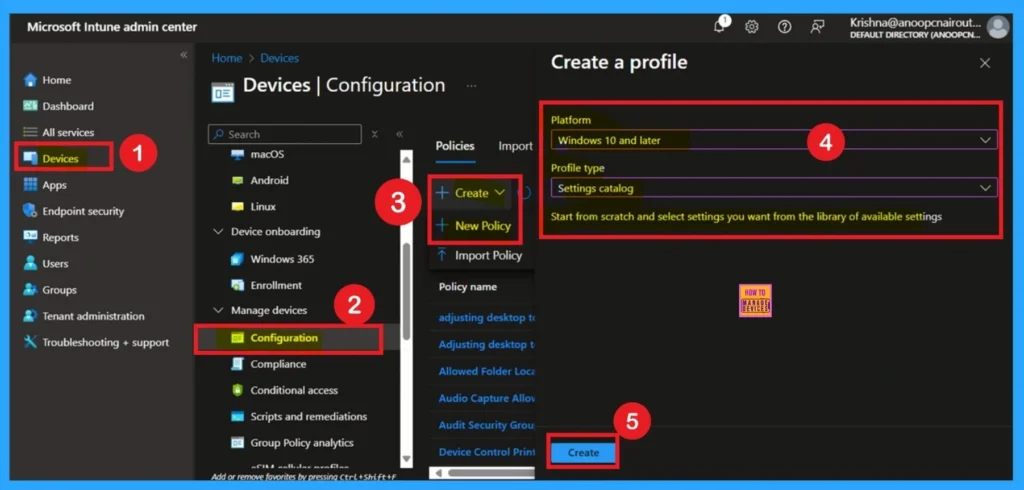
To begin, open Microsoft Intune and sign in with your administrator credentials. Once logged in, navigate to the Devices section and select Configuration Profiles. In this section, click on the + Create Policy option to create a new configuration profile.
- A new window titled Create a Profile will appear.
- Here, you need to provide some basic details: for the Platform, select Windows 10 and later, and for the Profile Type, choose Settings Catalog.
- After selecting these options, proceed to create the profile.
- FIX Teams Icon is Missing from the Start Menu FSLogix Issue
- TeamsTfwStartupTask Registry Key is not Roamed with FSLogix ODFC Containers
- How to Block App Location Access in Windows using Intune Policy
Importance of Basics
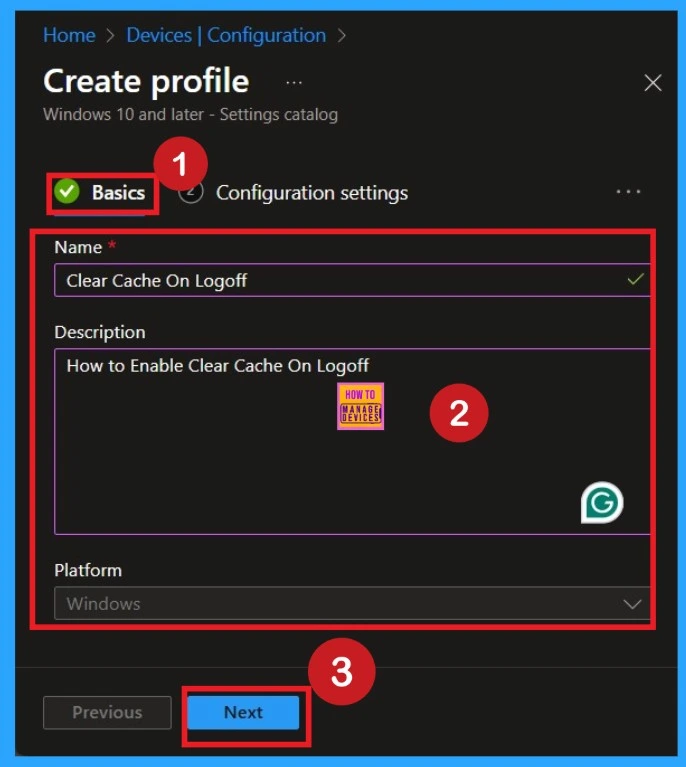
Now, we all know what the Basic tab means for us. If you don’t, it simply refers to the first step in the policy creation process, where you provide the basic details of your policy. In this section, you need to enter important information such as the Name and Description of the policy. You can give the policy any name that helps you easily identify it later in the future.
Additionally, you can add a short description to explain the purpose of the policy. Since we already selected the platform as Windows earlier, you don’t need to make any changes on this page. Once the basic details are filled in, simply click Next to continue.
Purpose of Configuration Settings
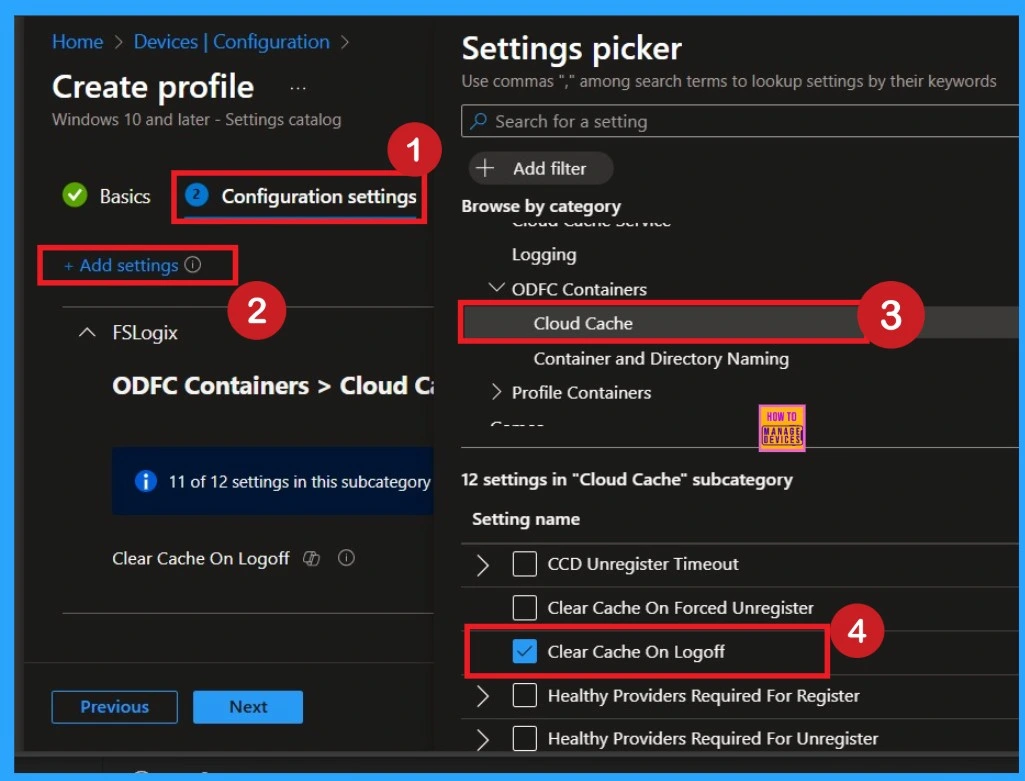
After completing the basics, you will now be on the Configuration Settings page. This is the first and most important step you need to work with. On this page, you will see a blue + Add Settings option and click on it. Once you click, a list of different categories will appear. From these categories, select ODFC Containers. Next, click on the small drop-down arrow beside it to expand the options.
You will then see two additional categories: Cloud Cache and Container Directory. Here, select Cloud Cache. Inside the Cloud Cache section, you will find around 12 settings. From these settings, choose the option called Clear Cache On Logoff.
Disabled Policy Mode
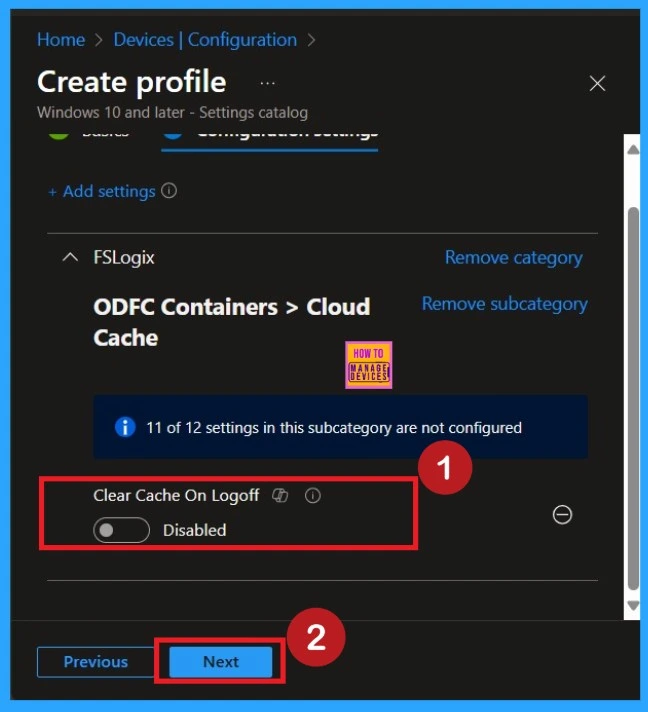
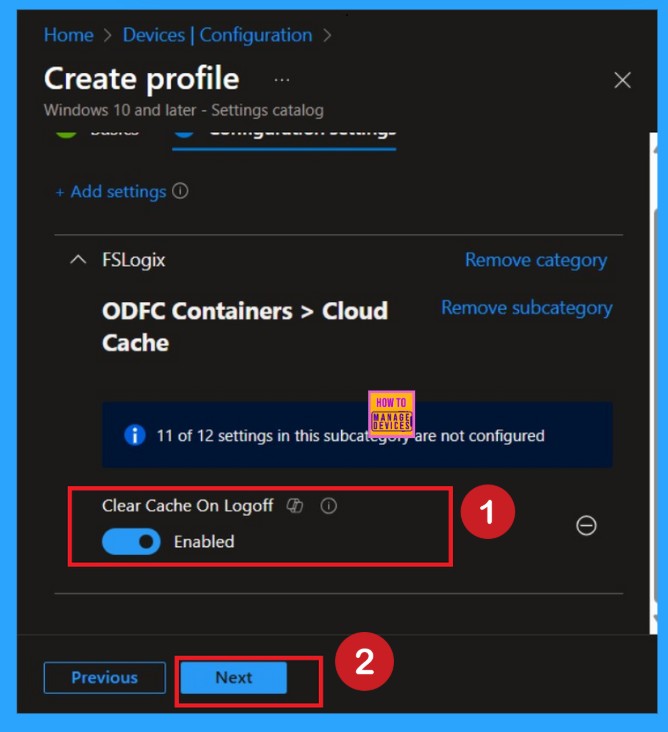
After selecting the policy, you can now close the Settings Picker window. You will return to the Configuration Settings page, where you can see that the policy is currently set to Disabled by default. If you want to proceed without making any changes, simply click Next to continue.
How to Enable this Policy
When the policy is enabled, it is very useful for virtual desktops, and shared workstations where multiple users log in and out frequently. Clearing the cache on logoff helps prevent data overlap, reduces disk usage, and improves the overall performance of the system.
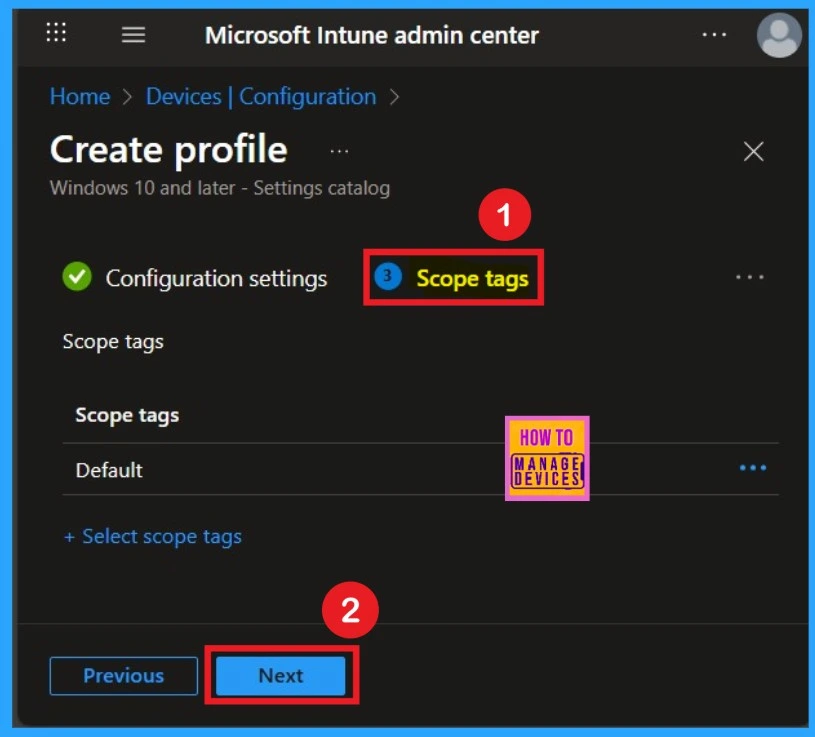
Scope Tags
The scope tag is not mandatory, so you can skip this section. It functions as a tool for organisation and access management, but assigning it is optional. Click Next if they’re not required for your setup.
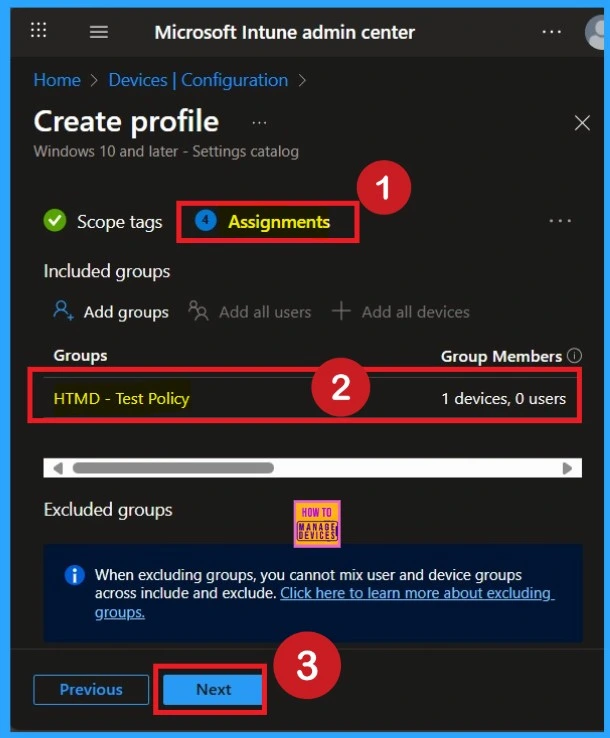
Assignment Section
The Assignment section is very important for policy deployment. In this section, you decide who will receive the policy within the organization. If you want to target specific groups, users, or devices, you can add them here to ensure the policy is applied only to the intended audience.
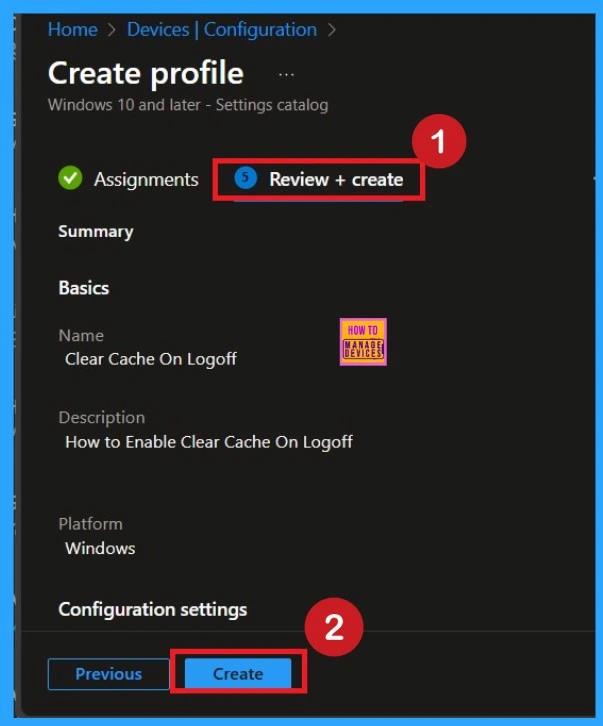
Review + Create
Review + Create is the last stage of policy creation. In this step, you will see a summary of all the details, including Basics, Configuration Settings, Assignments, and more. You can review all the information, and if anything needs to be changed, you can go back to the previous steps and edit them easily.
Monitoring Details
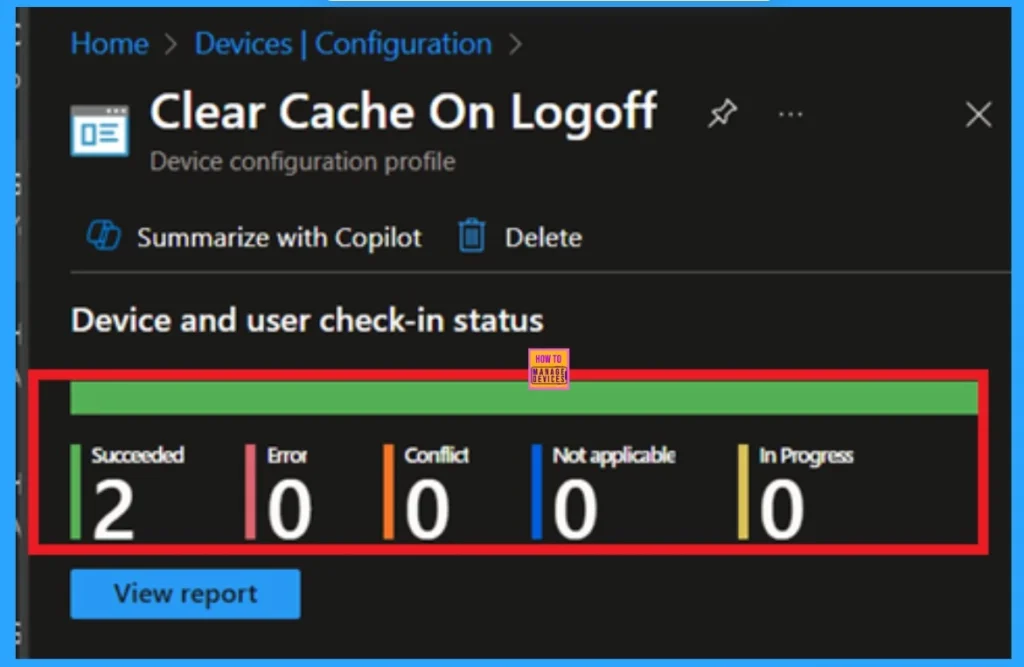
After creating the policy, you might in a thought that whether it was successfully applied or not. It is very important to verify this. To check, you normally need to wait up to 8 hours for the policy to sync automatically. However, if you want faster results, you can manually sync the policy through the Company Portal.
Using this method ensures the policy is applied more quickly and you can confirm the outcome without waiting the full sync time. To check the Monitoring status follow the steps;
- Navigate to Devices > Configuration Policies.
- In the Configuration Policies list, look for the policy you created.
- Click on the policy to view its deployment status and details.
Event Viewer
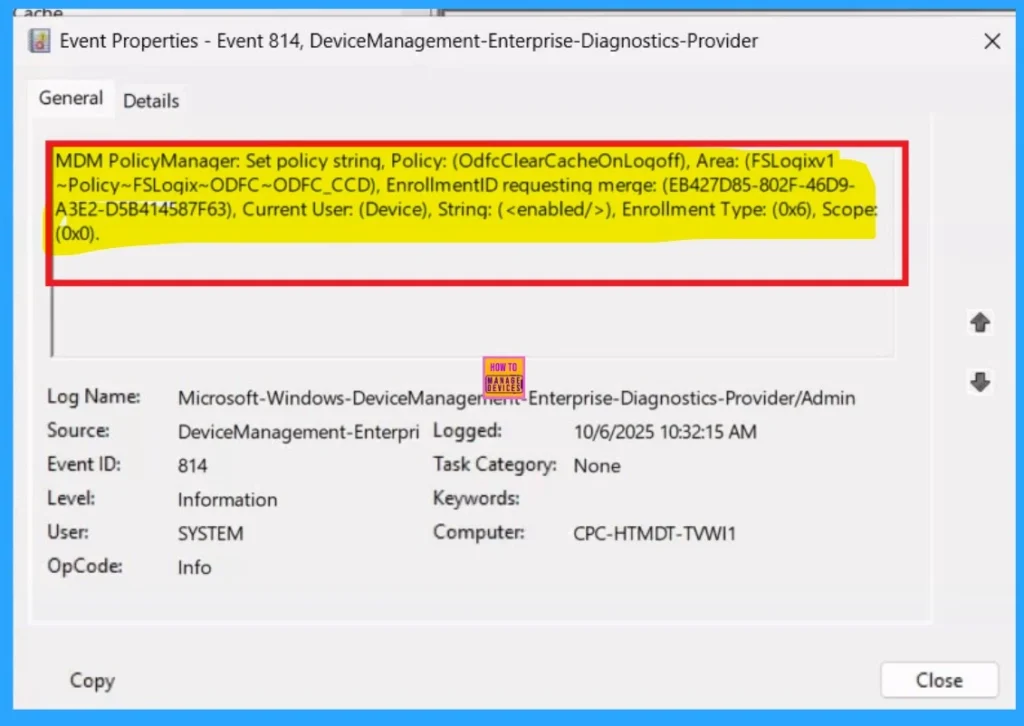
To get the client-side verification, open the Event Viewer and navigate to Applications and Services Logs > Microsoft> Windows > Device Management > Enterprise Diagnostic Provider > Admin. Once there, you can search for specific policy results by using the Filter Current Log feature located in the right pane. This helps quickly get the relevant results within the log.
| Policy Details |
|---|
| MDM PolicyManager: Set policy string, Policy: (OdfcClearCacheOnLoqoff), Area: (FSLoqixv1 ~Policy~FSLoqix~ODFC~ODFC_CCD), EnrollmentID requestinq merqe: (EB427D85-802F-46D9- A3E2-D5B414587F63), Current User: (Device), Strinq: (), Enrollment Type: (0x6), Scope: (0x0). |
How to Delete the Policy that you created
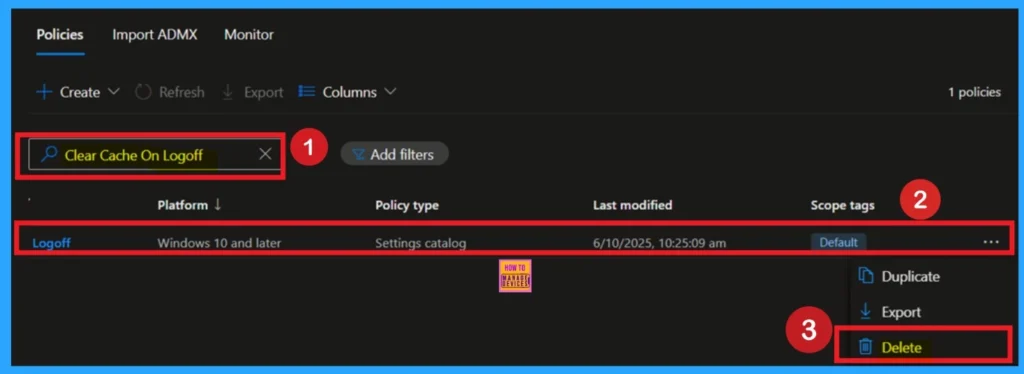
To delete a policy in Microsoft Intune, first sign in to the Microsoft Intune Admin Center. Navigate to Devices and then select Configuration. Locate and select the specific policy you want to remove. Once you’re on the policy details page, click the 3 -dot menu in the top right corner and choose Delete from the available options.
For detailed information, you can refer to our previous post – How to Delete Allow Clipboard History Policy in Intune Step by Step Guide.
How to Remove Policy
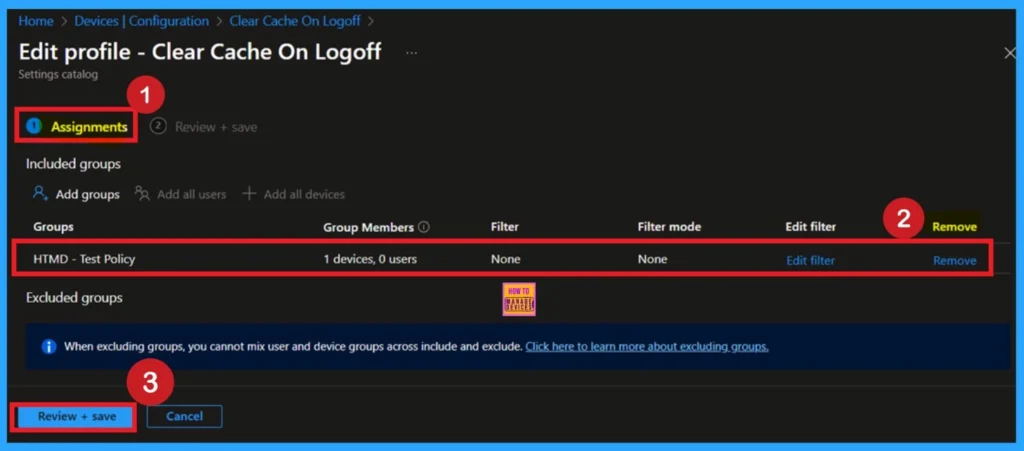
After creating the policy, if you want to remove the group that you previously selected, you can easily do that. First, go to Devices > Configuration policies. In the Configuration policy section, search for the policy, In the policy section When you Scroll down the page, and you will see sections like Basic Details and Assignment Details
- In the Assignment section, you will find an Edit option and click on it.
- When you click Edit, you will enter the Assignment page.
- Click on Remove, then proceed by clicking Review + Save.
For detailed information, you can refer to our previous post – Learn How to Delete or Remove App Assignment from Intune using by Step-by-Step Guide.
Need Further Assistance or Have Technical Questions?
Join the LinkedIn Page and Telegram group to get the latest step-by-step guides and news updates. Join our Meetup Page to participate in User group meetings. Also, Join the WhatsApp Community to get the latest news on Microsoft Technologies. We are there on Reddit as well.
Author
Anoop C Nair has been Microsoft MVP from 2015 onwards for 10 consecutive years! He is a Workplace Solution Architect with more than 22+ years of experience in Workplace technologies. He is also a Blogger, Speaker, and Local User Group Community leader. His primary focus is on Device Management technologies like SCCM and Intune. He writes about technologies like Intune, SCCM, Windows, Cloud PC, Windows, Entra, Microsoft Security, Career, etc.


Discussion