






Assign Custom Name for Windows 365 Cloud PC
Let’s learn how you can assign Custom Name for Windows 365 Cloud PC. Your Cloud PC will now have the custom name you assigned to it. You can use Cloud PC custom name template, using unique names for each one to help you keep them organized.
Windows 365 Cloud PC is a cloud-based virtual desktop solution that allows users to access their Windows desktop environment from anywhere with an internet connection. One of the features of Windows 365 is the ability to assign a custom name to your Cloud PC, which can be helpful for identifying and managing multiple Cloud PCs.
Assigning a custom name to your Windows 365 Cloud PC can be especially helpful if you have multiple Cloud PCs, as it can help you easily identify which PC you are accessing. It can also be useful for managing your Cloud PCs, as you can use descriptive names that make it easy to understand the purpose or function of each PC.
The introduction of the Cloud PC custom name template feature was made with Service Release 2303, which is highly appreciated by many of IT folks who had been waiting for it. Anoop had also created a feature request for a custom naming standard template for Cloud PC.

Assigning a custom name to your Windows 365 Cloud PC is a quick and easy way to personalize your virtual desktop experience and improve your productivity.
- Configure Single Sign-on SSO For Windows 365 Azure AD Join Cloud PC
- Windows 365 App Experience | Cloud PC Application For Windows
Assign Custom Name for Windows 365 Cloud PC Using Provisioning Policy
To configure Cloud PC naming, you can either create a new provisioning policy or modify an existing one. Let’s look at the steps to modify an existing Provisioning Policy for Windows 365 Cloud PCs, and here you can also update general information, image, and network connection.
- Sign in to the Microsoft Intune admin center https://intune.microsoft.com/.
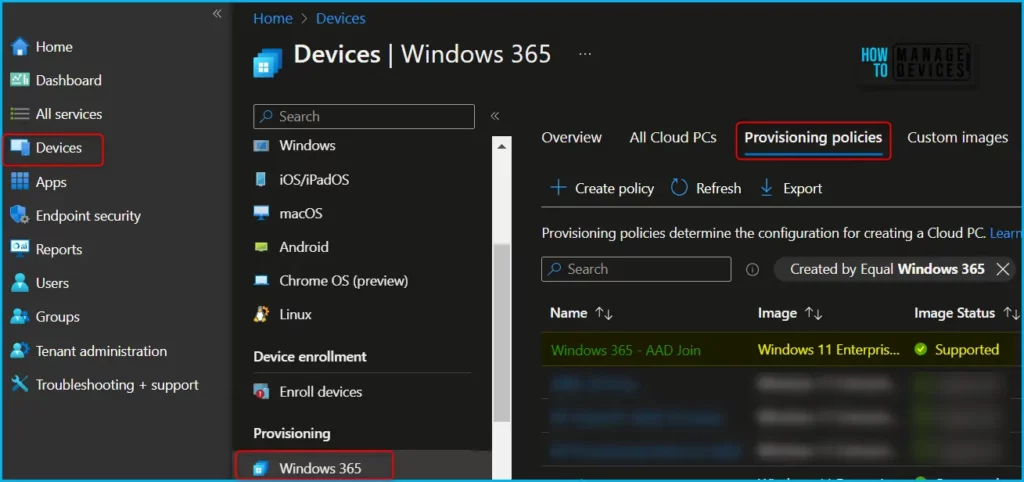
- Select Devices > Windows 365 > Provisioning policies. Select Cloud PC provisioning policy from the lists which you want to modify.
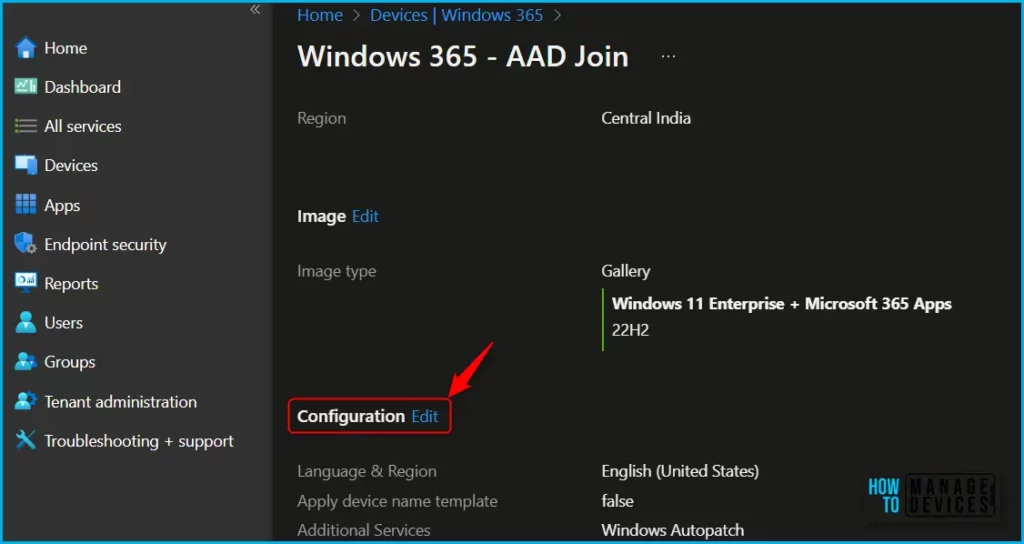
After selecting Provisioning policies, scroll down and click on the “Edit” button located in the Configuration section.
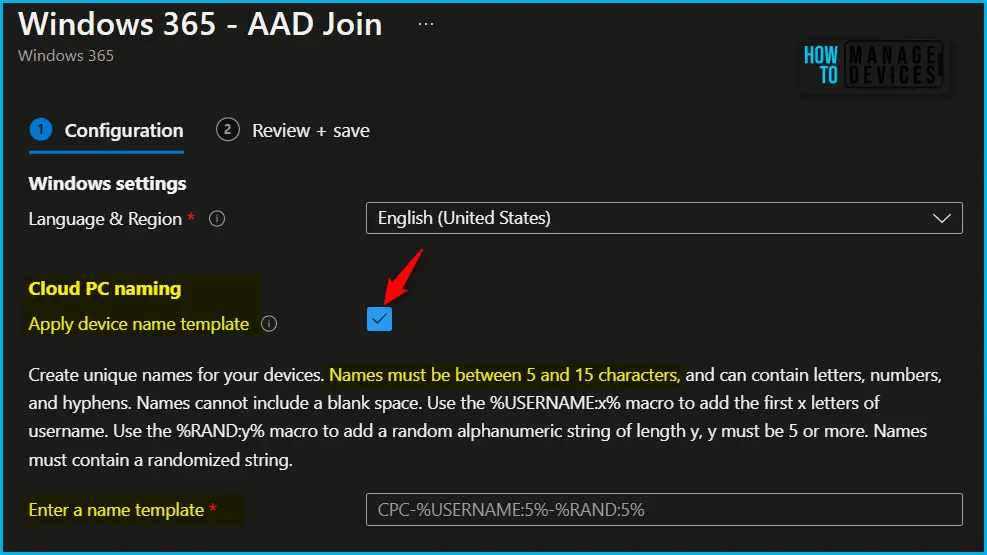
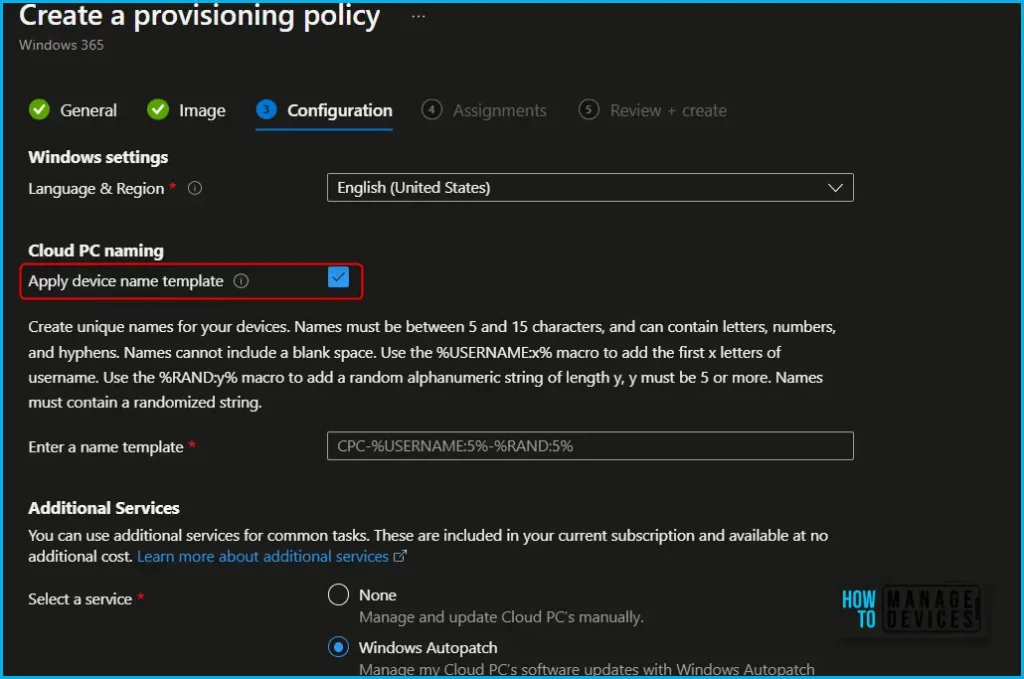
Select Apply device name template to create a Cloud PC naming template to use when naming all Cloud CPs that are provisioned with this policy. To create the template, it is important to review to the following set of guidelines:
- Names must be between 4 and 15 characters.
- Names can contain letters, numbers, hyphens, and underscores.
- Names can’t include blank spaces.
- Optional. Use the %USERNAME: X% macro to add the first X letters of the username.
- Required. Use the %RAND: Y% macro to add a random string of numbers, where Y equals the number of digits to add. Y must be 5 or more. Names must contain a randomized string.
On the Review+Create window, review the added configuration and click Update. A notification will appear automatically in the top right-hand corner with the message “Successfully updated policy.”
Newly provisioned Cloud PCs will honor the changes in your provisioning policy. To change the previously provisioned Cloud PCs to align with the changes, you must reprovision Cloud PCs. Here, you can learn how to reprovision Windows 365 Cloud PC
Important – When the Reprovision remote action starts, the user is signed off. The original Cloud PC is deleted, including all user data, applications, customizations, etc.
Create Provisioning Policy for Windows 365 Custom Name Templates
To create Windows 365 Cloud PC provisioning policies and specify custom name for Windows 365, follow these steps: specify the connection, Windows 10/11 images, and user groups. The provisioning policy enables you to configure the necessary settings for hosting and managing your cloud PCs.
When creating a Provisioning Policy in Windows 365, you need to specify the join type. There are two options for selecting the join type for Cloud PC. You can check more about the Azure AD Join and Hybrid Azure AD Join for Windows 365 Cloud in the post.
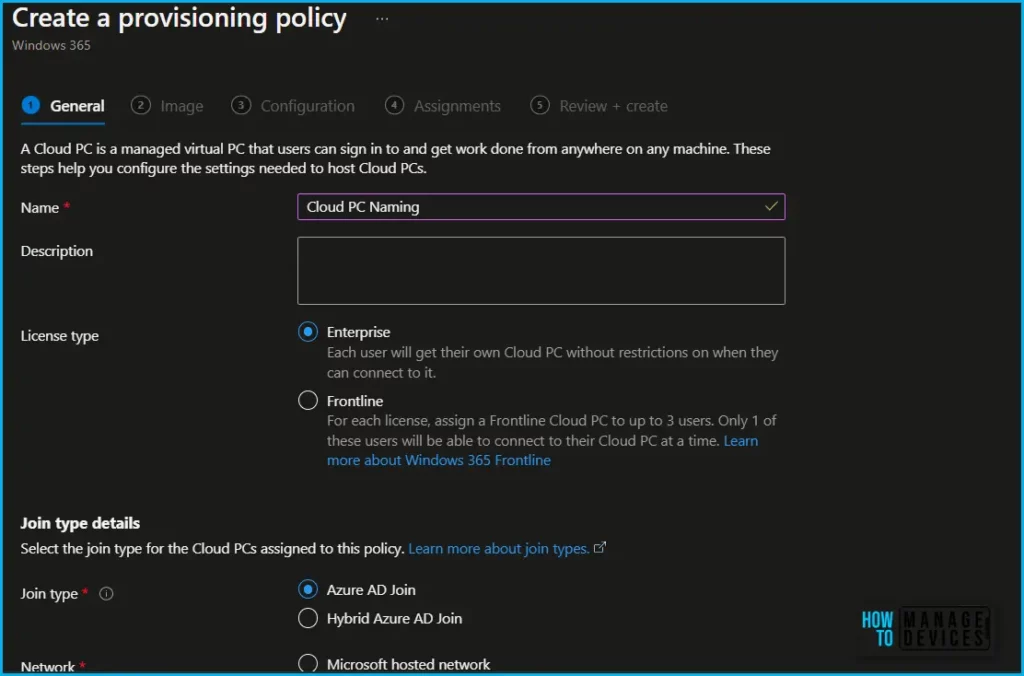
The next option available while creating a new provisioning policy allows you to specify the configuration settings for Cloud PC naming.
Here you also select the language and region settings. Click the drop-down and select your desired language and region. The chosen language pack will be installed on Cloud PCs provisioned with this policy.
Check the box, Apply device name template to create a custom naming template to add names to your devices during provisioning and use the unique name you want to display. Click Next and complete the process.
Overall, Custom naming simplifies troubleshooting and enhances the overall user experience by making it easier to find and connect to Cloud PCs.
Author
About Author – Jitesh, Microsoft MVP, has over six years of working experience in the IT Industry. He writes and shares his experiences related to Microsoft device management technologies and IT Infrastructure management. His primary focus is Windows 10/11 Deployment solution with Configuration Manager, Microsoft Deployment Toolkit (MDT), and Microsoft Intune.

Discussion