






How to Control Default Pop-up for Specific Sites Using Intune Policy
Hi everyone! Today, we’re going to talk about how to How to Control Default Pop-up for Specific Sites Using Intune Policy. As we all know, some policies are very useful for organizations to enable or disable features to improve user experience and security.
Unwanted features, like random pop-up windows, can often annoy users and affect the performance of their devices. When it comes to browsers, especially Microsoft Edge, pop-up windows are a common issue. Sometimes, they can be useful but most of the time, they are distracting and harmful.
In this policy, we focus on managing pop-up windows for specific websites in Microsoft Edge. This allows organizations to block unnecessary pop-ups, while still allowing trusted websites to use them when needed. This improves both security and user productivity.
This policy lets administrators choose which websites are allowed to open pop-up windows in the browser. Only the websites added to the approved list can show pop-ups. All other websites will be blocked unless the user’s own browser settings allow them.

Table of Contents
What Happens If the Policy Not Configured?
If this policy is not set, Microsoft Edge will use the default pop-up settings the user has chosen. This can cause problems because some users might allow harmful pop-ups by mistake, while others might block pop-ups that are actually needed.
How to Control Default Pop-up for Specific Sites Using Intune Policy
Above, we discussed how to allow or block pop-up windows on specific sites using individual policies. This feature is very helpful for organizations because it blocks all unwanted pop-ups while allowing only approved ones.
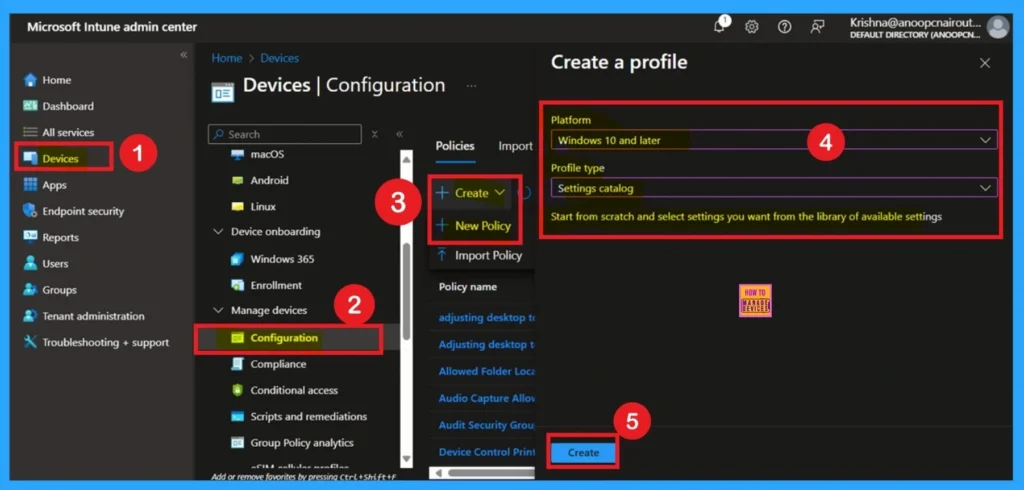
Deploying this policy through Microsoft Intune is simple. First, sign in to the Microsoft Intune admin center. Then go to Devices > Configuration and click on + Create policy. In the Create Profile window, choose the Platform as Windows 10 and later, and select Settings catalog as the Profile type. Then, click Create to proceed.
- Allow or Block Hardware Keyboard Text Suggestions in Text Input using Intune Policy
- Enable Disable Defender SmartScreen For Microsoft Store Apps In Windows 11
- Turn On or Off Microsoft Defender SmartScreen for Microsoft Edge in Windows 11
How to Fill Basic Details
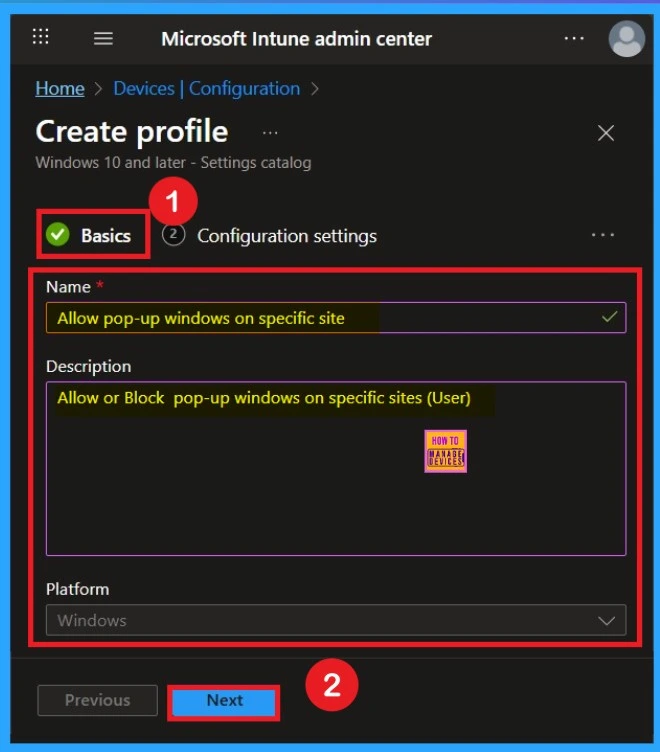
The Basics section is the first step in creating the policy. Here, you need to fill some basic details such as the Name, Description, and Platform. The Name field is very important because it helps you quickly identify the policy later from a long list of other policies. You should give it a clear name. You can also fill in the Description field to explain the purpose of the policy.
This is helpful for anyone who may manage or review the policy later. The Platform section is already filled in as “Windows 10 and later,” so you don’t need to change anything there. Once you’re done, click Next to move to the next step.
Know about the Configuration Settings
If you want to enable the policy, you can do so by toggling the switch from left to right. Once enabled, the toggle will turn blue. After enabling it, another field will appear where you need to enter the specific site URL. You can add one or more URLs here. In this example, I’ve added one URL. Then, click Next to continue.
Disable the policy by Default
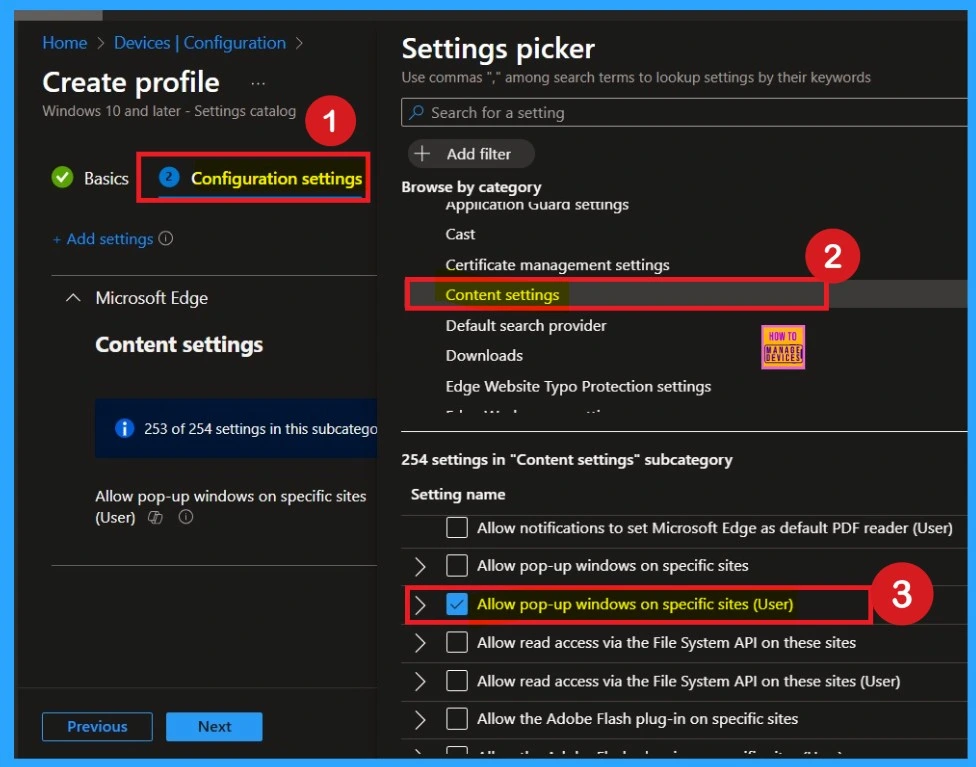
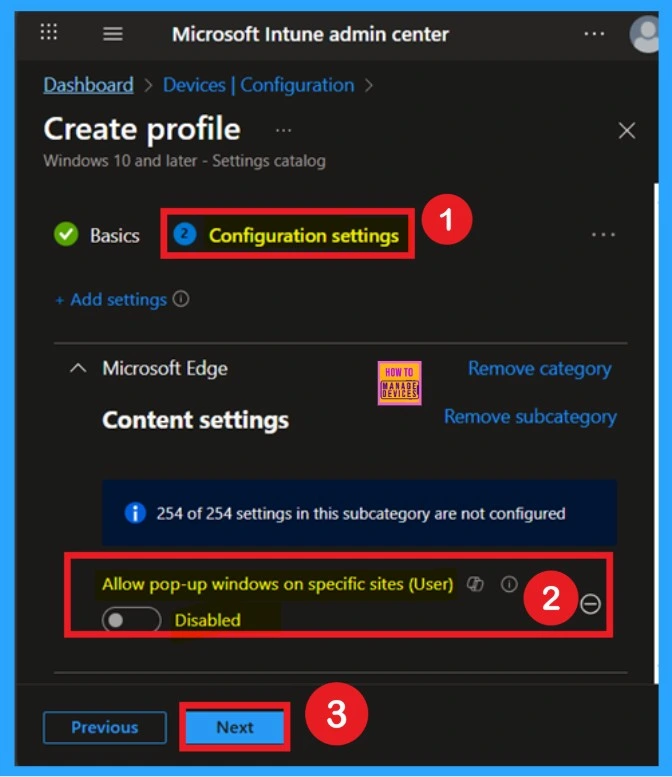
After selecting the configuration settings, you can now close the Settings picker window. Once it is closed, you will see the selected policy listed on the Configuration settings page. By default, the policy is set to Disabled. If you want to proceed with the current settings or make changes later, simply click Next to continue with the policy creation process.
How to Enable a Policy
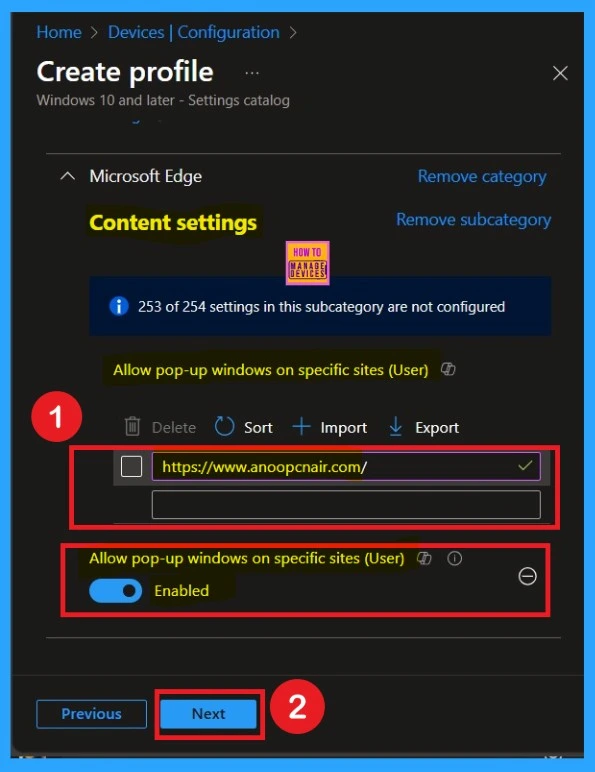
If you want to enable the policy, you can do so by toggling the switch from left to right. Once enabled, the toggle will turn blue. After enabling it, another field will appear where you need to enter the specific site URL. You can add one or more URLs here. In this example, I’ve added one URL. Then, click Next to continue.
What is a Scope Tag
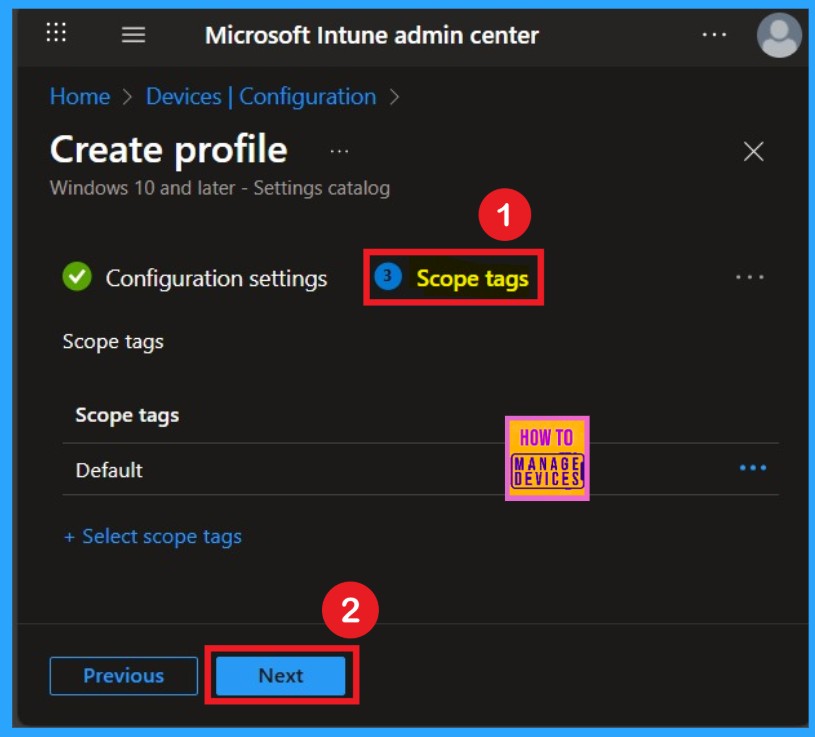
Now your are on the Scope tags section. Scope tags are used to assign policies to specific admin groups for better management and filtering. If needed, you can add a scope tag here. However, for this policy, I chose to skip this section.
Know the Importance of Assignments
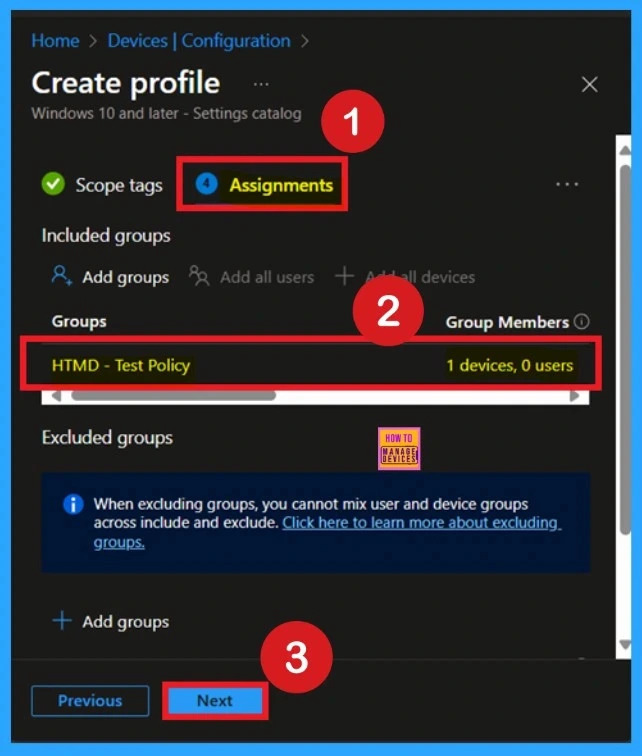
Next, you’ll reach the Assignments section, which is a very important step. This is where you decide which user or device groups should receive the policy. In this case, I selected the specific group I wanted to apply the policy to. After selecting the group, click Next to continue.
Review + Create
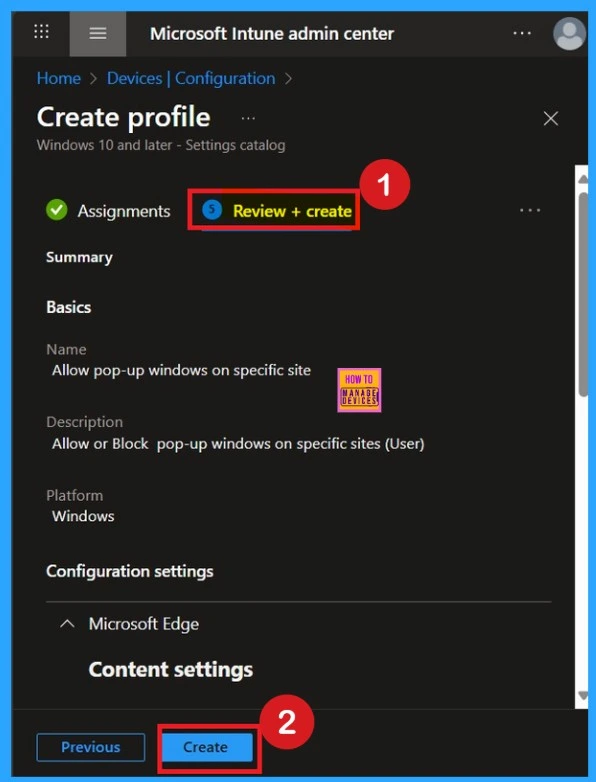
The final step is the Review + Create tab, also known as the Summary tab. Here, you’ll find a complete overview of all the details and settings you’ve configured for the policy. Take a moment to review everything carefully. If everything looks fine, click Create to complete the process.
If you spot any errors or need to make changes, you can return to the previous sections and update the information as needed. After clicking Create, you’ll receive a confirmation notification indicating that the policy has been successfully created.
Monitoring Status
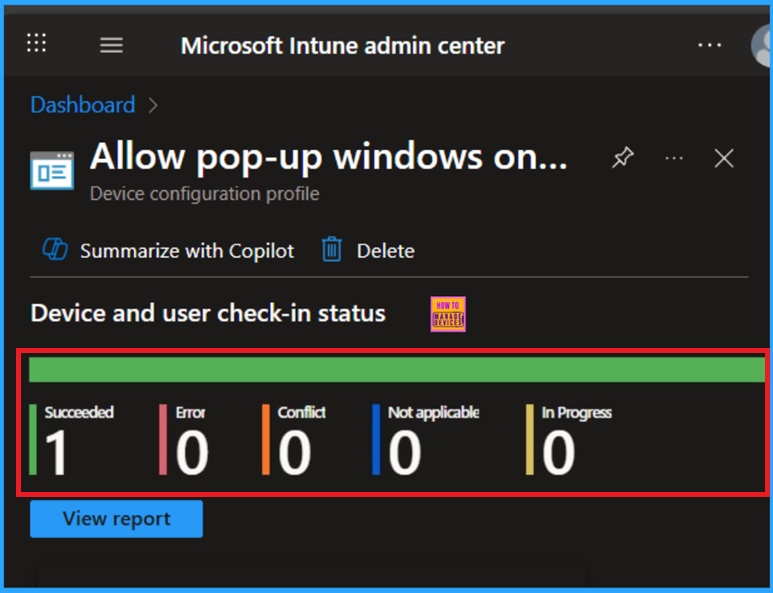
To check the status of a policy in the Intune portal, navigate to Devices > Configuration, then select the policy by name. Look for a status of Succeeded 1, which indicates that the deployment was successful.
If you want to speed up the update, you can use a manual sync from the Company Portal. Keep in mind that the status may not update that time and wait a few minutes for the sync to finish before checking again.
Client- Side Verification
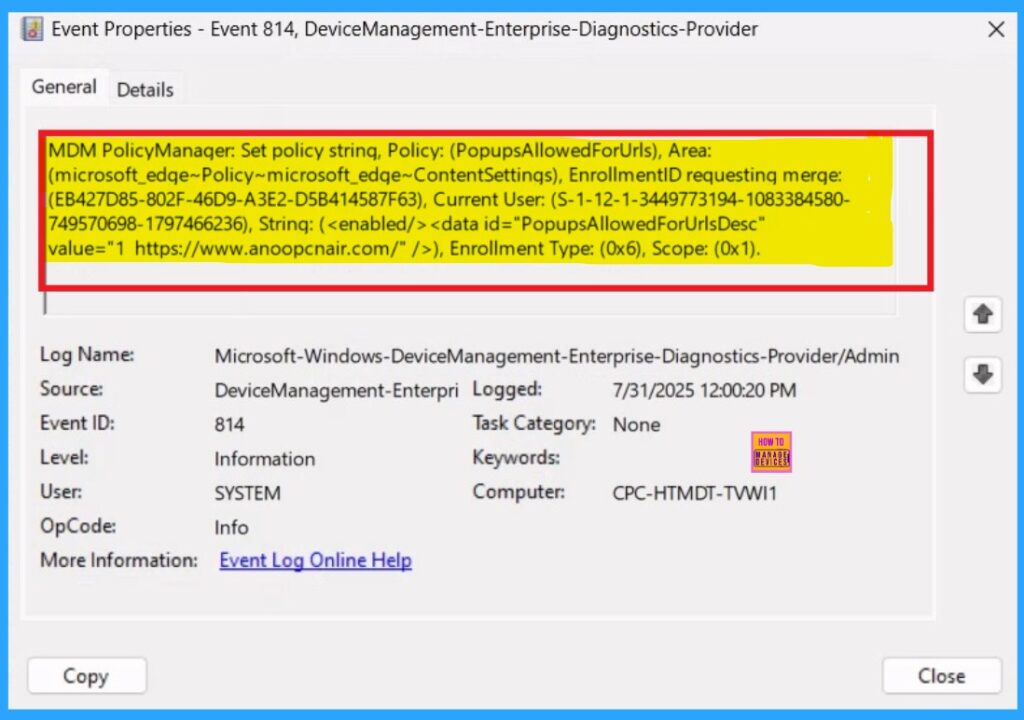
You can verify the confirmation in the Event Viewer by looking for Event ID 813 or 814. To access this, open Event Viewer and navigate to Applications and Services Logs > Microsoft > Windows >Device Management Enterprise Diagnostic Provider > Admin.
- You can see a list of policy-related events now.
- I found the policy details in the Event ID 814.
| Policy Details |
|---|
| MDM PolicyManager: Set policy string, Policy: (PopupsAllowedForUrls), Area: (microsoft_edqe~Policy~microsoft_edqe~ContentSettinqs), EnrollmentID requesting merqe: (EB427D85-802F-46D9-A3E2-D5B414587F63), Current User: (S-1-12-1-3449773194-1083384580- 749570698-1797466236), Strinq: ( ), Enrollment Type: (0x6), Scope: (0x1). |
How to Remove Policy Group
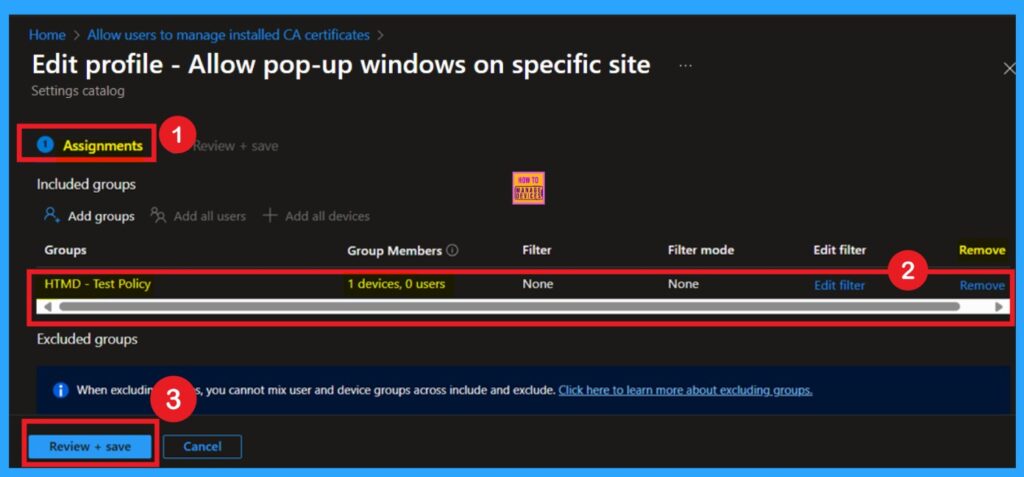
Start by navigating to the Monitoring status page via Devices > Configuration. Search for the policy by name and click on it to open its monitoring details. Scroll down to the Assignments section and click Edit. This will take you back to the policy’s assignment settings. From here, you can remove the group you no longer want the policy to apply to. For a view of the process, refer to the screenshot below.
For detailed information, you can refer to our previous post – Learn How to Delete or Remove App Assignment from Intune using by Step-by-Step Guide.
Delete the Policy
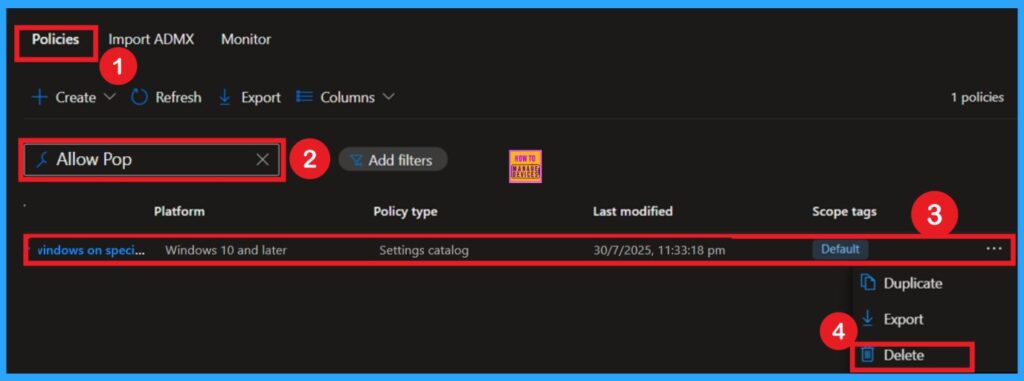
To delete a policy in Microsoft Intune, first sign in to the Microsoft Intune Admin Center. Navigate to Devices and then select Configuration. Locate and select the specific policy you want to remove. Once you’re on the policy details page, click the 3 -dot menu (⋯) in the top right corner and choose Delete from the available options.
- A screenshot is provided below to assist you with the process.
Need Further Assistance or Have Technical Questions?
Join the LinkedIn Page and Telegram group to get the latest step-by-step guides and news updates. Join our Meetup Page to participate in User group meetings. Also, join the WhatsApp Community to get the latest news on Microsoft Technologies. We are there on Reddit as well.
Author
Anoop C Nair has been Microsoft MVP for 10 consecutive years from 2015 onwards. He is a Workplace Solution Architect with more than 22+ years of experience in Workplace technologies. He is a Blogger, Speaker, and Local User Group Community leader. His primary focus is on Device Management technologies like SCCM and Intune. He writes about technologies like Intune, SCCM, Windows, Cloud PC, Windows, Entra, Microsoft Security, Career, etc.


Discussion