






How to Deploy Wireshark Using SCCM Application Model
In this post, we will see the Deployment of Wireshark Using SCCM. We will make use of the MSI application to deploy Wireshark using SCCM.
The Wireshark packet analyzer is a free and open-source program. In addition to network troubleshooting, analysis, and developing software and communications protocols.
Wireshark is the world’s foremost and widely-used network protocol analyzer of deep inspection of hundreds of protocols, with more being added all the time. Wireshark has a rich feature set that includes Live capture, offline analysis, and more.
It also provides decryption support for many protocols, including IPsec, ISAKMP, Kerberos, SNMPv3, SSL/TLS, WEP, and WPA/WPA2. Also with the help of Wireshark, coloring rules can be applied to the packet list for quick, intuitive analysis.

If available, the MSI application is the best method for deployment on client machines using SCCM. As stated in the beginning, here we are using the MSI application for the deployment of Wireshark as it is available on the internet.
- PuTTY Installation Using SCCM | Detailed Guide
- Differences between SCCM Applications and Packages Workloads
What is an MSI file?
Windows packages that contain installation information, including files to be installed and installation locations, are called MSI files. The EXE and MSI files both install and launch Windows programs.
The EXE file may not always contain an installer and may launch its program when double-clicked. An MSI file, however, always includes an installer.
Wireshark Install Uninstall Commands
Let’s start with the Deployment of Wireshark using SCCM. As told earlier, we are using the MSI file for Wireshark Deployment. You will see why the availability of MSI files for any application brings sparkles in the eyes of the SCCM Admin.
Here we don’t need to work on prerequisites as we used to tell you in the previous posts in which we used EXE files.
- All we have to do is download the MSI installer and the logo of Wireshark, as we know it is available for download, and our half job is done.
One can easily download the latest Installer directly from Wireshark official site. They have provided different setups for different environments. One can easily differentiate and choose the right setup for Windows.
The following table gives you all the details required for the Wireshark Deployment tool using SCCM. This includes the command line for Wireshark silent install, Uninstall, and Product Code.
| Name | Install Command Line | Uninstall Command Line | Detection Method |
|---|---|---|---|
| Wireshark Deployment Tool – Windows Installer (*.msi file) | Install -> msiexec /i “Wireshark-win64-3.6.9.msi” /q | Uninstall -> msiexec /x {DB774FB5-6899-4673-8E2D-AFBA3B8B26C5} /q | Windows Installer – {DB774FB5-6899-4673-8E2D-AFBA3B8B26C5} |
Wireshark Application Creation Using SCCM Console
This MSI application deployment guide will use the SCCM admin console to create an application. To start with the Application creation part, copy the downloaded setup to the package source location of the SCCM Server.
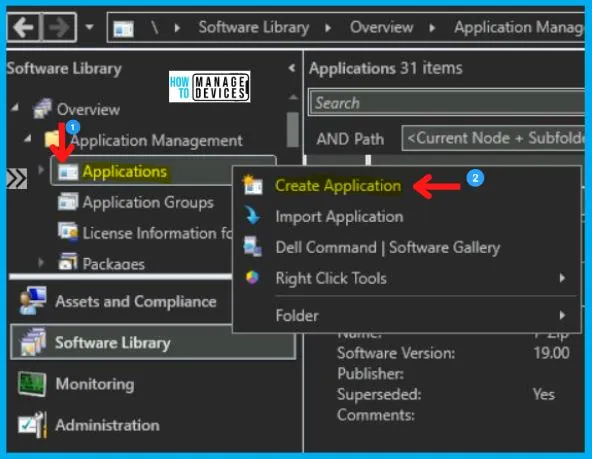
- Navigate to SCCM Console\Software Library\Overview\Application Management\ Applications.
- Right-click on Applications and select Create Application.
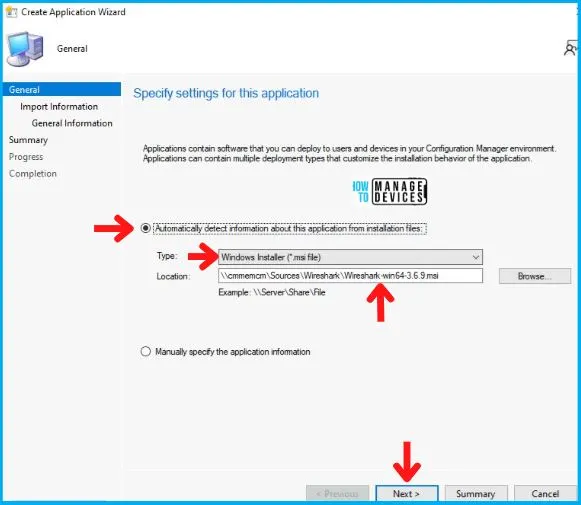
For all MSI application deployments, always Select the Automatically detect Information about the application from installation files and choose Windows Installer (.msi files) in the Type category. Also, enter the UNC Path for the application in Location and click Next as shown below in the image.
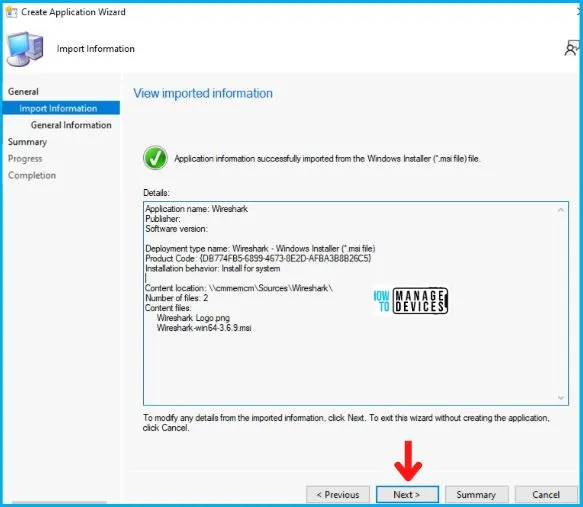
Now you will see the real Magic!!! As soon you click on next, you will see that all the information has been imported from the MSI file as shown below, and click Next.
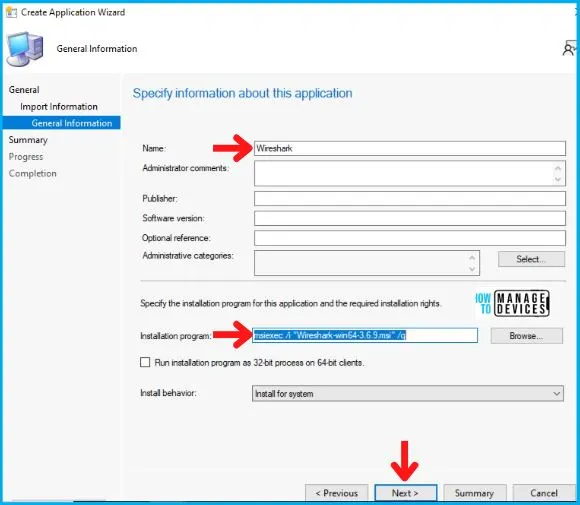
Also in the General Information Tab shown below, you will see it imports the install behavior/command from the installer itself.
- Silent Command Line for Wireshark = msiexec /i “Wireshark-win64-3.6.9.msi” /q
After this, click Next on the Summary Tab and end this Create Application Wizard by clicking on Close in Completion Tab.
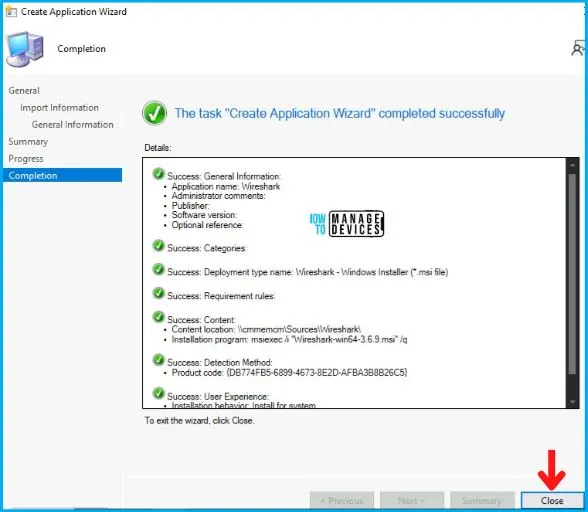
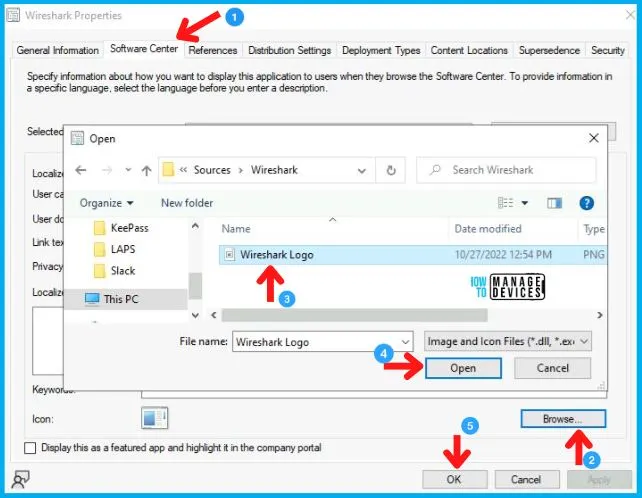
After the creation of the Application, it will appear in the Application Node. Now to Add an Icon to the Wireshark, right-click on the Wireshark and click on Properties.
After this choose Software Center Tab as shown below. And click on Browse in Icon, select the icon, and click on Apply and OK, as shown in the image below.
Distribute Wireshark Application
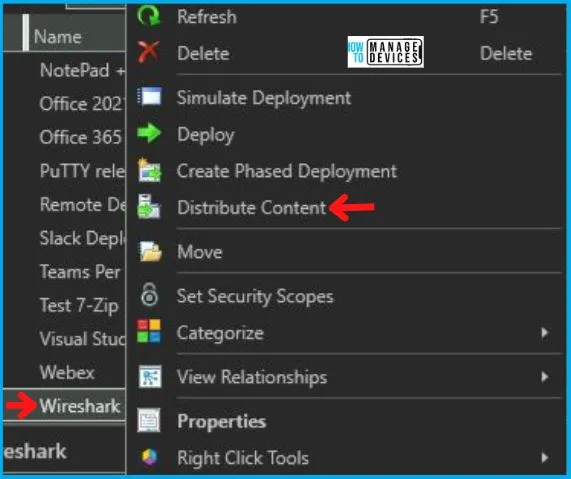
After the creation of the Application, it will appear in the Application Node. To begin with, the distribution right-clicks on the Wireshark Application and clicks on Distribute Content, as shown in the picture below.
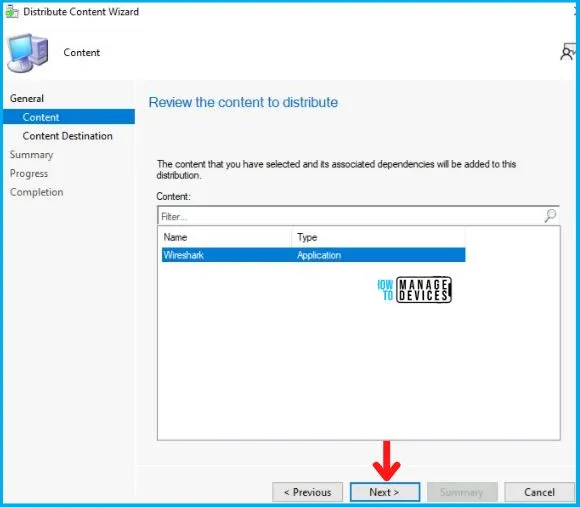
Now the Distribute Content Wizard will open, and click Next in the General Tab. Then select the Application Name in the Content Tab and Click on Next, as shown in the image below.
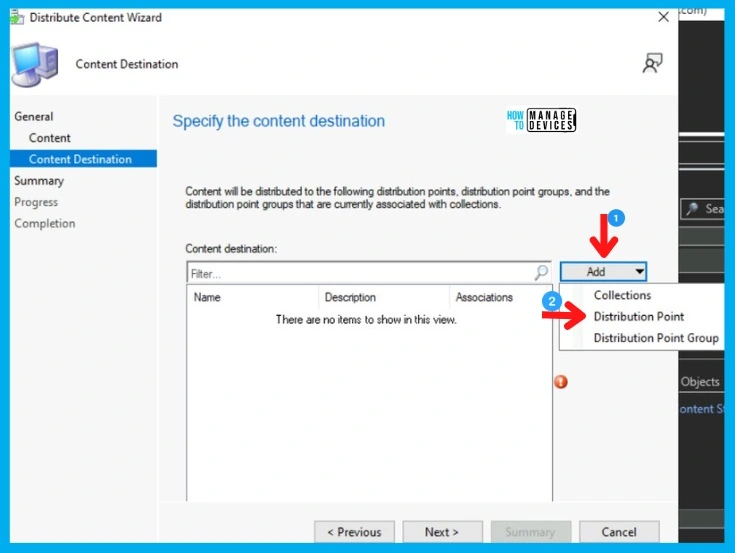
After this, in the Content Destination Tab, Click on Add and select the Distribution Point option.
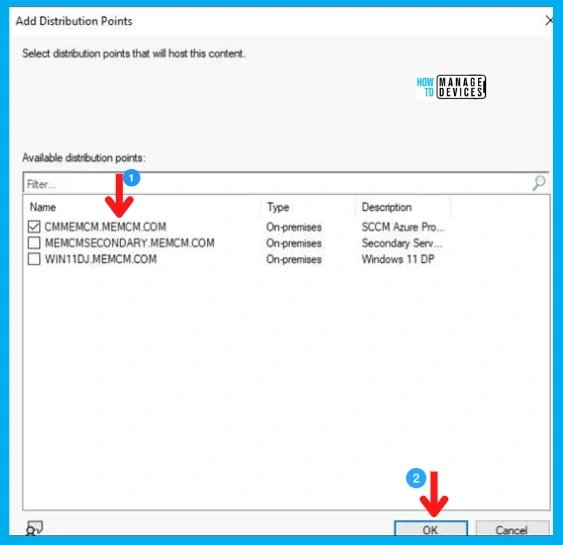
Then Add Distribution Point page will pop up, choose the Distribution Point on which you want to distribute the Application and click on OK, and then on Next.
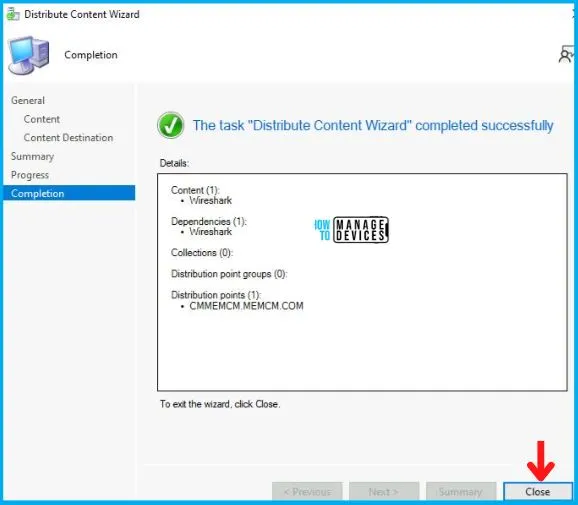
After this, Click Next on Summary Tab and complete this Distribution process by clicking Close on Completion Tab.
Deploy Wireshark using SCCM
So as of now, we have accomplished two tasks i.e., Application Creation and Application Distribution to the DP. Now all that is left is the Deployment of the Wireshark on the All Windows 10 Device Collection.
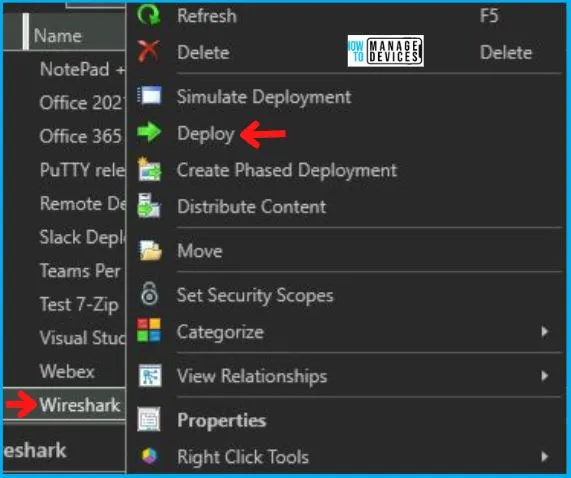
As you can see, your Application is displaying in Application Node, Right-click on Wireshark and select Deploy.
After this, Deploy Software Wizard opens, and in the General Tab, enter the Name of the Application and click on Browse to select the Collection.
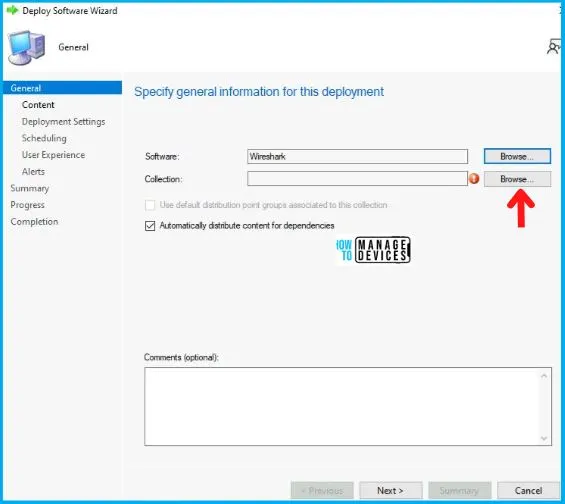
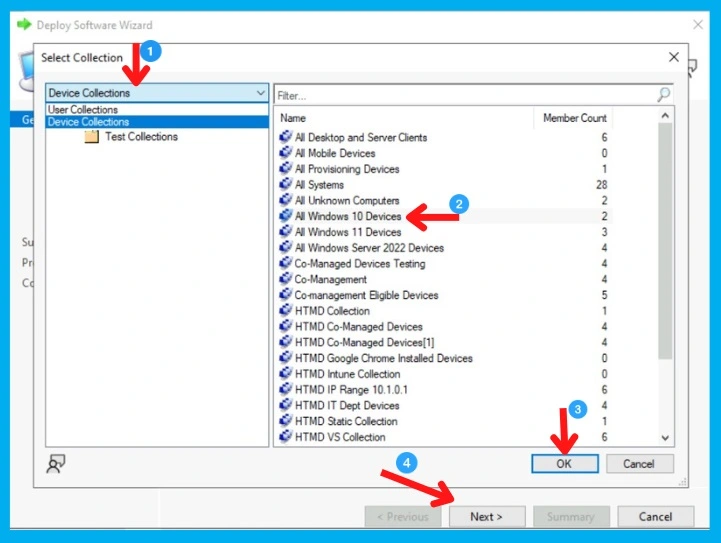
Now the Select Collection page will pop up; choose Device Collection from the drop-down menu, and then
- Select your targeted Device Collection and click on OK, and then Next.
- Here I choose All Windows 10 Devices.
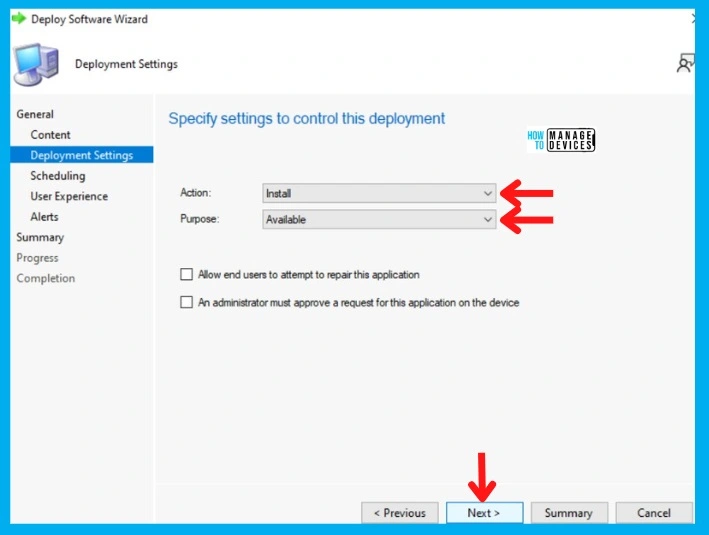
Now in the Deployment Settings Tab, select:
- Install in the Action box
- And choose Available in the Purpose category.
In the Scheduling Tab, enter the time details if you want it to be available at a specific time; otherwise, leave it as it is and click Next. After this, in the User Experience Tab,
- Select Display in Software Center and shows all notification options in the User
- Select Display in Software Center and shows all notification options in the User notifications, and click on Next as shown below.
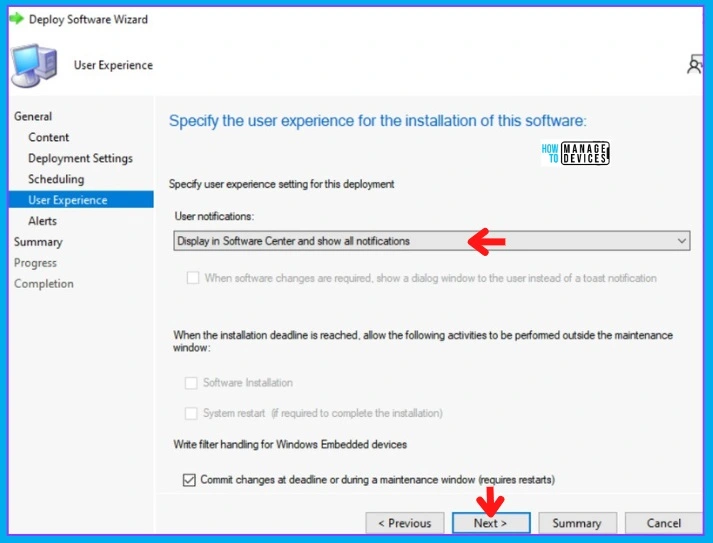
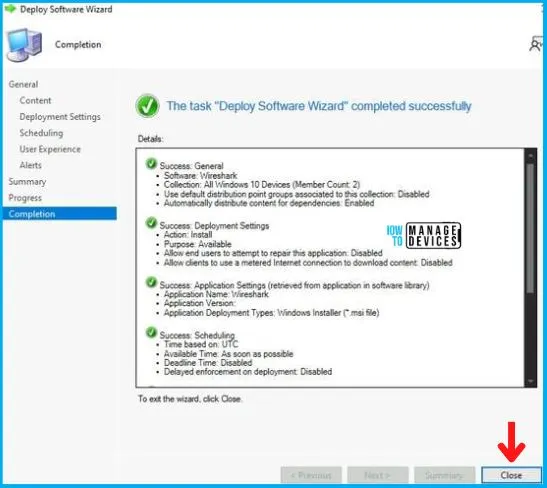
In the Alerts and Summary Tab, click on Next and to end the process, click on Close in the Completion Tab.
- Insiders Guide SCCM Application Model Troubleshooting
- Deep Dive SCCM Application Model Troubleshooting – Client End
Time to Login to Windows Machine
In this section, we will check the end-user experience for Wireshark Application Deployment and Installation. The Wireshark Application is Created, Distributed, and Deployed.
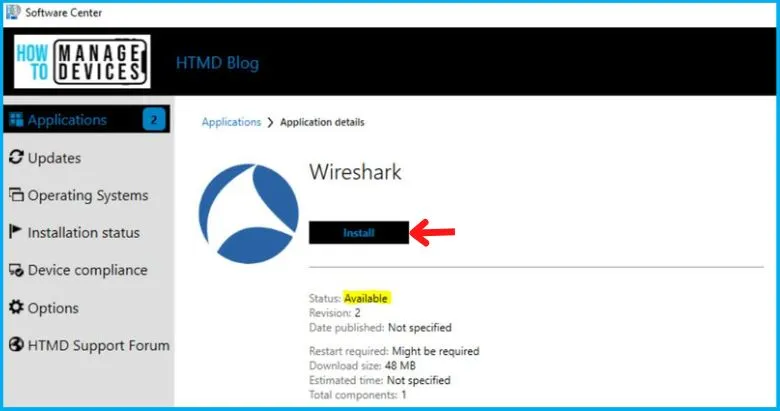
Now, if you check the Software Center of Win 10 device from the Windows 10 Device (or All Windows 11 Device) Collection, you will see the Application in Available Mode, and the user can install it as per the requirement.
As you can see in the below screenshot, the Wireshark Application is installed successfully on Windows 10/11 devices. This proves that the above MSI installer works fine for Wireshark Application Installation using SCCM.
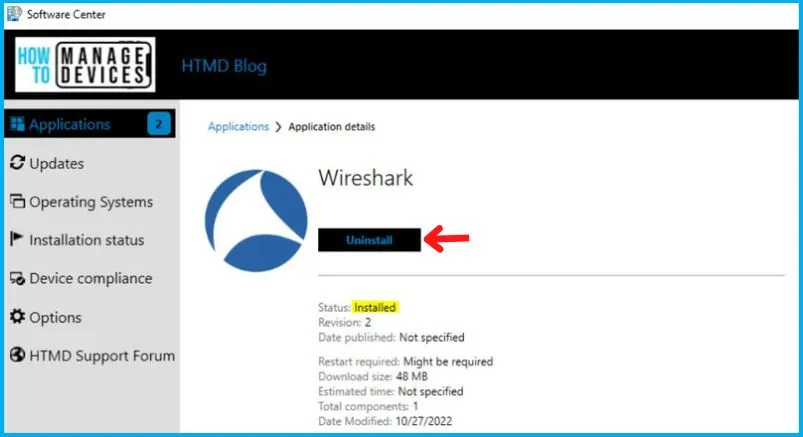
So the above picture depicts that we have finally created, Distributed, Deployed, and Installed the Wireshark Application shown in the Software Center as shown in the above image.
Author
Abhinav Rana is working as an SCCM Admin. He loves to help the community by sharing his knowledge. He is a BTech graduate in Information Technology.

Discussion