






Control Edge Extensions from External Stores using Intune Policy
Let’s discuss Control Edge Extensions from External Stores using Intune Policy. Microsoft Edge provides different extensions to enhance the browser’s functionality. The extensions are small software programs that helps to add new features, modify behaviour etc.
As you know that, usually Microsoft Edge allows its own extensions through the official Microsoft Edge Add-ons store. But with Configure default state of Allow extensions from other stores setting policy you can install extensions from other stores like, Chrome Web Store.
This policy provides many security benefits for your organization. If you enable this policy you can install extensions from the Chrome Web Store, which has a much larger catalog than the Edge Add-ons store. By using other store extensions you can enhance productivity.
By configuring this policy, users will get expanded extension access with thousands of additional productivity, security, and customization options. An an Admin you can ensure that all users get customization experience on Microsoft Edge browser.

Table of Contents
Control Edge Extensions from External Stores using Intune Policy
Let me explain with an example. Imagine if you are managing, a software development team uses Microsoft Edge as their default browser. Your organization want to use tools such as React Developer Tools, Postman Interceptor, and JSON Formatter which are only available on Chrome Web Store.
By implementing this policy in Microsoft Edge, you can access these tools within the Microsoft Edge browser. There is no need to switch to another browser.
- How to Enable Preload of the New Tab Page in Edge for Faster Rendering Using Intune
- Enable Disable Show Home Button in MS Edge Using the Microsoft 365 Admin Center
- Enable Disable Search Bar Allowed in Edge Through Microsoft 365 Admin Center Policy
Steps to Configure Extensions from Other Stores Setting
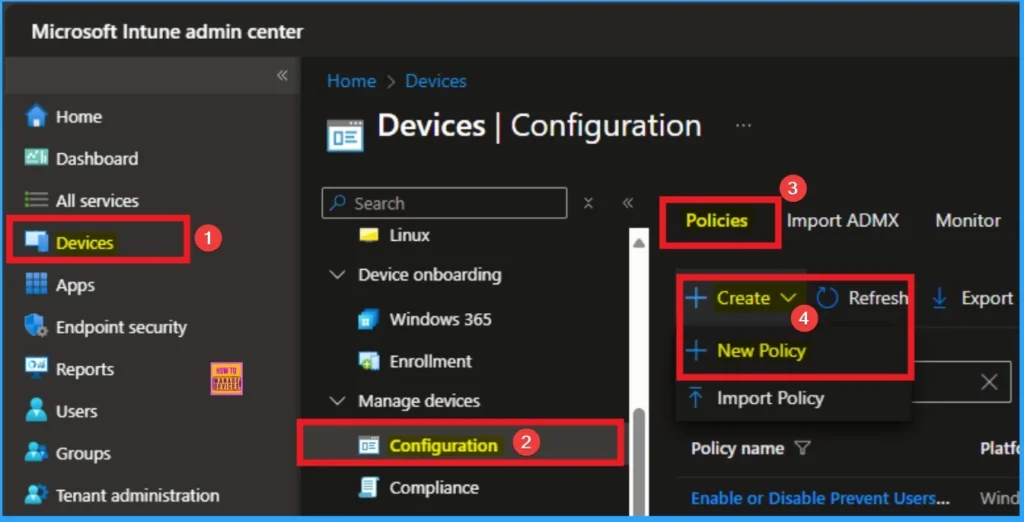
With Microsoft Intune admin center you can easily configure this policy. Settings Catalog allows you to configure Extensions from Other Stores policy. Open Microsoft Intune admin center. From Policies, click on the + Create button and select +New Policy. Go to Devices > Configuration.
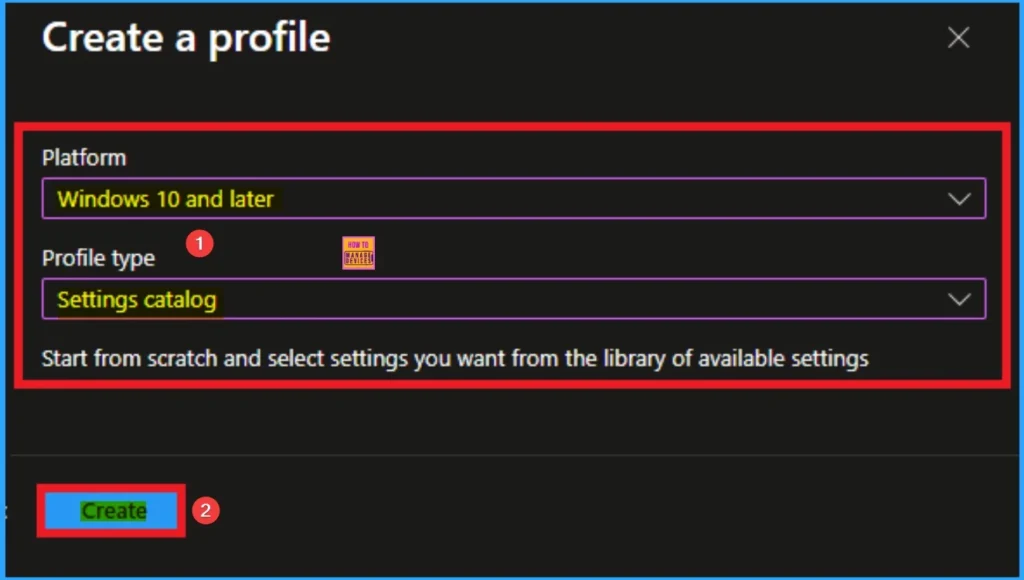
Profile Creation
Profile Creation is an important part in Intune Policy creation. In this stage you can select platform and profile for your policy. It helps you to efficiently configure the policy to specific devices. Here I selected Windows 10 and later as the Platform and Settings catalog as the profile type. Then click on the Create button.
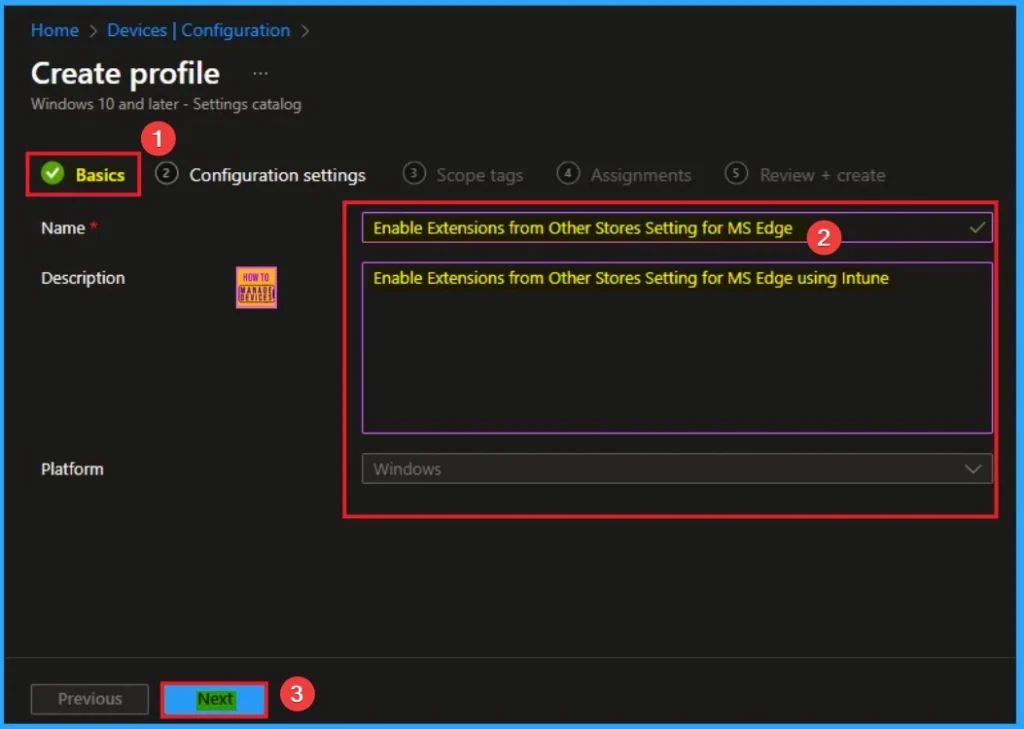
Beginning Step
After that you can give a name for your policy. The Name and Description is necessary to understand the purpose of the policy. Here Description is optional and Name is mandatory. After adding this click on the next button.
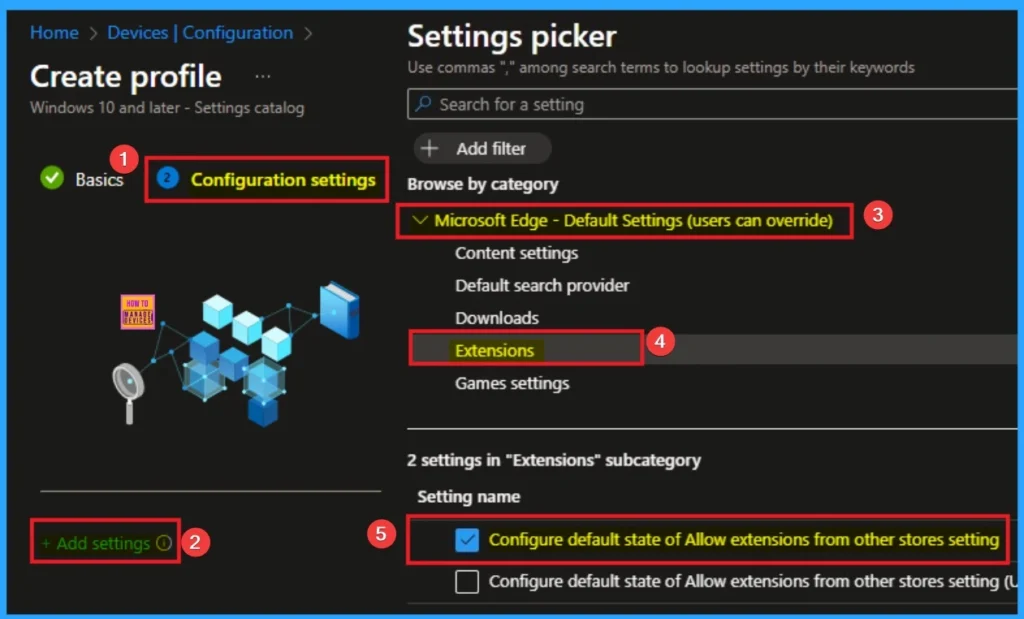
Configure the Extensions from Other Stores Settings
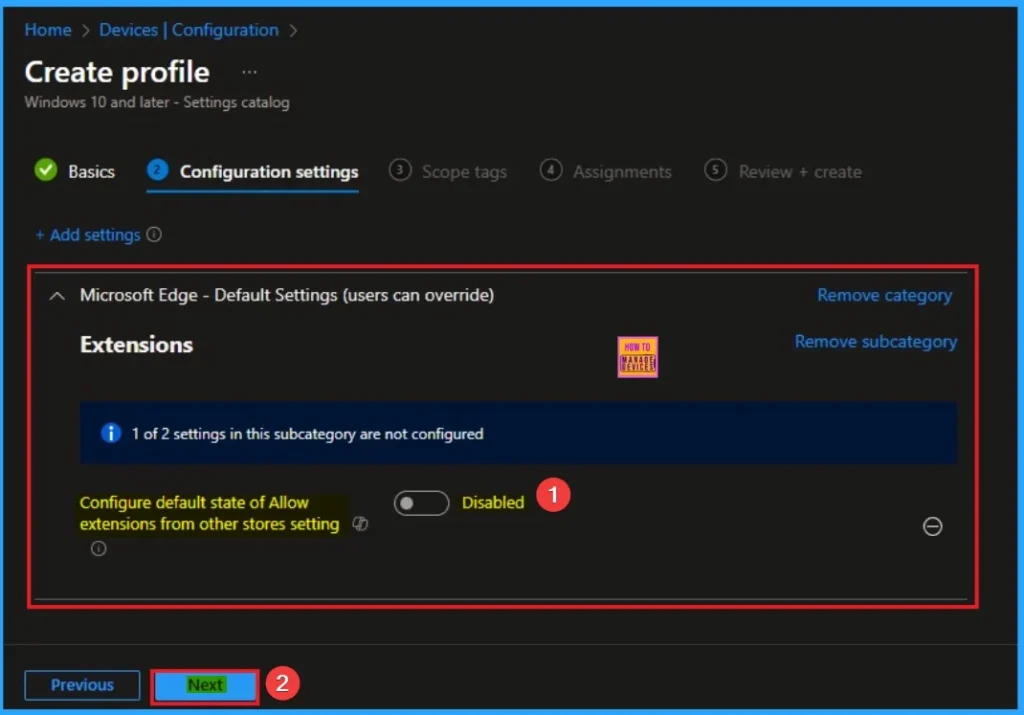
Configuration Settings tab helps you to select specific settings to configure the policy. o select a setting, click on the +Add settings hyperlink. Then you will get Settings Picker. After that, you will get the Settings Picker. Here I choose Microsoft Edge – Default settings (Users can override) and Choose Extensions. From this sub category I choose Configure default state of Allow extensions from other store settings.
Disable Extensions from Other Stores Policy
If you are choosing Disable value for this policy you can improve the security. When you disable this policy users are only permitted to use extensions form Edge Add-ons. It has only Microsoft verified extensions. The default value is disable. If you are go with this click on the Next Button.
Enable Extensions from Other Stores Policy
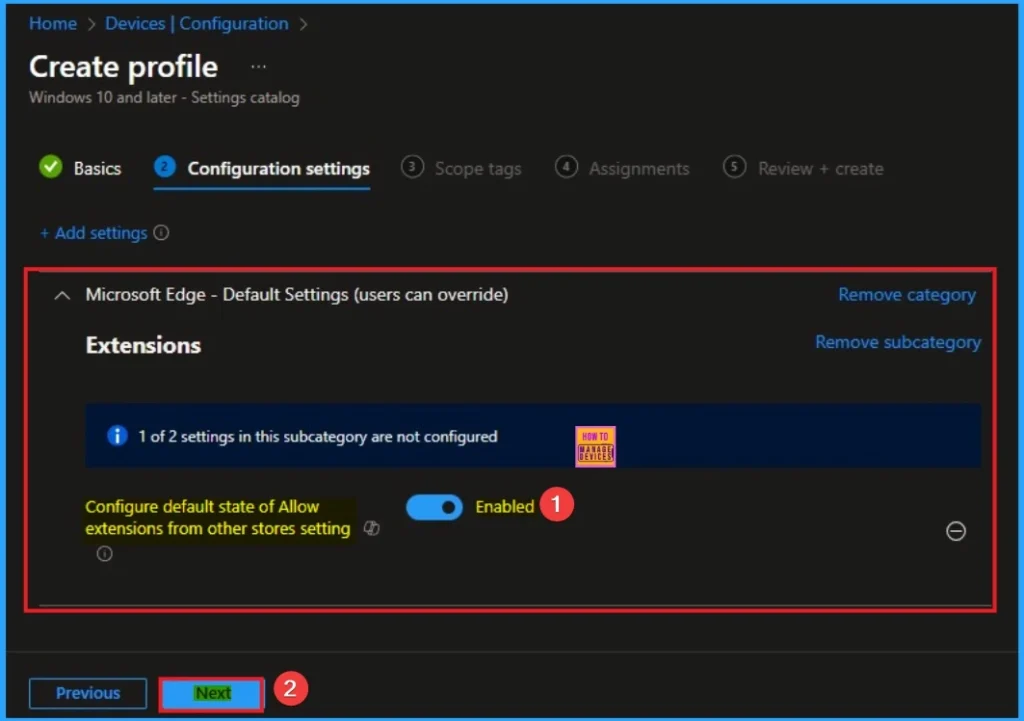
By enabling the policy you can access widely used extension from other stores. You can enable the functionality by enabling the policy. Here I enable this policy and click on the Next button.
Scope Tags
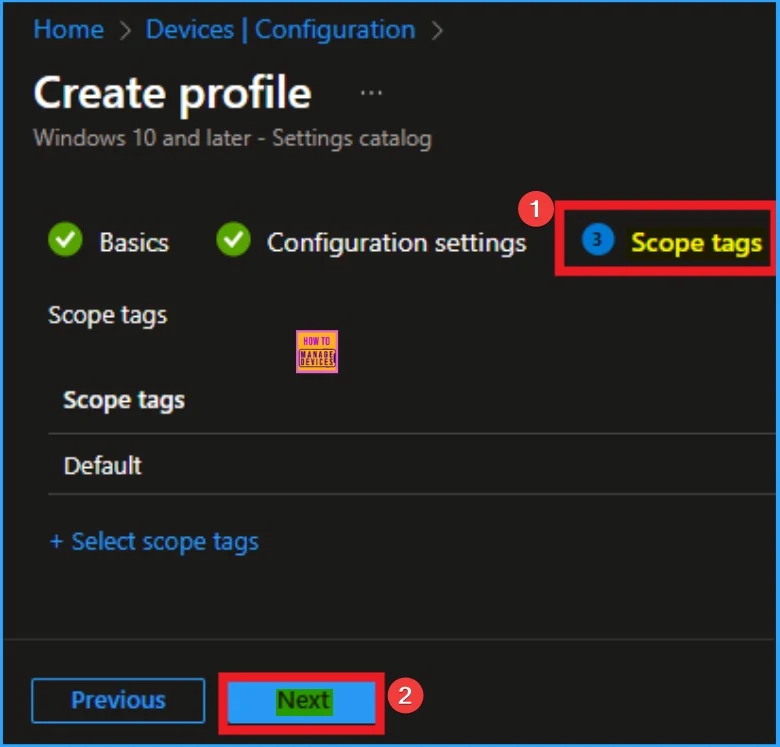
By using scope tags, you can restrict the visibility of the Preload of the New Tab Page in MS Edge. It is helps to organise resources as well. Here I would like to skip this section, because it is not mandatory. Click on the Next button.
Assign this Policy to Specific Groups
The assignment tab helps you to assign the policy to specific Entra Groups. Here I click, +Add groups option under Included groups. I choose a group from the list of groups and click on the Select button. Again, I click on the Select button to continue.
Complete Policy Creation with Review + Create Tab
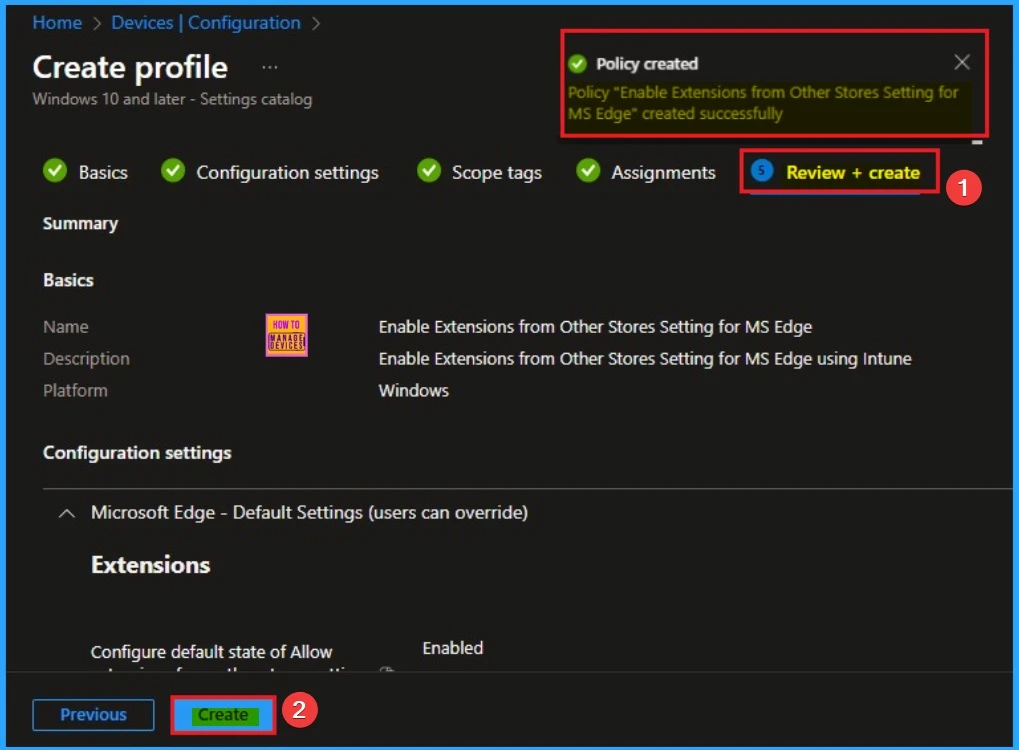
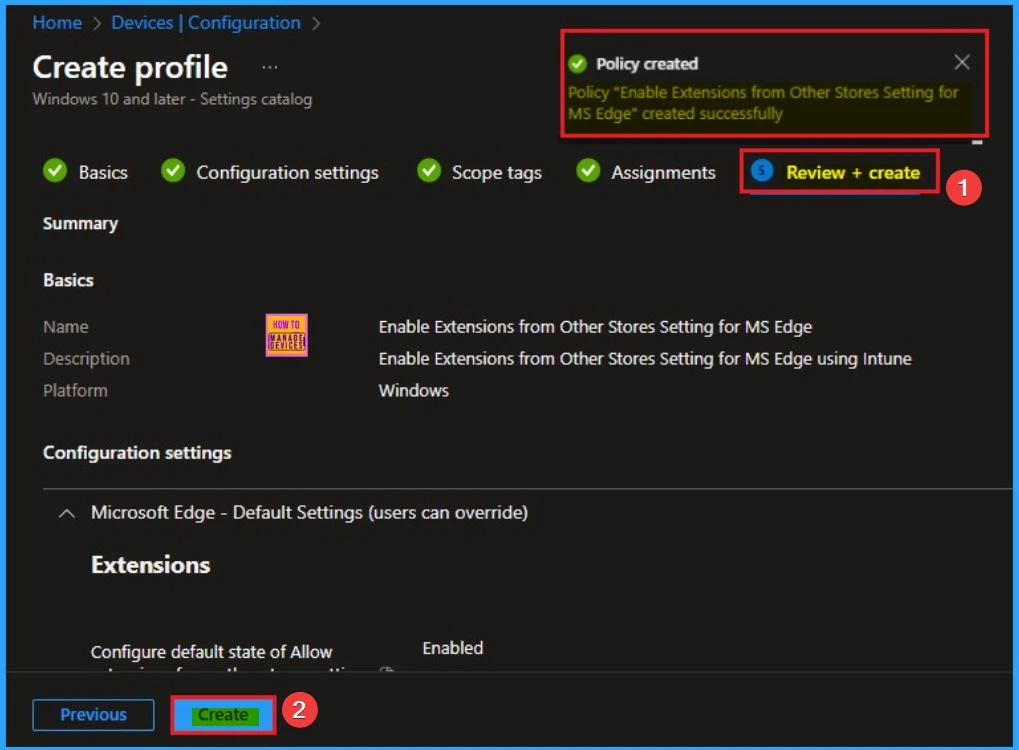
To complete the policy creation you can review all the policy details on the Review + create tab. It helps to avoid mistakes and successfully configure the policy. After verifying all the details, click on the Create Button. After creating the policy you will get success message.
Monitoring Status
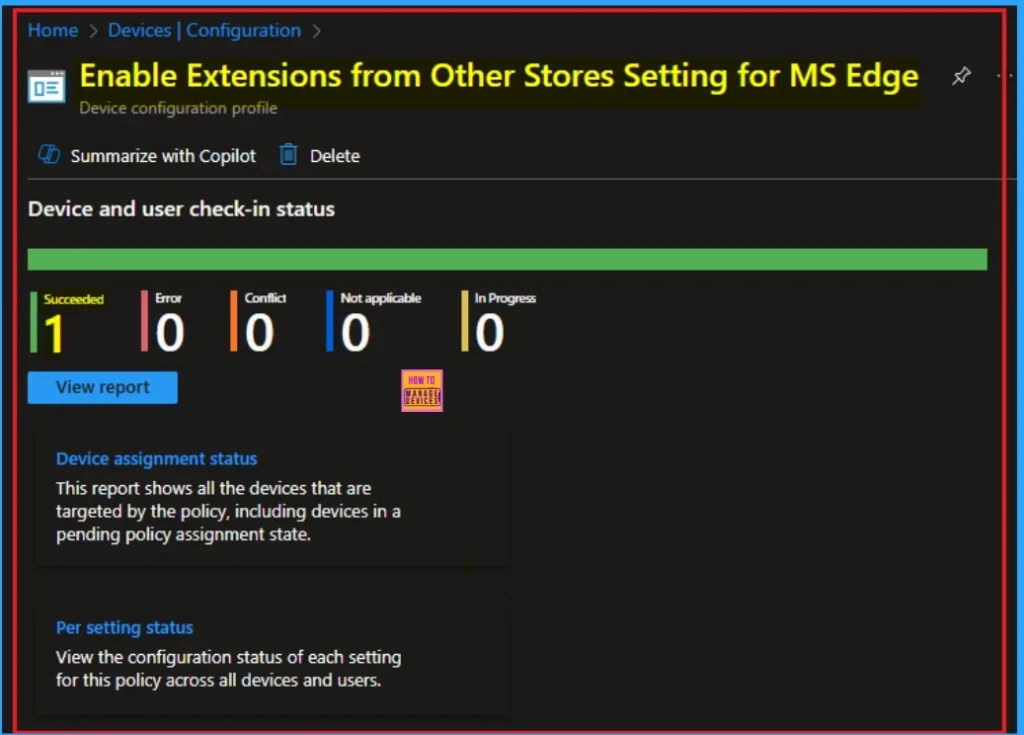
To quickly configure the policy and take advantage of the policy sync the assigned device on Company Portal. Open the Intune Portal. Go to Devices > Configuration > Search for the Policy. Here, the policy shows as succeeded.
Client Side Verification with Event Viewer
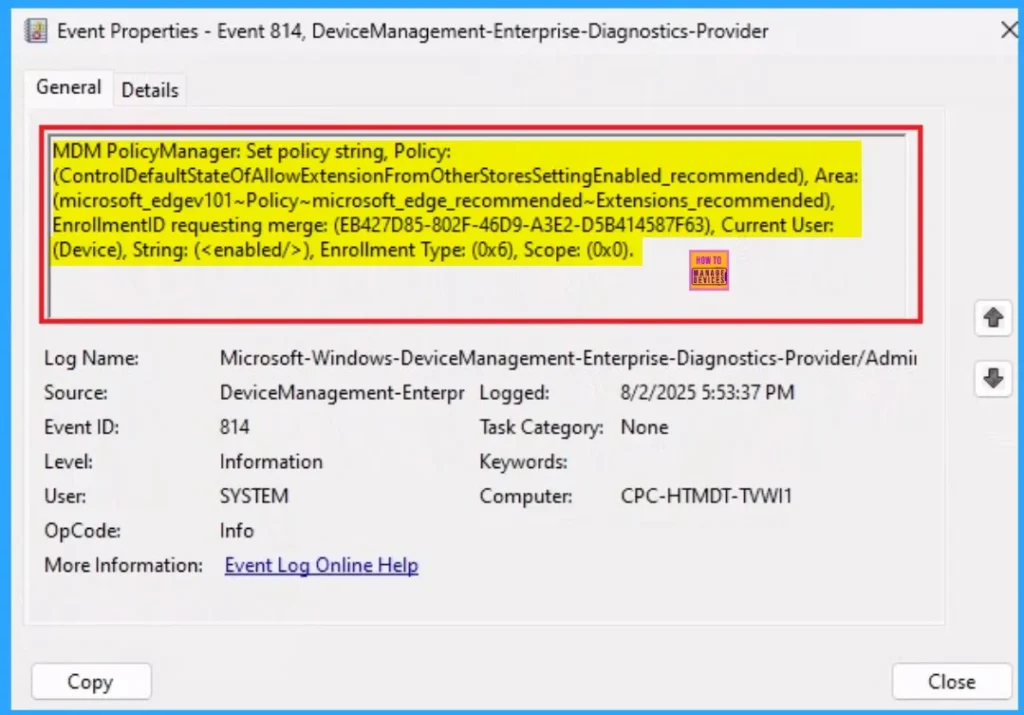
If you get success message, that doesn’t means you will get the policy advantages. To verify the policy successfully configured to client device check the Event Viewer.
- Open Event Viewer: Go to Start > Event Viewer.
- Navigate to Logs: In the left pane, go to Application and Services Logs > Microsoft > Windows > DeviceManagement-Enterprise-Diagnostics-Provider > Admin.
- Filter for Event ID 814: This will help you quickly find the relevant logs.
| Event ID Details |
|---|
| MDM PolicyManager: Set policy string, Policy: (ControlDefaultStateOfAllowExtensionFromOtherStoresSettingEnabled_recommended), Area: (microsoft_edgev101~Policy~microsoft_edge_recommended~Extensions_recommended), EnrollmentID requesting merge: (EB427D85-802F-46D9-A3E2-D5B414587F63), Current User: (Device), String: (), Enrollment Type: (0x6), Scope: (0x0). |
Removing the Assigned Group from Extensions from Other Stores Policy
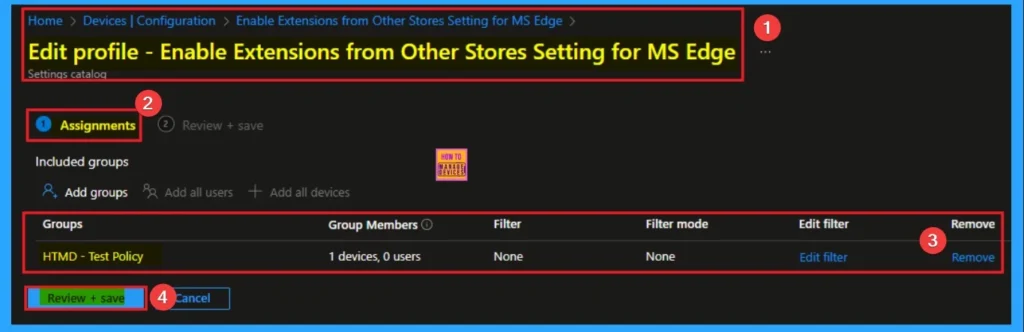
If you want to remove the Assigned group from the policy, it is possible from the Intune Portal. To do this, open the Policy on Intune Portal and edit the Assignments tab and the Remove the Policy.
To get more detailed information, you can refer to our previous post – Learn How to Delete or Remove App Assignment from Intune using by Step-by-Step Guide.
How to Delete Microsoft Account Connection Settings
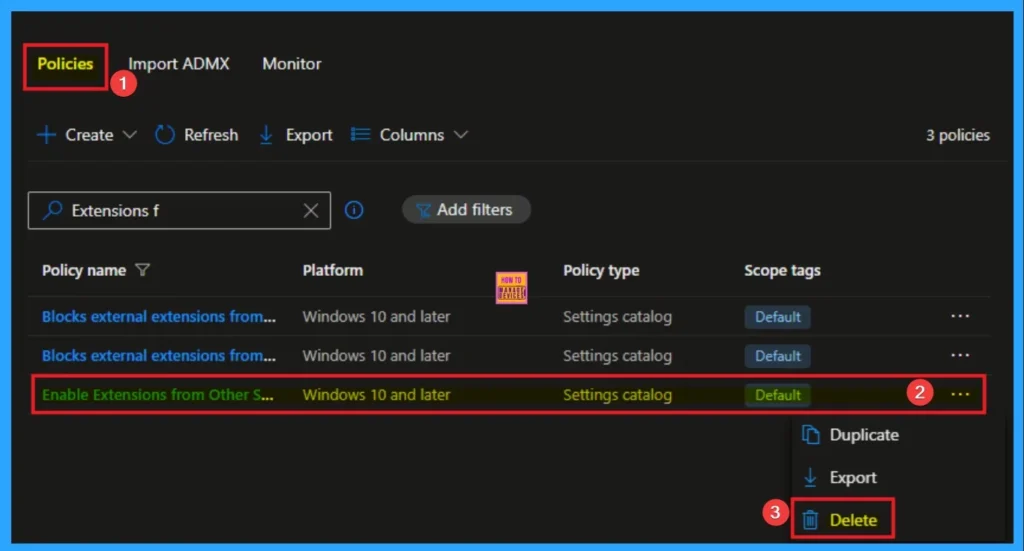
You can easily delete the Policy from Intune Portal From the Configuration section you can delete the policy. It will completely remove from the client devices.
For detailed information, you can refer to our previous post – How to Delete Allow Clipboard History Policy in Intune Step by Step Guide.
Need Further Assistance or Have Technical Questions?
Join the LinkedIn Page and Telegram group to get the step-by-step guides and news updates. Join our Meetup Page to participate in User group meetings. Also, Join the WhatsApp Community to get the latest news on Microsoft Technologies. We are there on Reddit as well.
Author
Anoop C Nair has been Microsoft MVP for 10 consecutive years from 2015 onwards. He is a Workplace Solution Architect with more than 22+ years of experience in Workplace technologies. He is a Blogger, Speaker, and Local User Group Community leader. His primary focus is on Device Management technologies like SCCM and Intune. He writes about technologies like Intune, SCCM, Windows, Cloud PC, Windows, Entra, Microsoft Security, Career, etc.


Discussion