






How to Allow or Block Email Scanning using Intune Policy
Let’s discuss how to Allow or Block Email Scanning using Intune Policy. Intune and Microsoft Defender Antivirus work together to protect your devices. With Intune, you can manage all your antivirus settings for Windows and other devices from one central place.
The Email scanning setting in Intune makes Microsoft Defender Antivirus check your email and attachments for malware when it scans your device. This protects you from dangerous emails like phishing and viruses. It works with email programs like Outlook during all types of scans and also looks inside attachments and compressed files.
When email scanning is enabled, the engine analyzes your mailbox and email files. It checks email content and attachments in formats like PST (Outlook), DBX, MBX, MIME (Outlook Express), and BinHex (Mac). However, email scanning does not work with modern email clients.
Enabling this setting activates the email scanning functionality. If you choose to disable this setting or leave it unconfigured, the email scanning feature will remain inactive. This allows you to control whether the system analyzes email messages for potential threats.

Table of Contents
What are “Allowed Values” in the Microsoft Intune Settings Catalog?
Allowed Values in the Intune Settings Catalog are simply the specific choices you have for configuring a setting in a policy. These choices dictate exactly how a particular setting will function on a device, such as turning it on (enabled), turning it off (disabled), or activating a specific feature.
Allowed Values of Allow Email Scanning is given below:
0 (Default) : Not allowed. Turns off email scanning
1 : Allowed. Turns on email scanning.
How to Allow or Block Email Scanning using Intune Policy – Windows CSP – Defender
The Windows Defender CSP is a collection of settings that lets administrators use MDM tools like Intune to configure and manage Microsoft Defender Antivirus features on devices. This allows for consistent security policies and control over Defender settings throughout an organization.
Description framework properties of the Allow Email Scanning policy are given below.
| Property Name | Property Value |
|---|---|
| Format | int |
| Access Type | Add, Delete, Get, Replace |
| Default Value | 0 |
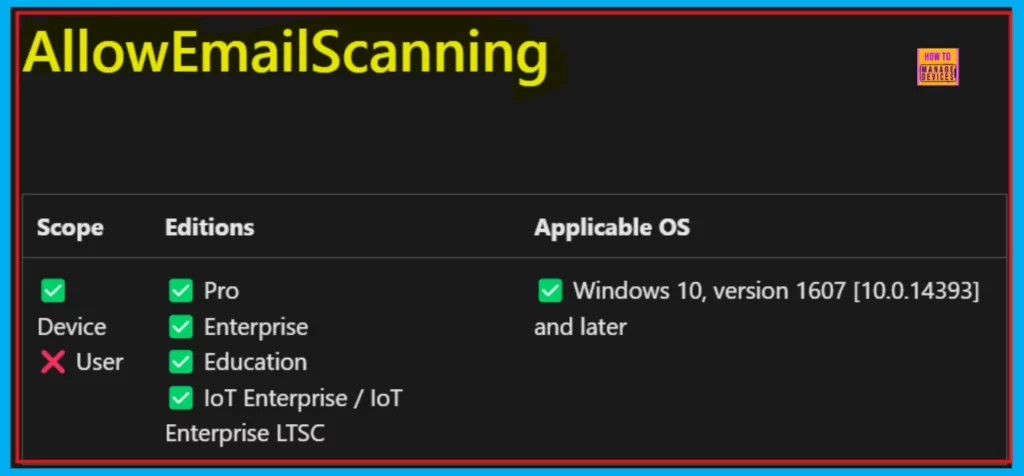
./Device/Vendor/MSFT/Policy/Config/Defender/AllowEmailScanning
- Latest Microsoft Defender Antivirus Configuration Policy Settings In Intune
- Enable or Disable Hotspot Authentication in Networks using Intune Policy
- Enable or Disable Web-to-App Linking with App URI Handlers in Windows using Intune Policy
How to Allow or Block Email Scanning using Intune Policy
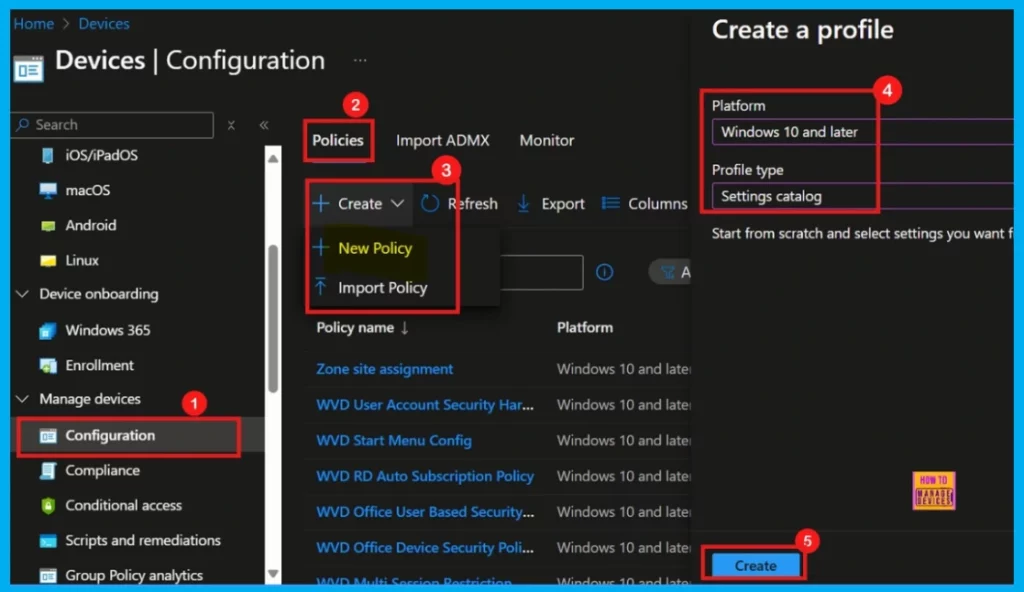
To enable or disable Allow Email Scanning, we first need to create a profile after signing in to the Microsoft Intune Admin Center. Open the Intune admin center and select Devices then Configurations. Click + Create on the right and pick New Policy.
- Now, the Create a Profile page is displayed.
- Select the Platform as Windows 10 and later.
- Choose the Profile type as Settings Catalog.
- Click the Create button to proceed.
Basics
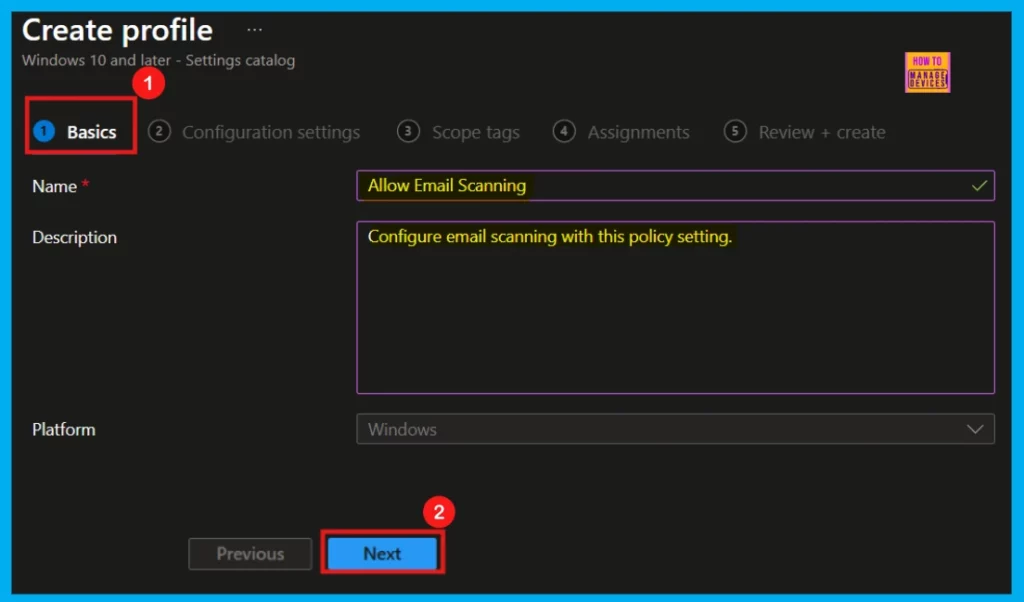
The Basic tab is where we start creating the policy. Here, we can give the policy a Name (which we must do) and optionally add a Description. Once we have entered this information, click Next to continue.
- Policy Name: Allow Email Scanning
- Description: Configure email scanning with this policy setting
- Platform: Windows
Configuration Settings
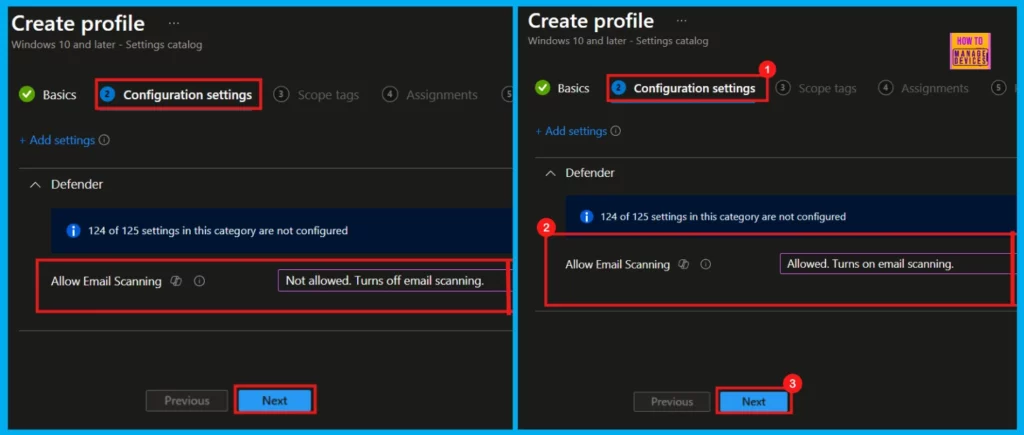
On the Configuration Settings tab, we will find various policy options. To begin, click +Add settings, where we can see the Settings Picker. From the available categories, select Defender, and then choose the Allow Email Scanning setting. After selecting it, we can close the Settings Picker to proceed with configuring the policy.
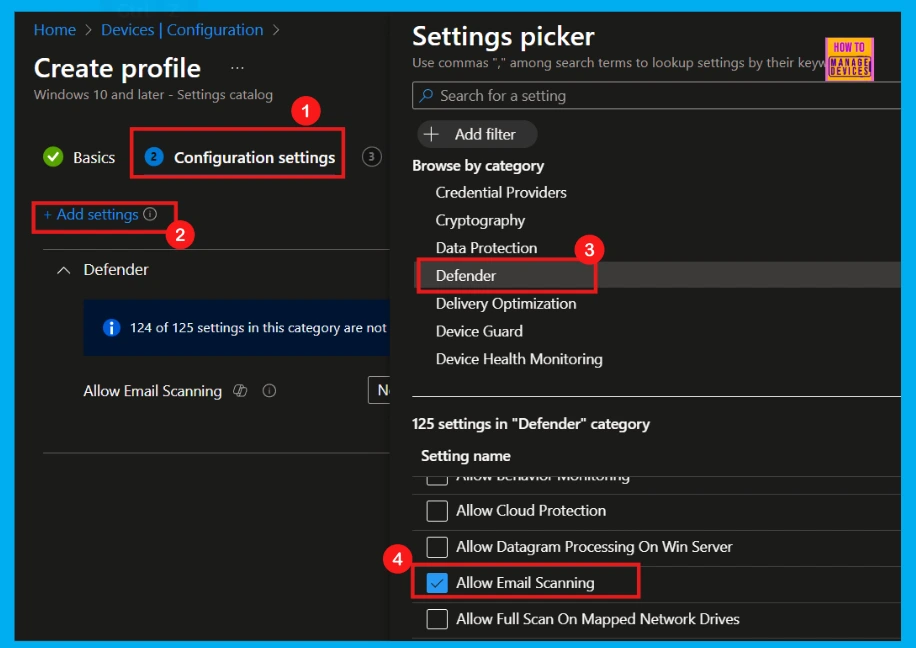
After closing the Settings Picker, the policy we chose will now be visible in the Configuration Settings. By default, the Allow Email Scanning setting is disabled (not allowed). If you’re satisfied with this, simply click the Create button to finalize it.
However, for this specific scenario, the goal is to enable email scanning. Therefore, from the dropdown menu associated with the Allow Email Scanning setting, I will select the Allowed (Turn on email scanning) option.
- Click Next to move on.
Scope Tags
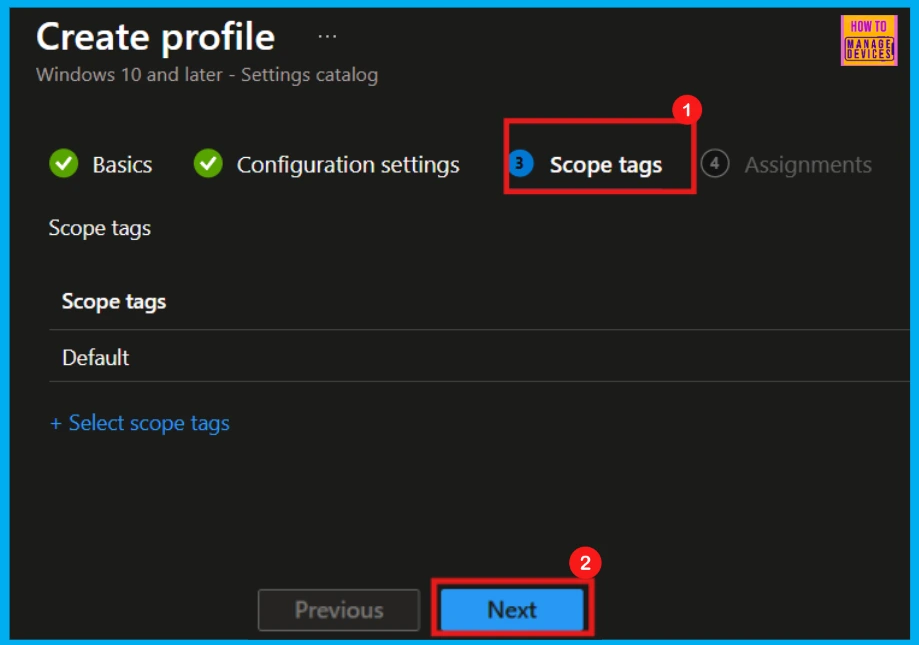
Scope tags allow us to apply this policy to specific groups of users or devices. This step is optional, so we can easily skip it if we don’t need it. In this case, I’ll skip this section and click the Create button.
Assignments
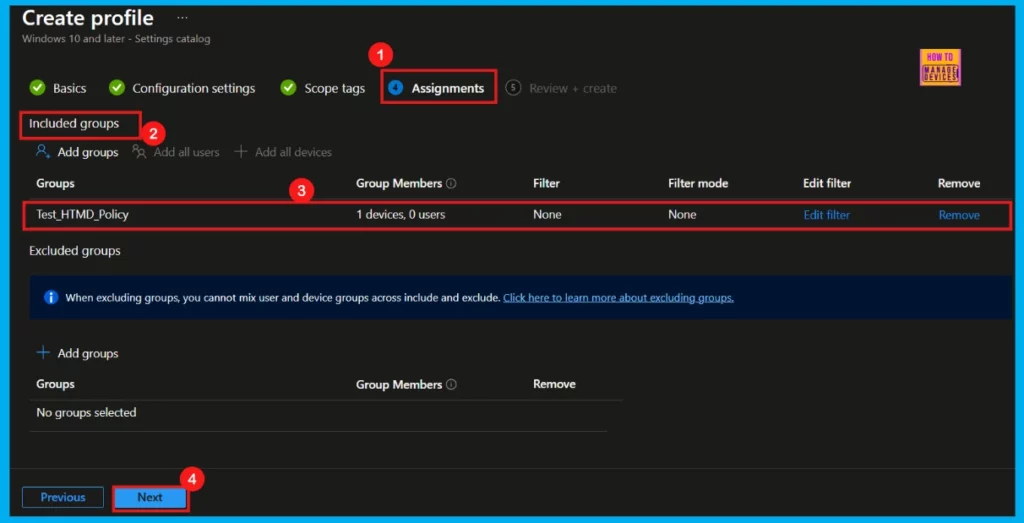
The Assignments tab is where we can choose the specific groups, we want to apply the Allow Email Scanning policy to. To do this, click the +Add groups option under Included groups and then select the desired group from the list available in your tenant.
- Here, I select Test_HTMD_Policy as the group.
- Click on the Select button.
- Click on the Next button to proceed.
Review + Create
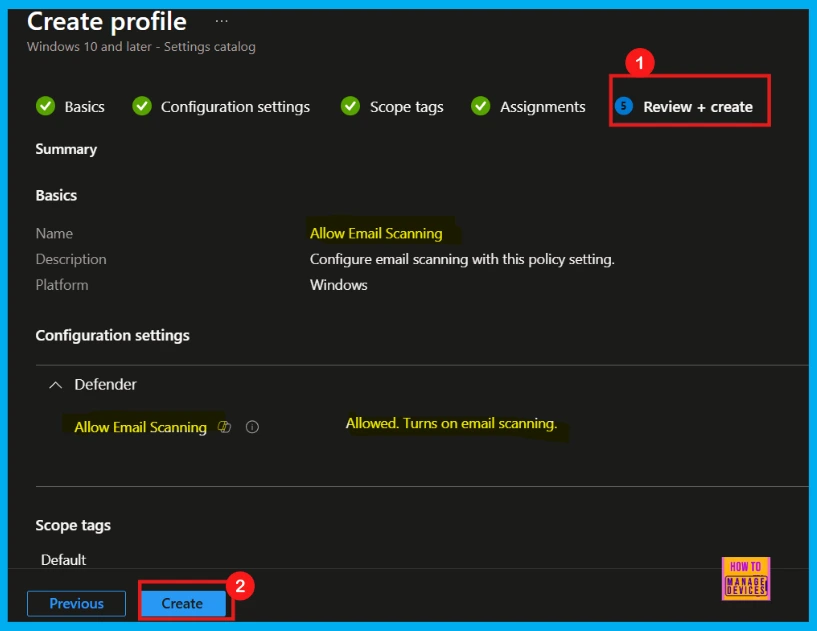
On this final Review + Create page, we can see the summary of the policy details which we are given in the previous steps. Double-check all the details of the policy and if everything looks correct, click the Create button.
Monitoring Status
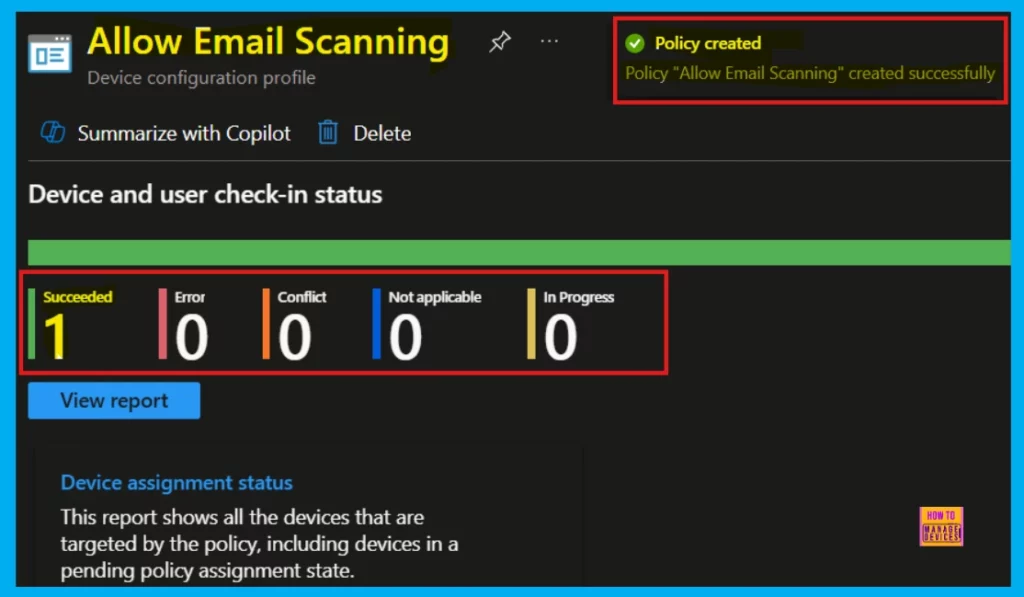
Once click Create, we will get a confirmation that the policy was created successfully. For quicker deployment, we can manually sync the device in the Company Portal. Afterwards, we can track the deployment status in the Company Portal’s monitoring section. In this case, the Status shows succeeded (1).
Client Side Verification – Event Viewer
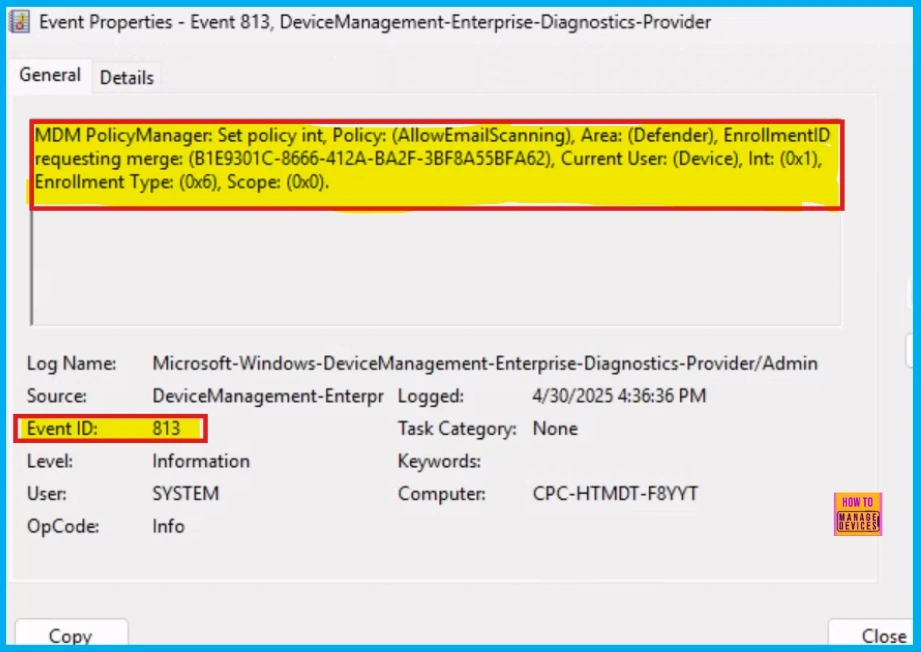
To easily check if the policy has been applied on the client side, we can use the Event Viewer. Open it and go to this location: Application and Services Logs > Microsoft > Windows > DeviceManagement–Enterprise–Diagnostics–Provider > Admin.
MDM PolicyManager: Set policy int, Policy: (AllowEmailScanning), Area: (Defender), EnrollmentID requesting merge: (B1E9301C-8666-412A-BA2F-3BF8A55BFA62), Current User: (Device), Int: (0x1), Enrollment Type: (0x6), Scope: (0x0).
Remove Group Assignment from Allow Email Scanning Policy
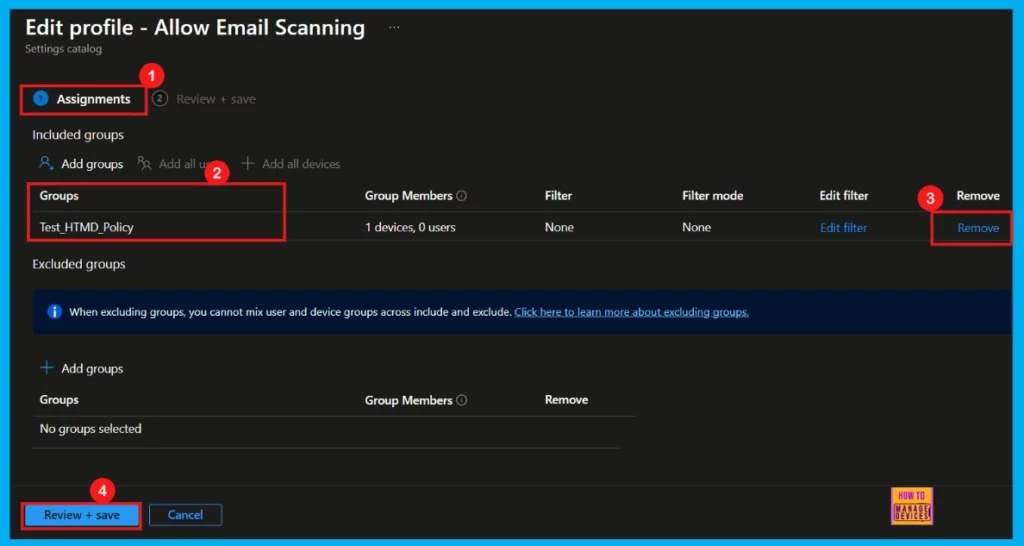
If you need to remove an assigned group from the Allow Email Scanning Policy, simply open the policy, navigate to the Assignment tab, and then select the Edit option. You can find further details on how to do this in the post below.
Learn How to Delete or Remove App Assignment from Intune using Step by Step Guide
How to Delete Allow Email Scanning Policy
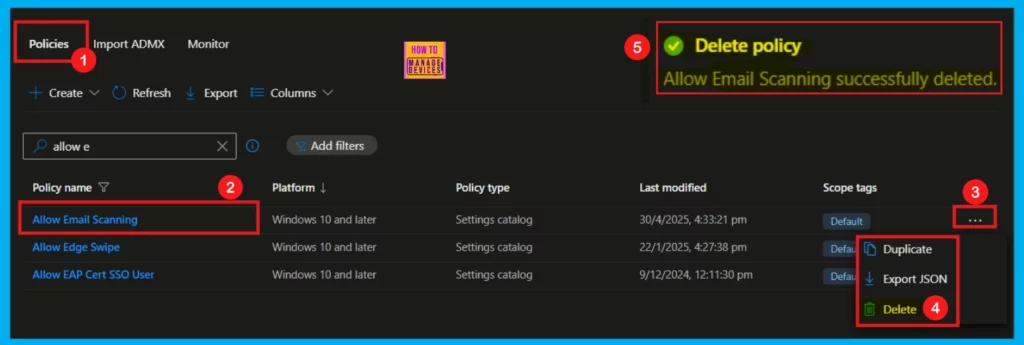
Deleting a policy from Intune is straightforward. For security reasons, administrators might need to remove policies. You can easily do this through a few simple steps in the Intune Portal.
- Intune Admin Center > Devices> Configuration > Policies
- Select Allow Email Scanning policy
- Click on the 3 dots(…) option and Click on the Delete button.
- Now you will see, Are you sure want to delete Allow Email Scanning using Intune Settings Catalog? Click Delete.
- Upon clicking the Delete button, Intune will display a notification confirming the successful deletion of the policy.
For more information you can refer our previous post – How to Delete Allow Clipboard History Policy in Intune Step by Step Guide
Need Further Assistance or Have Technical Questions?
Join the LinkedIn Page and Telegram group to get the latest step-by-step guides and news updates. Join our Meetup Page to participate in User group meetings. Also, Join the WhatsApp Community to get the latest news on Microsoft Technologies. We are there on Reddit as well.
Author
Anoop C Nair has been a Microsoft MVP for 10 consecutive years from 2015 onwards. He is a Workplace Solution Architect with more than 22+ years of experience in Workplace technologies. He is a Blogger, Speaker, and Local User Group Community leader. His primary focus is on Device Management technologies like SCCM and Intune. He writes about technologies like Intune, SCCM, Windows, Cloud PC, Windows, Entra, Microsoft Security, Career, etc.


Discussion