






How to Change the Automatic Sleep Settings in Windows 11
Hi, today in this post, we are discussing a new topic: How to Change the Automatic Sleep Settings in Windows 11. Windows 11 is the latest operating system known for its user-friendly features, which allow users to work efficiently.
Regarding features, we must mention our device’s sleep mode. You all know that sleep mode is one of the best features for saving energy on our devices. Putting the screen to sleep saves power and reduces energy consumption.
When using a Windows 11 computer, you can customize the duration, after which the system automatically enters sleep mode. As we know, the system battery is essential for a user; if the energy is drained out quickly, that may affect our laptops, too.
System Timeout is essential for the device’s energy, so Windows 11 allows users to customize the Timeout. We can manually set the time for sleep timeout. This post discusses changing when to put a computer to sleep timeout in Windows 11.

- Windows 11 Checkpoint Cumulative Updates
- How to Change Handwriting Panel Font in Windows 11
- How to Change Text Cursor Thickness in Windows 11
- Fixing MS Edge Battery Drain Issue on Windows 11
- Multiple Methods to Open Disk Management in Windows 11
- 5 Ways to Check App Storage Space Usage in Windows 11
What is Sleep Mode in a Windows 11
How to Change the Automatic Sleep Settings in Windows 11
Above, we discussed an overall view of Sleep Timeout in Windows 11. Sleep timeout uses a small amount of power. Sleep mode is a quick break for your computer. When you’re not actively using a device, your PC takes a little power break. During this time, it saves your work and turns off the screen to save energy.
- You can customize how long your screen stays on when it’s not used.
- The energy level depends on how you put the sleep time out time duration
- Longer timeouts save more power, but shorter timeouts ensure quicker sleep activation.
- So let’s look into that When to Put Computer to Sleep Timeout in Windows 11
1. Change Sleep Timeout Through Settings
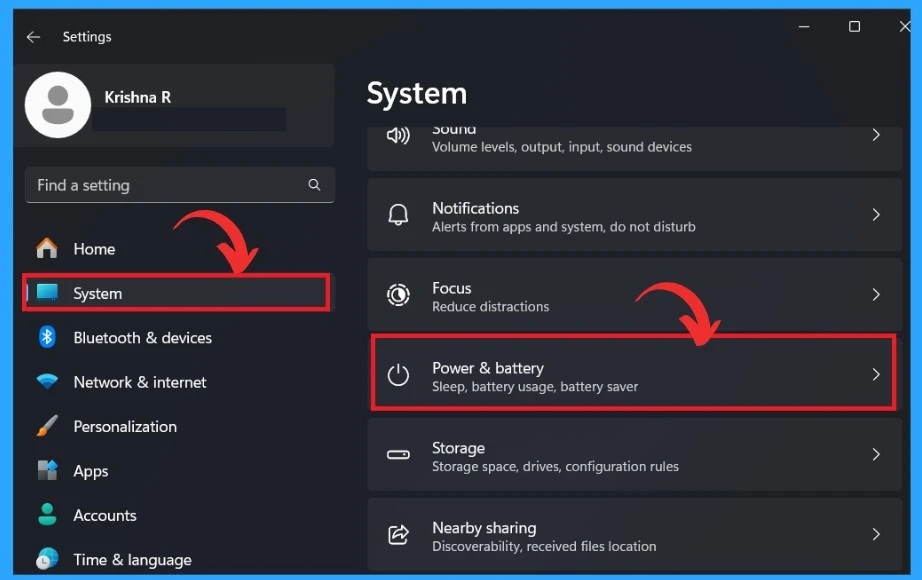
The first method uses the settings option to change the sleep timeout in Windows 1. You must open the Windows 11 settings using the Win+I key to do this. When the settings are opened, click the System option and select the Power and Battery option.
See More: Monitor Battery Usage by Apps in Windows 11
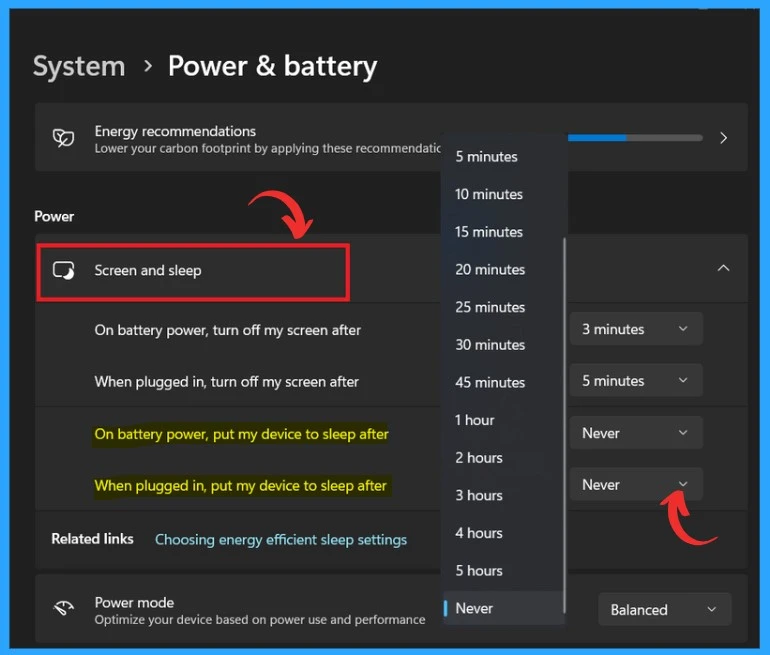
After opening the power and battery window, you can find the ‘‘Screen and sleep” option. Click on the drop-down arrow in the Screen and Sleep option. At that time, you will get the option to sleep time out. There are 4 options and particular times to easily set the screen timeout time. For example, I selected the Never option.
- The “Never” option means it won’t go to sleep automatically.
| Power Settings | Details |
|---|---|
| On battery power. Turn off my screen after | This option allows you to select how long your screen stays on when your computer runs on battery power. After the chosen time, the screen will turn off to save battery. |
| When plugged in, Turn off my screen after. | This option allows you to set the time when the screen turns off when your computer is plugged into a power source. |
| On battery power, put my device to sleep after | This setting allows you to see how long your computer waits before sleeping when it’s on battery power. |
| When plugged in put my device to sleep after | This setting controls the sleep timeout when your computer is plugged in. |
- How to Show or Hide Empty Drives in Windows 11
- Hide or Show Filmstrip in Photos App in Windows 11
- How to Stop Automatic Driver Installation in Windows11
- New Windows Update for Start Menu on Windows 11
2. Change Sleep Timeout Through the Control Panel
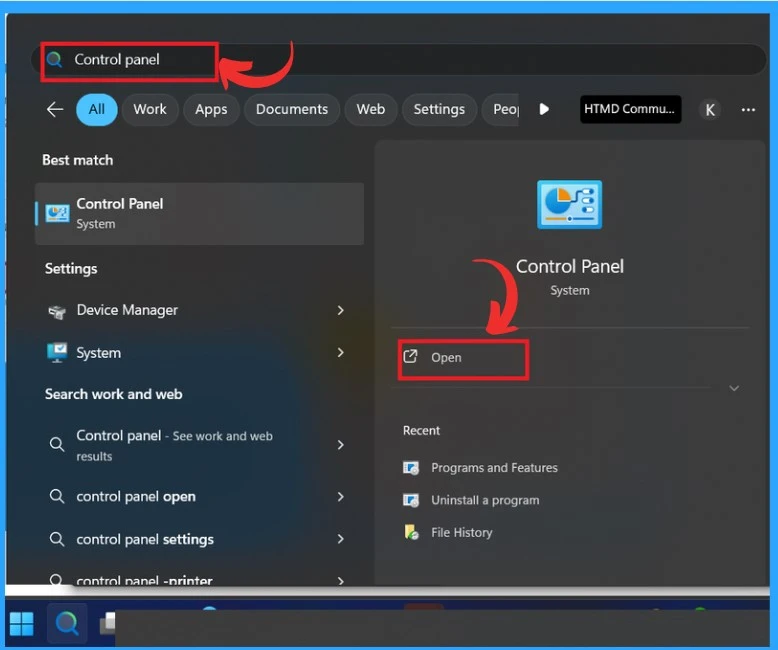
The next step is to Change Sleep Timeout Through the Control Panel. To do this, you first have to open the control panel and, to do so, search for the control panel using the search option in Windows 11.
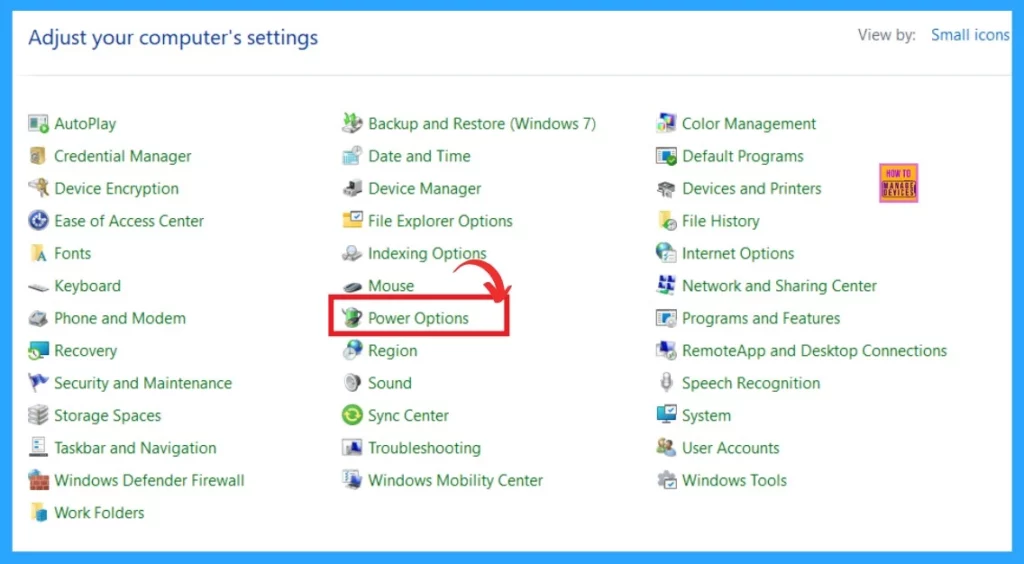
After opening the control panel, you will see many options for modifying system settings. In those options, you must concentrate on the “Power Options.” Click the Power options to proceed.
You may go to the next window when you click on the Power options. There are many other options for system power settings; you have to click on the option to ”change when the computer sleeps”.
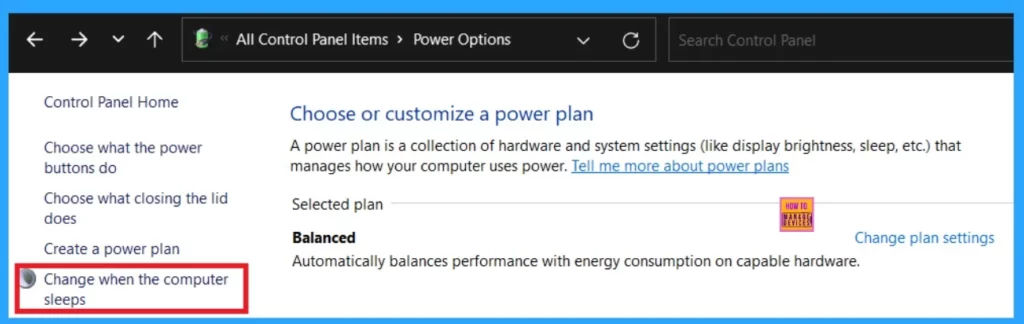
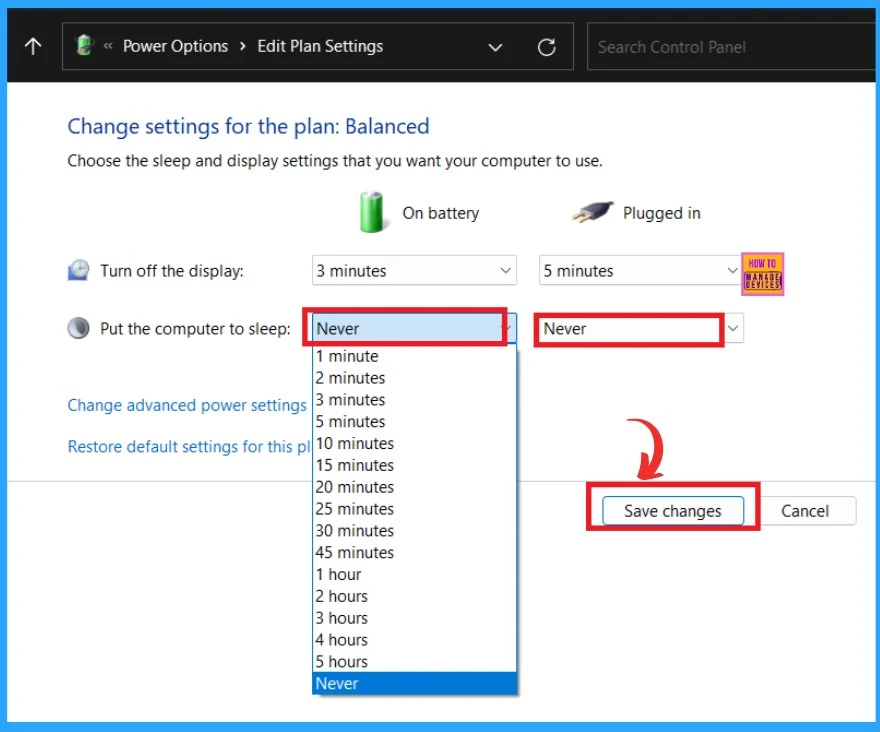
When you click “change when the computer sleeps,” you will see options to choose the sleep and display settings you want your computer to use. Choose “Never” or specify how long the computer should wait before it automatically goes to sleep when it’s running on battery power or plugged in. Then click on “Save changes.”
3. Change Sleep Timeout Through Advanced Power Plan Settings
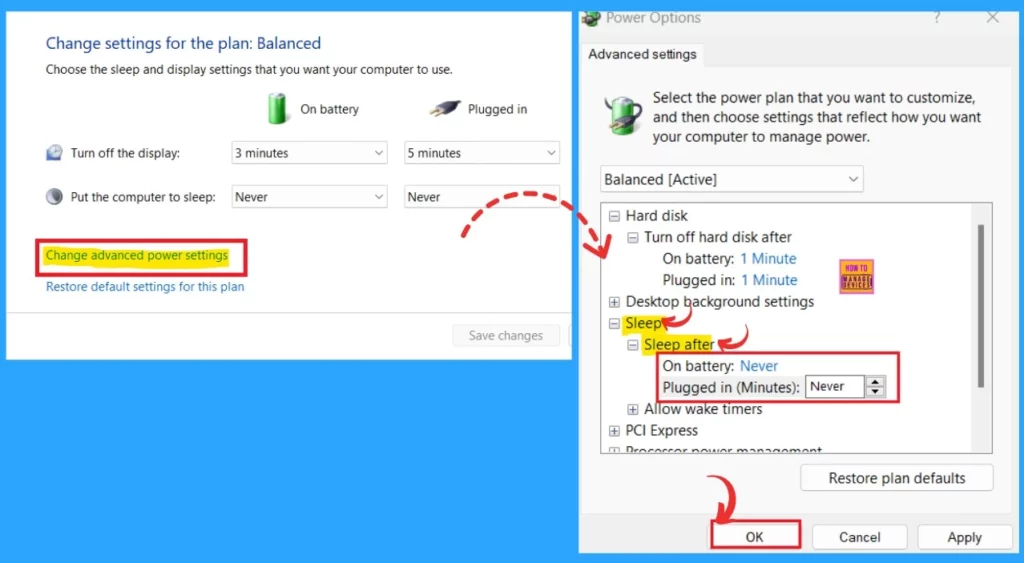
The next method is to Change Sleep Timeout Through Advanced Power Plan Settings. To access this method, go to Control panel>Power Options>Change when the computer sleeps. When the Change when the computer sleeps window opens, select Change advanced power settings.
- After clicking on the change advanced power settings.
- It opens the advanced Power plan settings.
- Maximize the option Sleep and then maximize Sleep after the option.
- Choose “Never” or decide how many minutes or hours you want the computer to wait before it goes to sleep when using battery power or plugged in.
- Then click or tap “OK.”
We are on WhatsApp. To get the latest step-by-step guides and news updates, Join our Channel. Click here for HTMD WhatsApp.
Author
Anoop C Nair has been Microsoft MVP from 2015 onwards for 10 consecutive years! He is a Workplace Solution Architect with more than 22+ years of experience in Workplace technologies. He is also a Blogger, Speaker, and leader of the Local User Group Community. His main focus is on Device Management technologies like SCCM and Intune. He writes about technologies like Intune, SCCM, Windows, Cloud PC, Windows, Entra, Microsoft Security, Career, etc..




Discussion