






How to Configure File Associations using SCCM
Let’s learn how to configure File Associations using SCCM. When deploying Windows 10 images, you can update the default programs associated with filename extensions or protocols. File Associations helps IT admin automate the settings to open a certain file type to be directly set with the default application.
To generate a default app associations XML File, Deploy your Windows image to a test computer and configure the programs that are included in your image. You can log in to Windows and export the default app associations that you have configured to an XML file. If the XML information is exported from a brand-new reference machine, the resulting XML file may be truncated until the delay-install apps have been fully installed on the system.
To change the application on the reference machine, just select that program for that association. Once selected that choice will be written to the registry and then available for export. You need to ensure all the prerequisites are in place before proceeding and, most importantly, test the prepared script’s execution manually to avoid further issues during sccm deployment.
Set or Change Default Apps on Windows 10
Deploy your Windows image to a test computer and configure the programs that you want to include in your image. Let’s follow the steps below –

- In Windows 10 device, Open the Settings > Default Apps and click the “Choose default apps by file type” button.
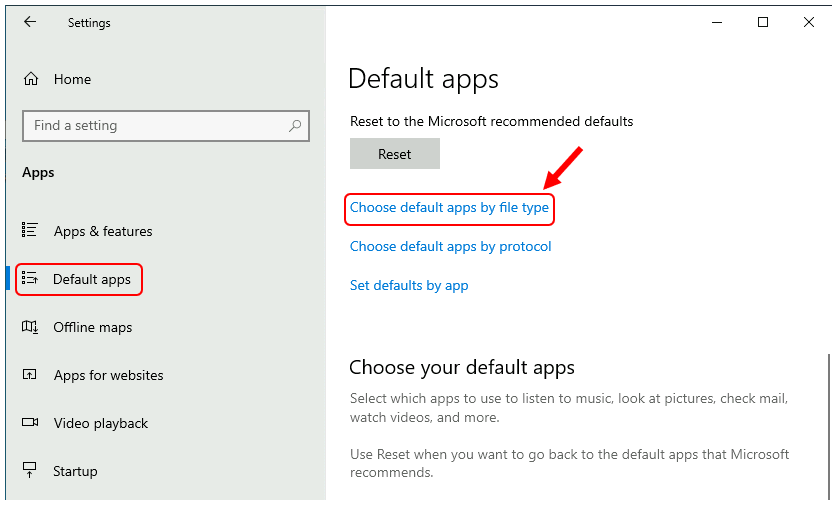
Configure default apps by filename extension or by an app. For example, to set PDF files to Adobe Reader as the default program that is used to open all of the document .pdf file types,
- Find the .pdf file in the list of file extensions and use the “Choose a default” button to change the default program to open html files from Microsoft Edge to Adobe Reader.
Note – It’s important to install an app if you’re setting it up as a default program in your test machine to export the configurations.
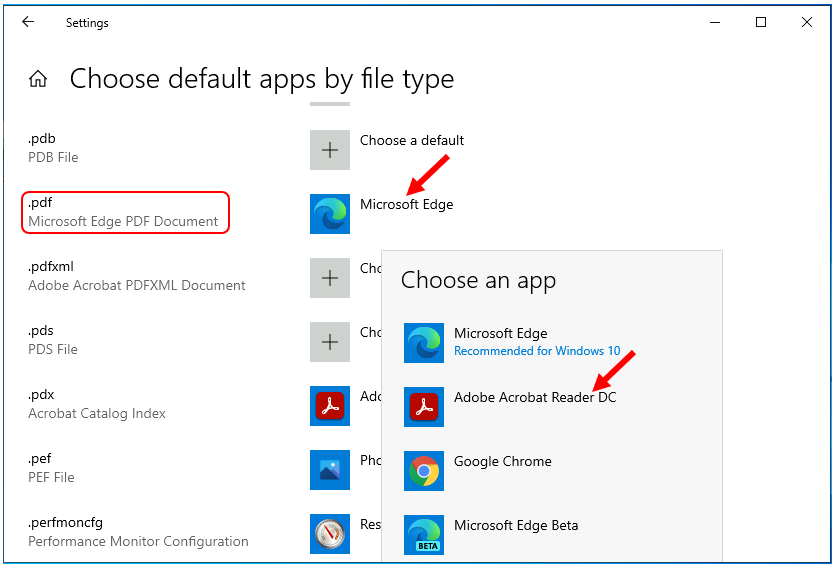
- Similarly, Find the .HTML, .HTM file in the list of file extensions and use the “Choose a default” button to change the default program to open from Microsoft Edge to Google Chrome.
- Once you are done with the selection of the file extensions that you want to open. Close the Settings app and validate the configuration manually by launching any installed program or application.
Export Custom Default App Associations
You can export the default application associations from a running operating system to a .xml file using DISM –
- Open a Command Prompt as administrator.
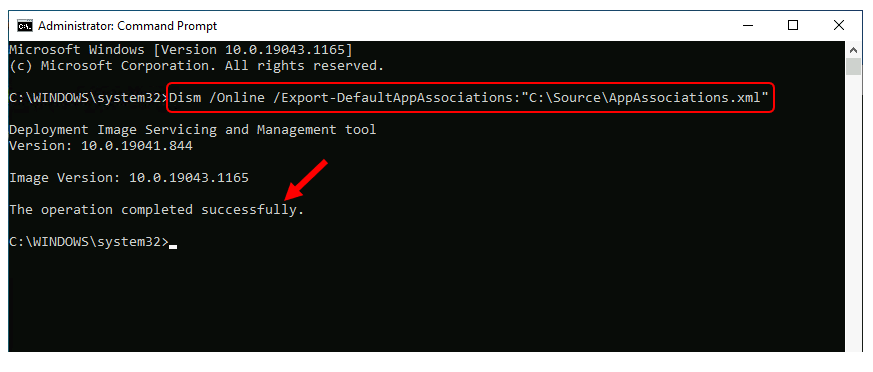
- To Export the default app association settings from the test computer to an .xml file, Type or copy and paste the command below
Dism.exe /online /Export-DefaultAppAssociations:"C:\Source\AppAssociations.xml"The command will save all the program associations you have configured on your user profile to the XML file. To review the default app association setting, you can open the exported file in any text editor and see the full list of exported file associations.
For Example: Here we’re saving the file to “C:\Source\AppAssociations.xml” Make sure your target path exists in the device.
Prepare Scripts
To change the default app association settings in your destination computer, You need to follow the steps to prepare scripts for execution –
- Copy the XML file to SCCM package source folder.
For the script to properly work, you’ll need to create the proper folder structure. Next, I will create a script that performs all the necessary actions, To Import a set of default application associations to a specified Windows image from a .xml file –
- Open Notepad on your device. Copy and paste the below line, Save it as DefaultApps.bat to the appropriate location –
@ECHO OFF
Dism.exe /online /Import-DefaultAppAssociations:"%~dp0AppAssociations.xml"
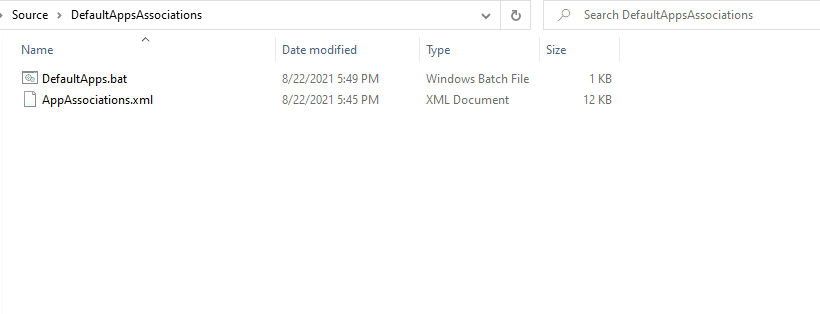
Once you have done! Your folder structure should appear like this in SCCM package source –
Create File Associations Package in SCCM
The next step is to create a package in Configuration Manager that contains the AppAssociations.xml file, DefaultApps.bat in the same directory. Let’s get started –
- In the Configuration Manager console, Go to the Software Library workspace, expand Application Management, Right-click Packages and select Create Package.
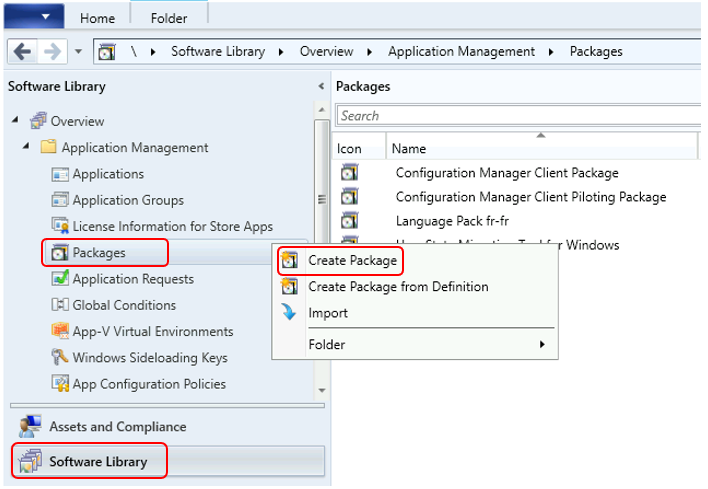
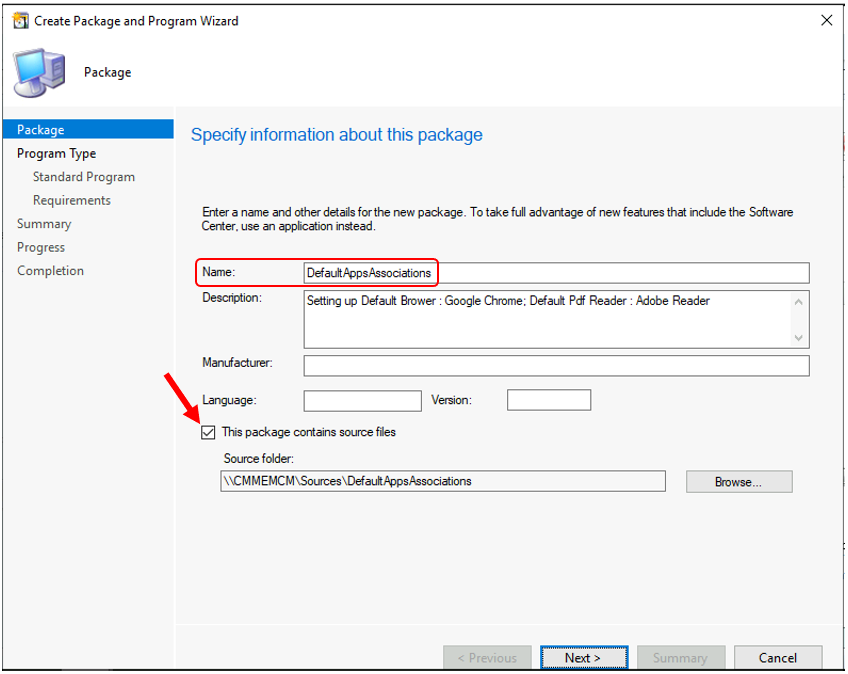
On the Package page, Specify the following information and click Next.
- Name: Specify a name for the package.
- Description: Specify a description for this package.
- Source folder: Choose to Browse to select the UNC path and then specify the location of the source files for the package.
Note – Ensure you have copied the exported file association to the network path. You must have access to the network path and any subfolders content.
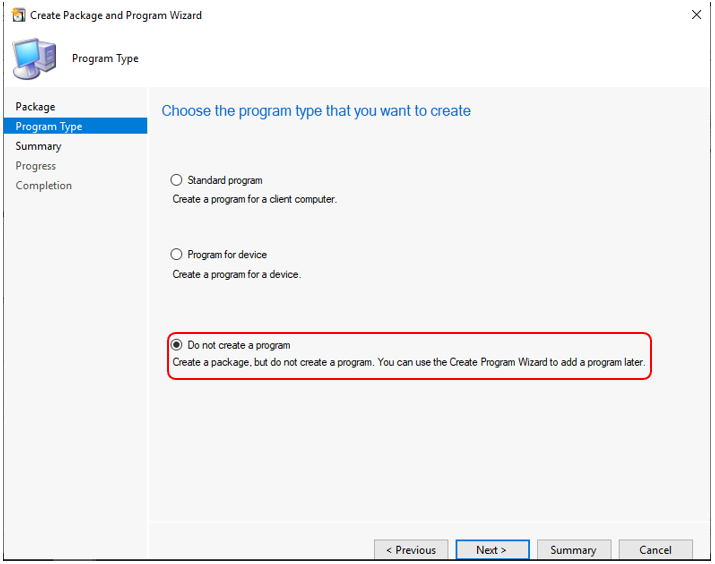
- On the Program Type, Choose the type of program Do not create a program. Click Next.
- Review the settings, click Next.
- The Package creation process was completed successfully. Click Close to complete the wizard.
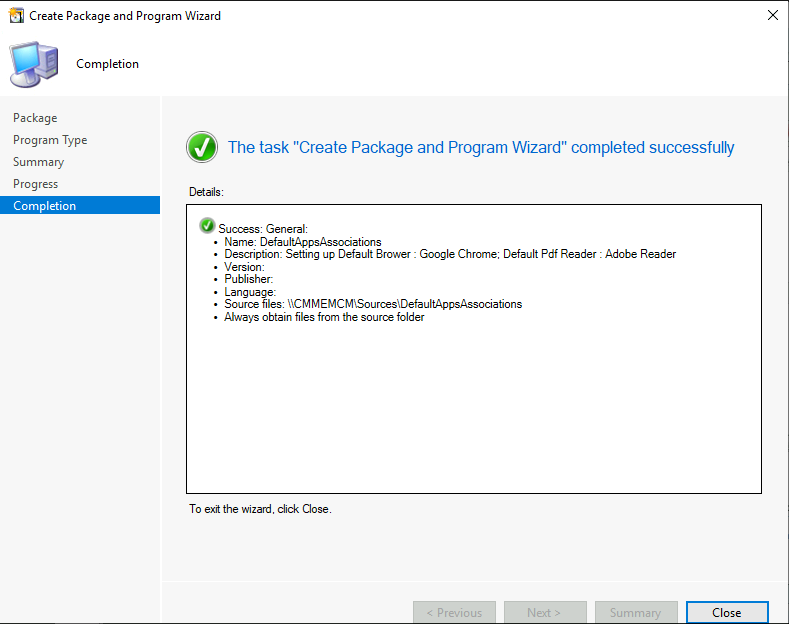
The Windows 10 Default file associations now appear in the Packages node of the Configuration Manager console. You’ve finished creating a package.
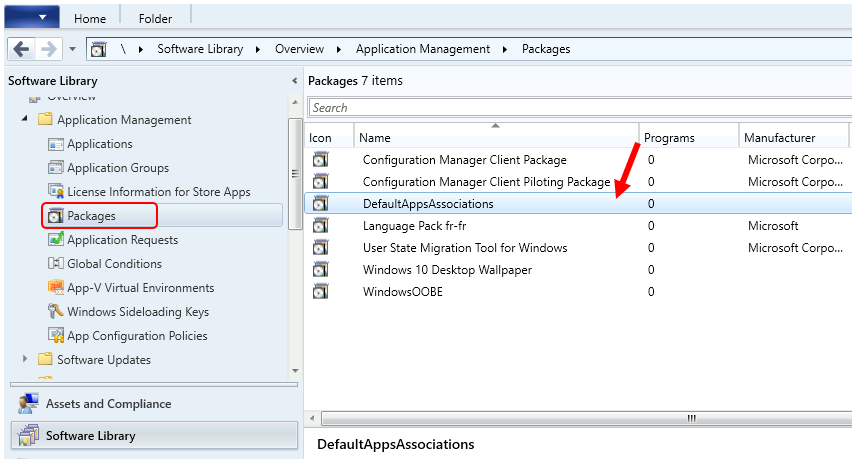
Important – You must distribute the content to the distribution point. Right-click on package and click Distribute Content. Select the distribution point or groups where you want to distribute this package.
Deploy File Associations using SCCM Task Sequence
Let’s follow the steps to add the default file associations package to SCCM Task Sequence –
Create or Edit an Existing Task Sequence
This Guide will help you to create a Configuration Manager task sequence from scratch. Use the following steps to modify an existing task sequence –
Customize Task Sequence
- In the Configuration Manager console, go to the Software Library workspace, expand Operating Systems, and then select the Task Sequences node.
- In the Task Sequence list, select the task sequence that you want to edit. Select Edit to modify.
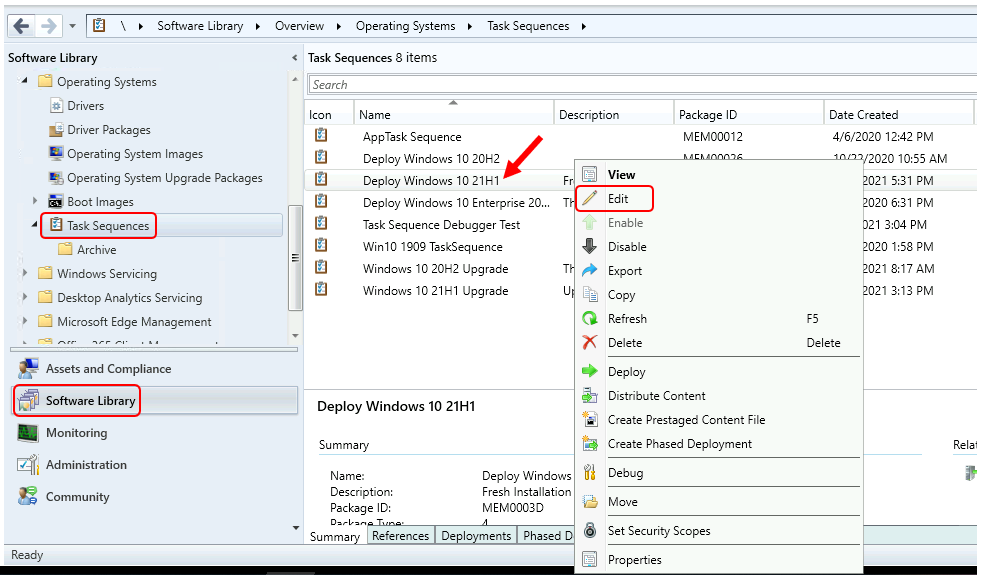
You can add Run Command Line, PowerShell Script options based on the script you had. We will add the following steps to the task sequence –
Run Command Line
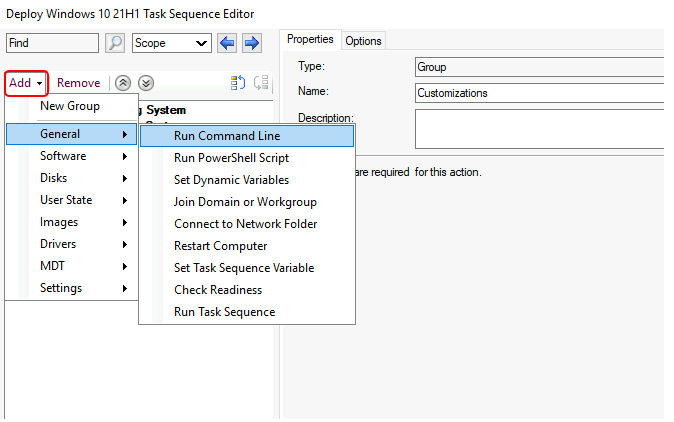
- To add this step in the task sequence editor, select Add, select General, and select Run Command Line.
- On the Properties tab for this step, configure the settings described in this section. Specifies the command line that the task sequence runs.
Package – Select this option to specify the Configuration Manager package that contains the necessary files for execution.
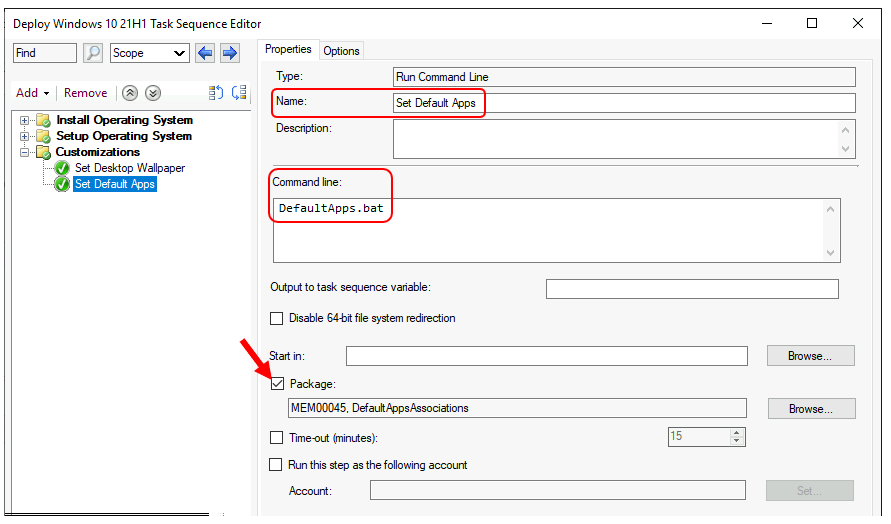
Review other settings added in Task Sequence, make sure to apply all changes. Click Apply and OK, close the window.
Select the task sequence and target the Deployment to Collections. You can refer to Easy Guide to Deploy Windows 10 21H1 Using SCCM Task Sequence | ConfigMgr | Step by Step
Results – End User Experience
Once the deployment is completed successfully, you will see Adobe Reader DC as the default PDF reader based on the applied configuration. You will be able to open pdf files directly with Adobe Reader if the apps are installed on your device or any other file extension you had configured.
The default application associations will be applied for each user during their first logon.
Troubleshooting Reference
The first basic step to troubleshoot SCCM OSD Task Sequence issues is to check out the SMSTS.log. More Details on how to read SMSTS.log effectively for troubleshooting SCCM OSD Task Sequence.
Learn about SCCM OSD SMSTS Log File Reading Tips with the built-in log reader tool CMTrace – SCCM OSD SMSTS Log File Reading Tips | ConfigMgr | MEMCM
About Author -> Jitesh has over 5 years of working experience in the IT Industry. He writes and shares his experiences related to Microsoft device management technologies and IT Infrastructure management. His primary focus area is Windows 10 Deployment solution with Configuration Manager, Microsoft Deployment Toolkit (MDT), and Microsoft Intune.
Resources
- SCCM 2107 is Released How to Upgrade to ConfigMgr 2107
- SCCM Customize Windows Out of Box Experience OOBE Using ConfigMgr
- Easy Guide to Deploy Wallpaper using SCCM
- HTMD Blog #2 Archieve Posts
How to run a script where local machine is not communicating to the SCCM Server ? I want to run a script to remediate issue for various remote machines from local machine using admin privileges using command prompt.
During the imaging process or before the creation of the user profile, it’s the way to go but after, it’s another story. I’m using getfta.exe and setfta.exe (3rd party tool) in a sccm application than run under the current user crendential to change the file type association.
Can you share some more information on this method?
StaffHello – Had you tried to follow the steps? Basically what info are you looking for here, We’ll be happy to help 🙂