






Customize Recycle Bin Settings Easily on Windows 11
Let’s learn to Customize Recycle Bin Settings Easily on Windows 11. The Recycle Bin is a default storage location for the files the user deleted from the PC. Users can modify and customize the recycle bin’s default settings accordingly. By default, the file deleted by the user is not removed immediately from the drive; it is stored in the recycle bin marked as deleted.
Users can now decide what happens when they delete files from any device. If a user is not careful enough, the recycle bin will be filled with files that they do not need to store permanently or that they need to store a few times, so it gives them the freedom to decide what they want to do with those files.
A recycle bin can not store files forever; it depends on the drive size; Windows reserves a small percentage to store deleted files. Once the space fills up, the system automatically starts deleting the oldest files to free up space for files. Customizing the recycle bin allows a user to change the storage as required and also enables the confirmation prompt to minimize the times you delete files by mistake.
A user never thinks about making changes in the recycle bin and just ignores it. Instead, you can do many things by changing the settings to improve your Windows 11 system. Recycle bin acts as an added recovery program that helps recover files deleted by mistake. Let’s check what changes a user can make with the recycle bin.

- Troubleshoot Windows 365 Cloud PC Connectivity Check
- Reset Network Adapters in Windows 11 FIX Connection Issues
List of Customize Recycle Bin Settings in Windows 11
There are some settings available that enable you to make any changes to the recycle bin in Windows. The list of customization of recycle bin settings is represented below for reference.
- Find & Access the Recycle Bin
- Create a Recycle Bin Shortcut
- Change the Default Icon of the Recycle Bin
- Pin Recycle Bin to Task Bar
- Manage Recycle Bin Storage
- Permanently Delete File without sending to Recycle Bin
- Enabling Delete Confirmation
- Schedule to Empty the Recycle Bin
Find & Access the Recycle Bin
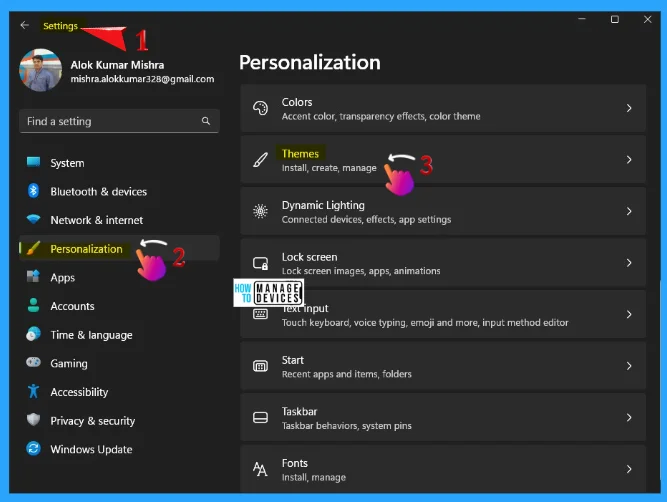
The recycle bin is available on the Desktop by default, but you can easily enable it using the settings app if it is not there. To do so, press Win Key + I. When the settings window appears, click on the Personalization option on the left panel, then under Personalization again click on the Themes option.
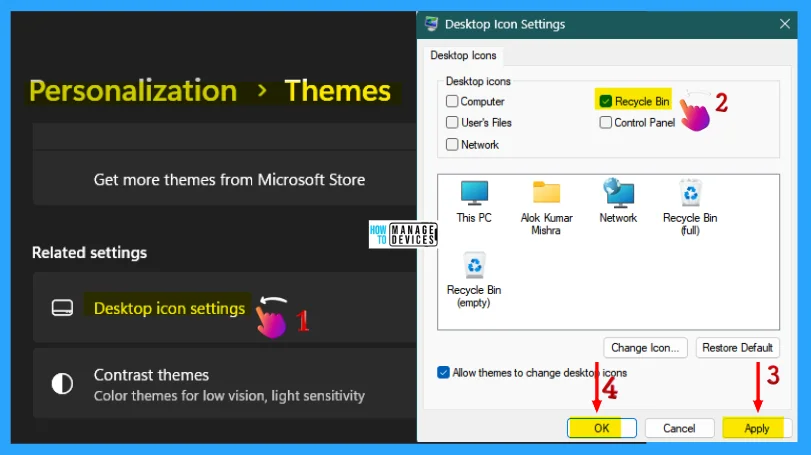
Under the themes option, scroll down to find & click on the Desktop Icon Settings option. In the next Window, check the Recycle Bin option, click Apply, and then OK, as shown in the image below.
NOTE! Reverse the last step to hide the Recycle Bin from your Desktop.
Create a Recycle Bin Shortcut
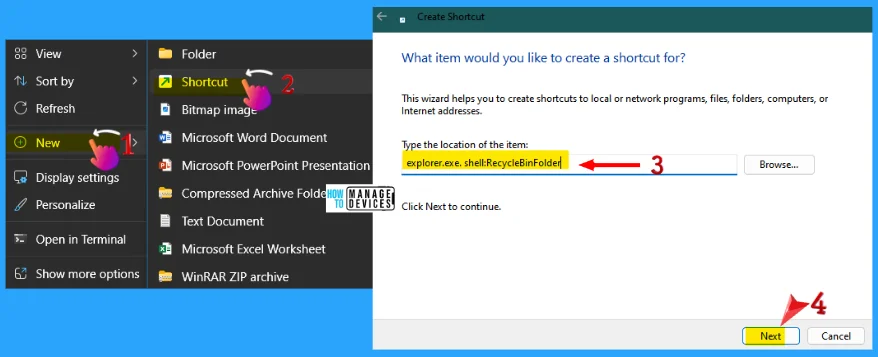
You can create a Recycle Bin shortcut. To create a shortcut, right-click on a space on the Desktop, select New from the options, and choose Shortcut. When the shortcut window appears, type “explorer.exe shell:RecycleBinFolder.” Now click on the Next button to proceed.
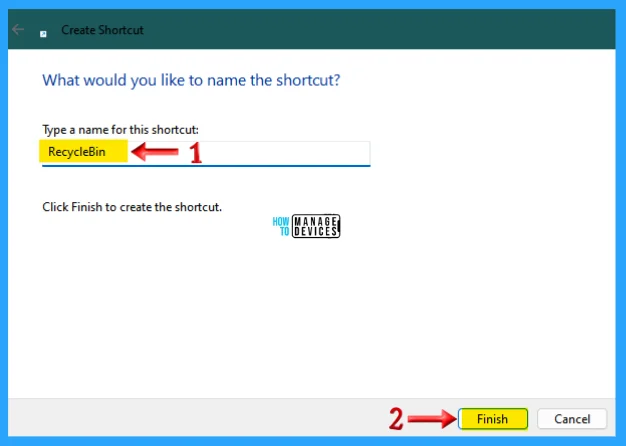
In the next window, type a name for the shortcut, like “Recycle Bin” and click the Finish button in the lower right corner to complete the process. Your recycle bin shortcut is now available on the Desktop.
Change the Default Icon of the Recycle Bin
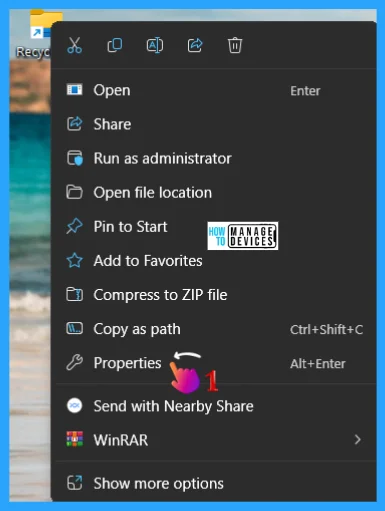
After completing all the above steps to create a shortcut for the recycle bin, right-click on the Recycle Bin shortcut icon and choose Properties, as illustrated in the image below.
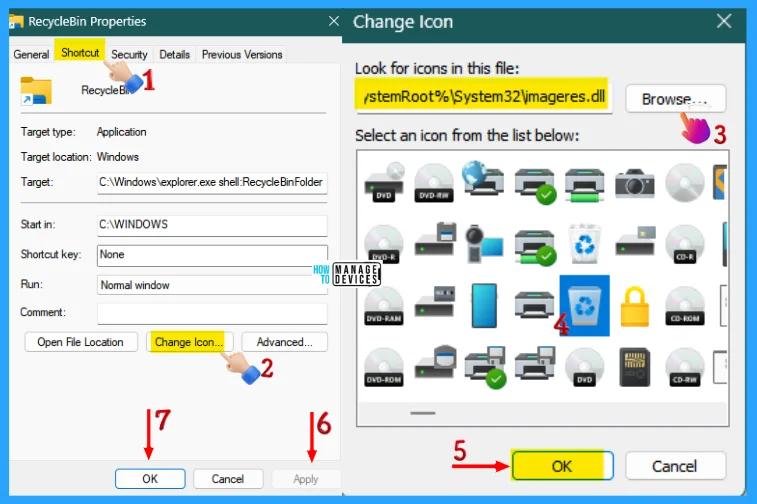
In the properties window, choose the Shortcut tab and select Change Icon. The change icon window is open now; browse for the current file or download it from a third party. Then, select one icon of your choice, click OK to close the change icon window, click on Apply, then OK on RecycleBin properties as shown below.
Pin Recycle Bin to Task Bar
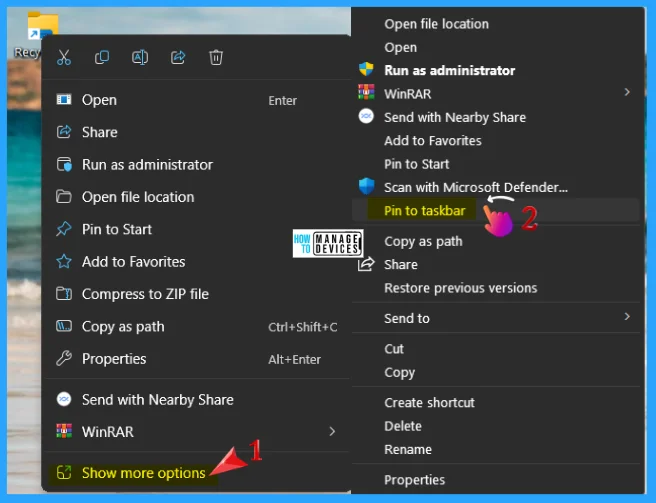
You can pin the Recycle bin to the Taskbar. Now, when the Recycle Bin shortcut is shown on the Desktop, right-click on the Recycle Bin Shortcut icon, then select the Show More Options button. Another option pack opens, then select the Pin to the taskbar, and your recycle bin is also shown in the image below.
Manage Recycle Bin Storage
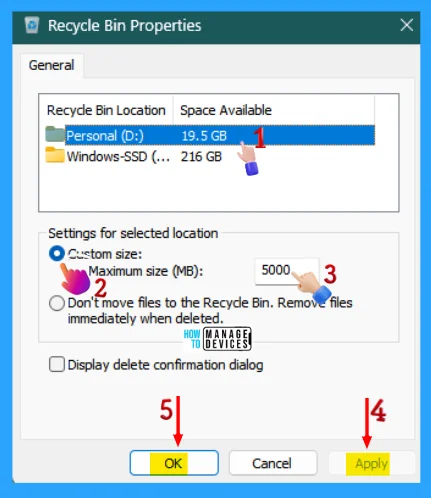
As per Windows, you can manage the storage of the Recycle Bin. Right-click on the recycle bin icon on the desktop and click on Properties. It is suggested to select the drive that contains more space. Then, customise the size of the disk space in MB and click on Apply, then OK.
NOTE! 1 GB is equal to 1024 MB; whatever size you want to specify, follow it accordingly.
Permanently Delete File without Sending to Recycle Bin
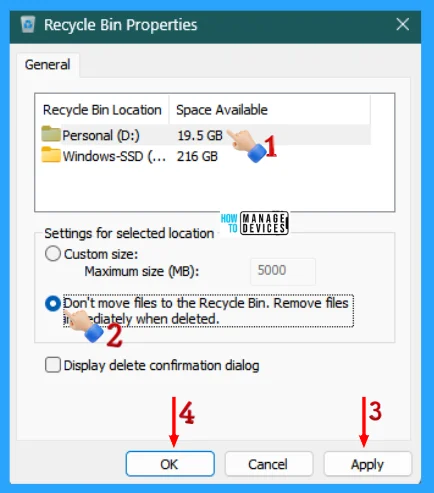
Follow the above process to reach the Recycle Bin Properties, then checkmark “Don’t move files to the Recycle Bin. Remove filed immediately when deleted“, then click on Apply, then OK.
Enabling Delete Confirmation
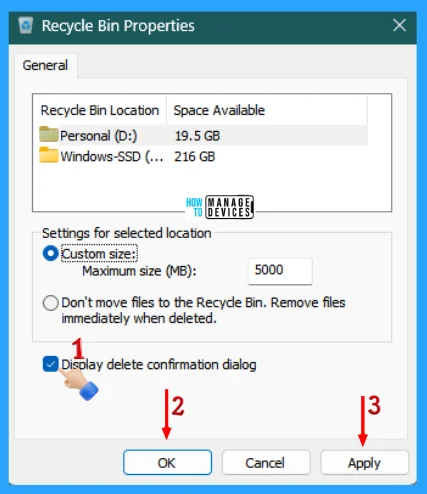
Again, go to the Properties of Recycle Bin, as shown above. At the bottom of the dialogue box, check the Display delete confirmation dialogue, then click on Apply and OK.
Schedule to Empty the Recycle Bin
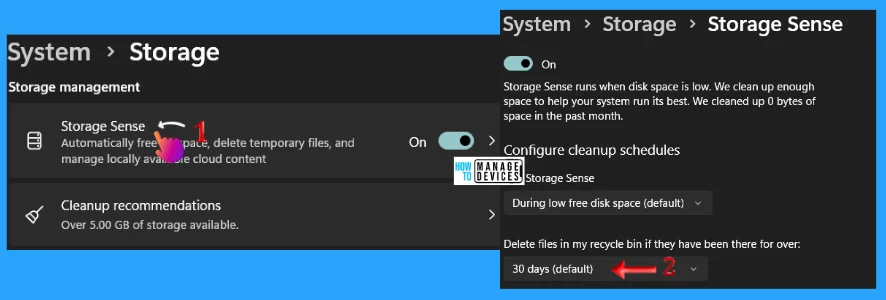
By default, a 30-day schedule in the Recycle Bin settings can erase the old documents if the bin becomes overloaded. To change those settings, press Win Key + I to open the settings app. When the settings window appears, click on the System option on the left panel, then under System again, click on the Storage option.
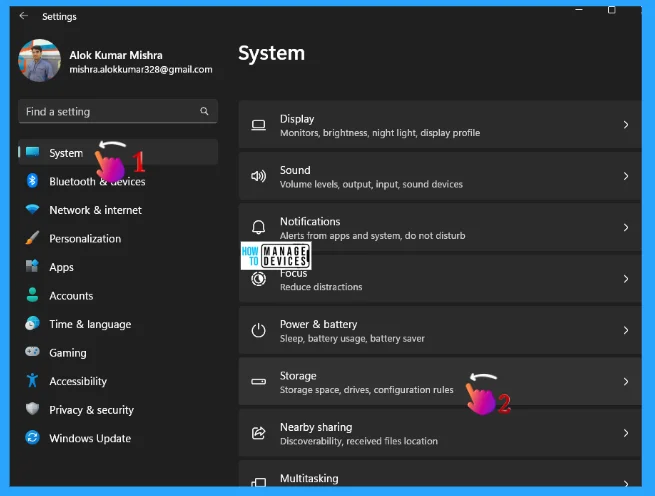
Click on the Storage Sense button under the Storage option. Under Storage again, click on the Storage Sense option. It works to automatically free up space, delete temporary files, and manage locally available cloud content. Now change the value under the Storage Sense option to Delete files in my recycle bin if they have been there for over 30 days. 30 days is the default, but you can change that by selecting other options.
I hope the Customize Recycle Bin Settings Easily on Windows 11 information is helpful. Please follow us on the HTMD Community and visit our website HTMD Forum, if you like our content. Suggest improvements, if any, and we love to know which topic you want us to explore next.
We are on WhatsApp. To get the latest step-by-step guides and news updates, Join our Channel. Click here –HTMD WhatsApp.
Author
Alok is a Master of Computer Applications (MCA) graduate. He loves writing on Windows 11 and related technologies. He likes to share his knowledge, quick tips, and tricks with Windows 11 or Windows 10 with the community.


Discussion