






Deploy LAPS Using SCCM Application Model
Hello, You All. Here we come with another deployment post. In this post, we will see how to deploy LAPS using SCCM Application Model. We use the MSI application to deploy Microsoft Local Administrator Password Solution (LAPS).
Local Administrator Password Solution (LAPS) provides management of local administrator account passwords for domain-joined computers. Passwords are randomized and stored in Active Directory (AD), protected by ACLs, so only eligible users can read it or request its reset.
LAPS simplifies password management and provides recommendations for preventing cyberattacks. Specifically, the solution reduces the risk of lateral escalation when customers use the same administrative local account and password on multiple computers.
Microsoft LAPS can be deployed using various methods, The solution is built on Active Directory infrastructure and does not require other supporting technologies. Domain administrators using the solution can determine which users, such as helpdesk administrators, are authorized to read passwords.

In this step-by-step guide, we will use the MSI Application Model to deploy Microsoft LAPS using SCCM. The MSI model is the best practice for deploying applications on Windows 10/11 devices.
- Fix Microsoft Store Error 0x000001F4 0x80131500 in Windows
- Dell SupportAssist Deployment Using SCCM | MSI Installation Guide
What is an MSI file?
Windows packages that contain installation information, including files to be installed and installation locations, are called MSI files. The EXE and MSI files both install and launch Windows programs. The EXE file may not always contain an installer and may launch its program when double-clicked. An MSI file, however, always includes an installer.
How to Deploy LAPS Using SCCM
Now we will begin the Deployment of LAPS using the SCCM. As told earlier, we are using the MSI file for LAPS Deployment. You will see why the availability of MSI files for any application is always a joy for SCCM Admin.
We don’t need to work on prerequisites as we used to tell you in the previous posts where we are using EXE files for the deployment.
- We have to download the MSI installer and the logo of the LAPS, as we know it is available for download, and our half job is done.
One can easily download the 64-bit application directly from LAPS. There are multiple files available for this download. Once you click the “Download” button, you will be prompted to select the files you need and choose the MSI setup for the Windows 64-bit architecture.
The following table gives you all the details required for the LAPS Deployment tool using SCCM. This includes the command line for LAPS silent installation, uninstall, Product Code, etc.
| Name | Install Command Line | Uninstall Command Line | Detection Method |
|---|---|---|---|
| LAPS Deployment Tool – Windows Installer (*.msi file) | Install -> msiexec /i “LAPS.x64.msi” /q | Uninstall -> msiexec /x {97E2CA7B-B657-4FF7-A6DB-30ECC73E1E28} /q | Windows Installer – {97E2CA7B-B657-4FF7-A6DB-30ECC73E1E28} |
Create LAPS Application Using SCCM Console
This MSI application deployment guide will use the SCCM admin console to create an application. To start with the Application creation part, copy the downloaded setup to the package source location of the SCCM Server.
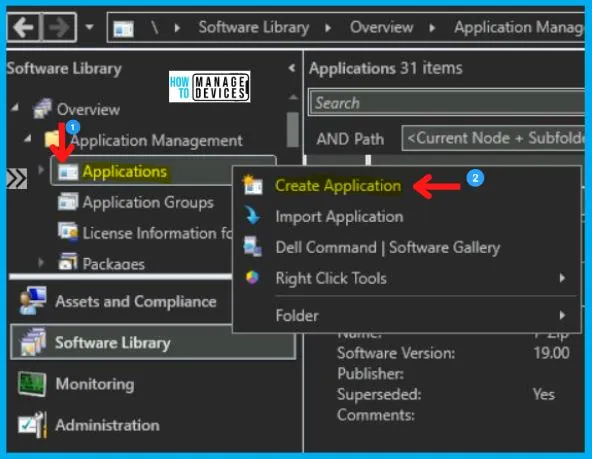
- Navigate to SCCM Console \Software Library\Overview\Application Management\Applications.
- Right-click on Applications and select Create Application.
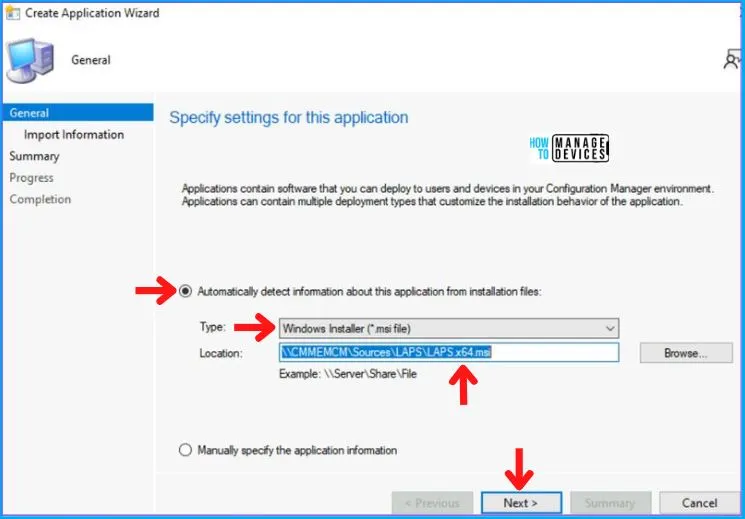
For all MSI application deployments, always Select the Automatically detect Information about the application from installation files and choose Windows Installer (.msi files) in the Type category. Also, enter the UNC Path for the application in Location and click Next.
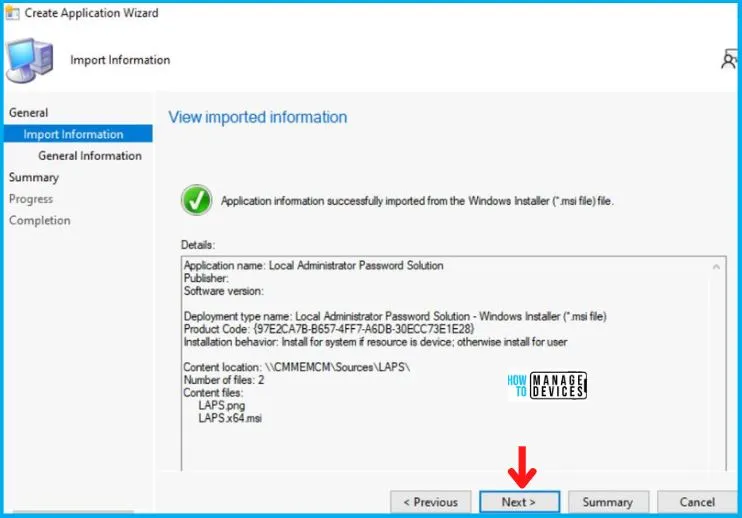
Now, something magical happens here, the thing for which MSI files are so famous. As soon you click on Next, you will see that all the information has been imported from the MSI file, like install commands and detection logic is shown below, and click Next.
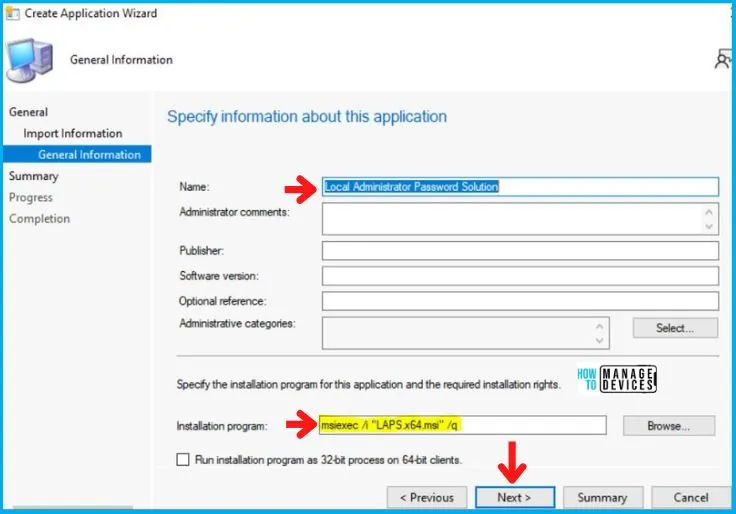
Also, in the General Information Tab shown below, you will see it imports the install behavior/command (msiexec /i “LAPS.x64.msi” /q) from the installer itself.
- Silent Install Command Line for LAPS – msiexec /i “LAPS.x64.msi” /q
- Uninstall Command Line – msiexec /x {97E2CA7B-B657-4FF7-A6DB-30ECC73E1E28} /q
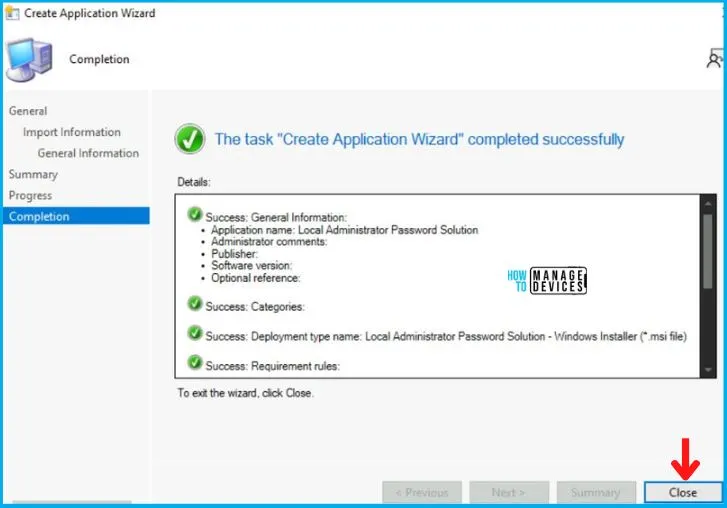
After this, click Next on the Summary Tab and end this Create Application Wizard by clicking on Close in Completion Tab.
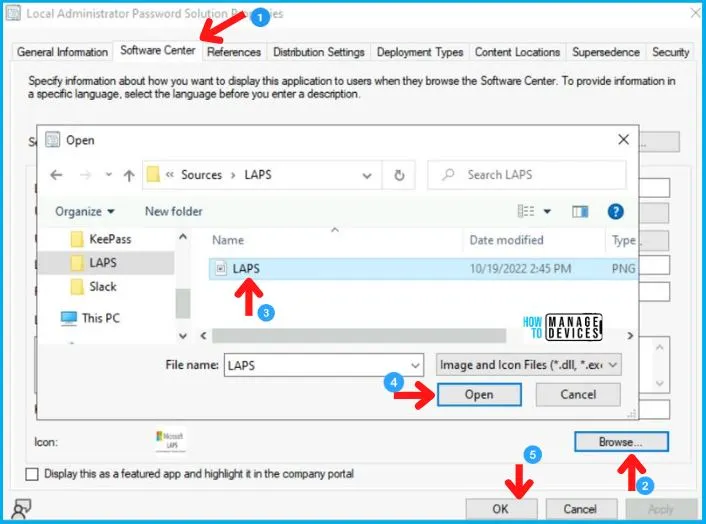
After the creation of the Application, it will appear in the Application Node. Now to Add an Icon to LAPS, right-click on LAPS and click on Properties.
After this, choose Software Center Tab as shown below. And click on Browse in Icon, select the icon, and click on Apply and OK, as shown in the image below.
Distribute the LAPS Application to the DP
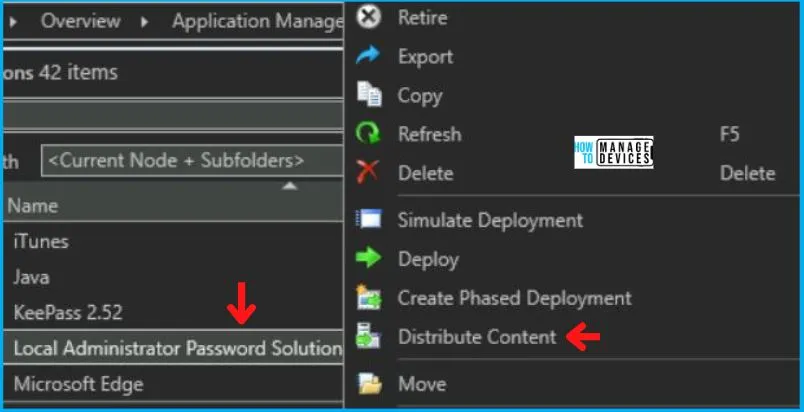
After the creation of the Application, it will appear in the SCCM Application Node. To begin with, the distribution right-clicks on the LAPS Application and clicks on Distribute Content, as shown in the picture below.
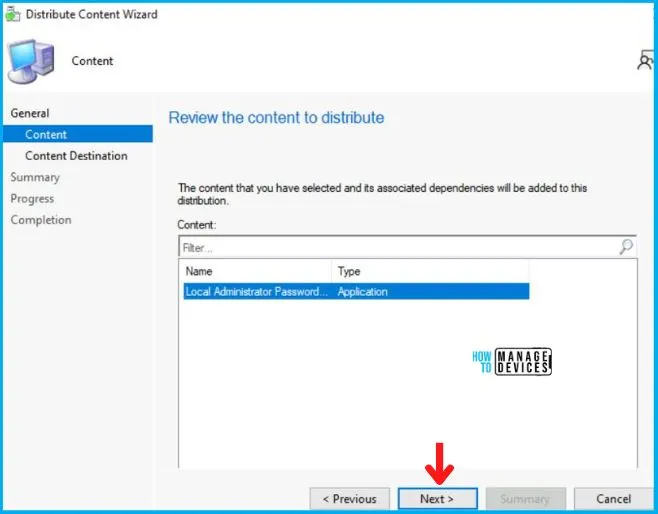
Now the Distribute Content Wizard will open, and click Next in the General Tab. Then select the Application Name in the Content Tab and Click on Next, as shown in the image below.
In the Content Distribution tab, click on ADD button as shown in the image below.
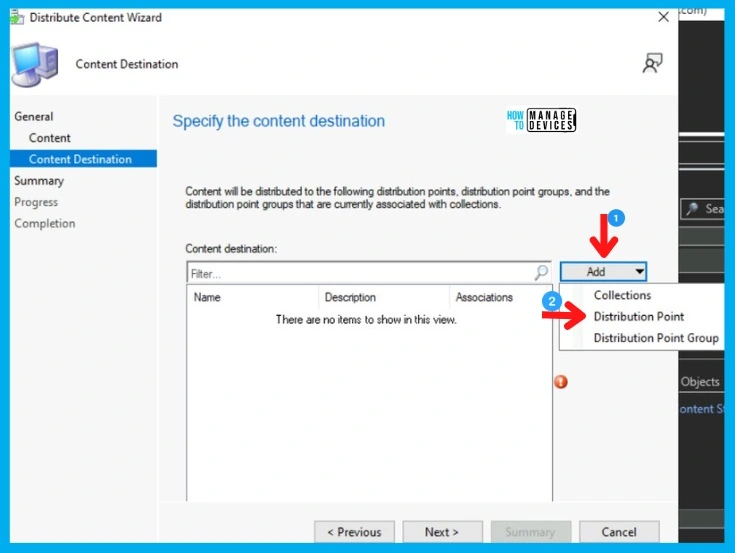
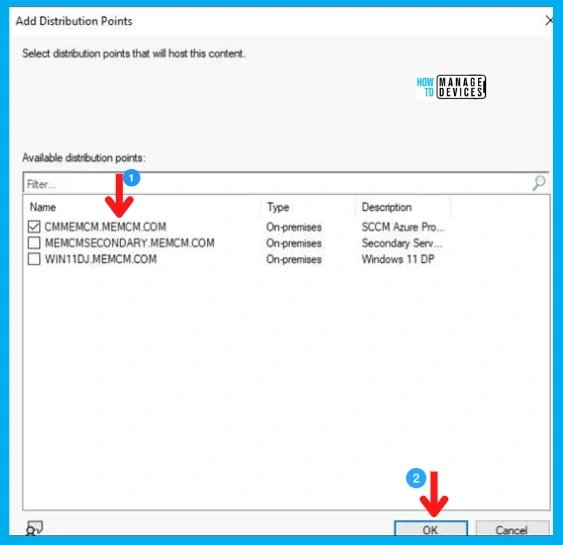
Then Add Distribution Point page will pop up, choose the Distribution Point on which you want to distribute the Application and click on OK, and then on Next.
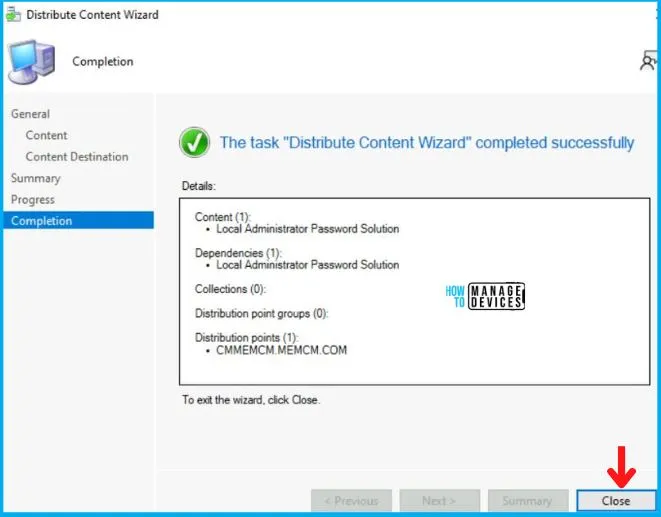
After this, Click Next on Summary Tab and complete this Distribution process by clicking Close in Completion Tab.
Deploy LAPS using SCCM
So as of now, we have accomplished two tasks, i.e., Application Creation and Application Distribution to the DP. Now all left is the Deployment of the LAPS on the All Windows 10 Device Collection.
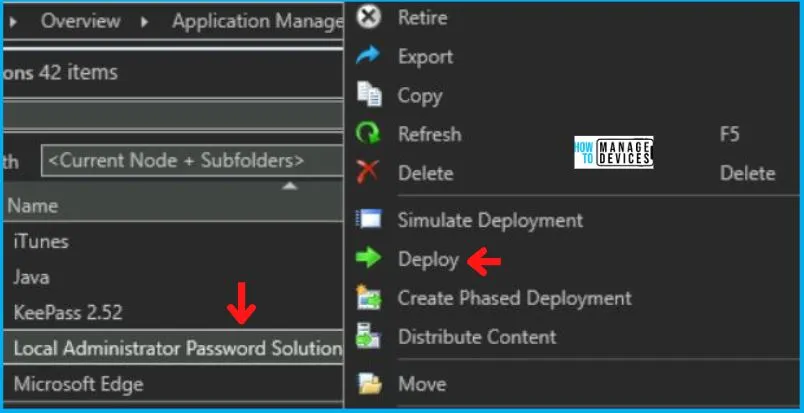
- As you can see, your Application is displaying in Application Node, Right-click on LAPS and click on Deploy.
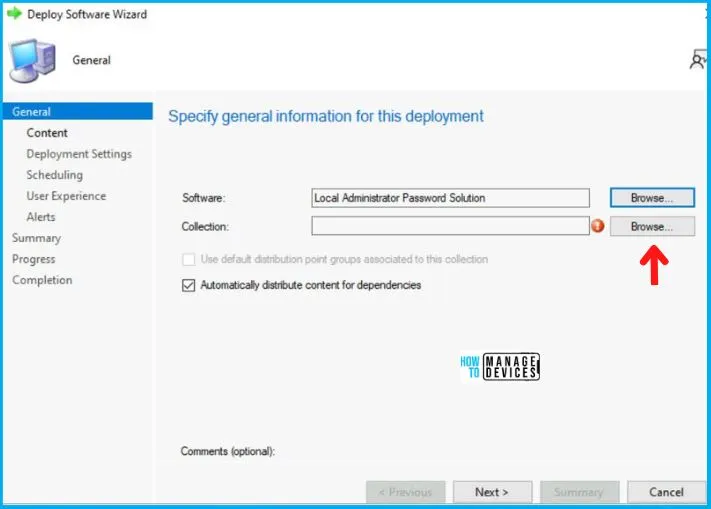
After this, Deploy Software Wizard opens, and in the General Tab, you will see the name of the application in the Name box and click on Browse to select the Collection.
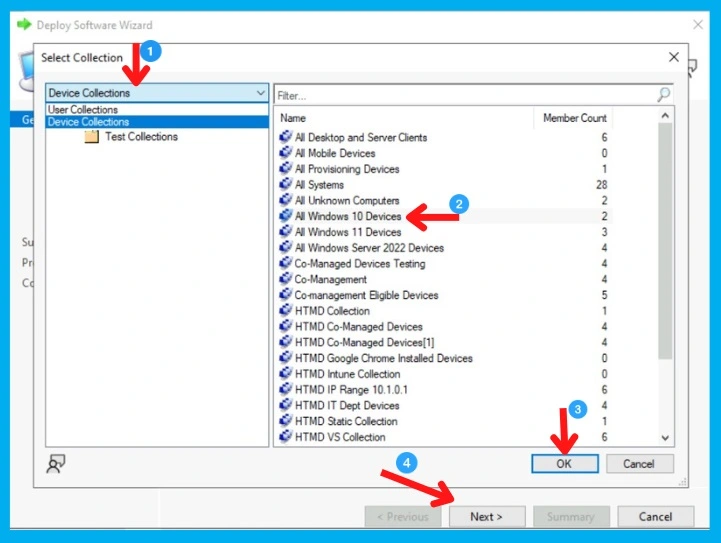
Now the Select Collection page will pop up; choose Device Collection from the drop-down menu, and then
- Select your targeted Device Collection and click on OK, and then Next.
- Here I choose All Windows 10 Devices or Windows 11 Devices
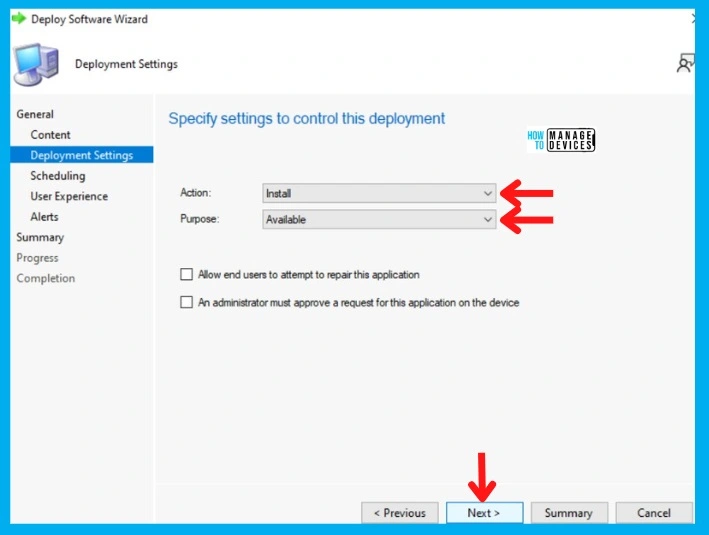
Now in the Deployment Settings Tab, select:
- Install in the Action box
- And choose Available in the Purpose category.
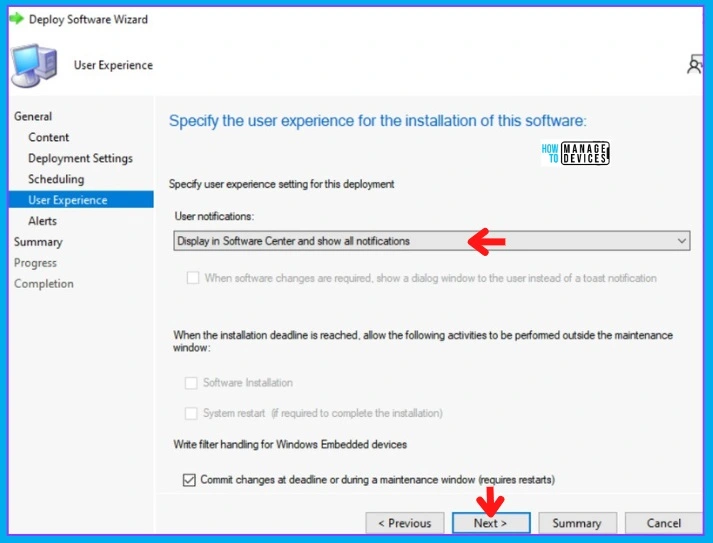
In the Scheduling Tab, enter the time details if you want it to be available at a specific time; otherwise, leave it as it is and click Next. After this, in the User Experience Tab,
- Select Display in Software Center and shows all notification options in the User notifications, and click on Next as shown below.
In the Alerts and Summary Tab, click on Next and to end the process, click on Close in the Completion Tab.
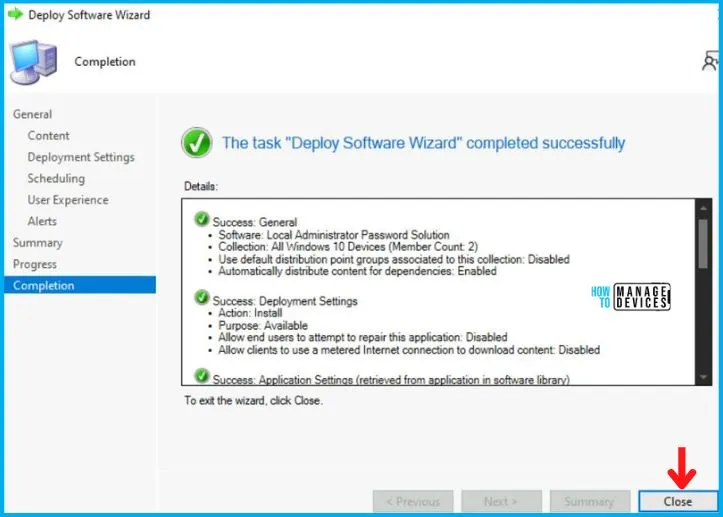
End User Experience – LAPS Installation
In this section, we will check the end-user experience for LAPS Application Deployment and Installation. The LAPS Application is Created, Distributed, and Deployed.
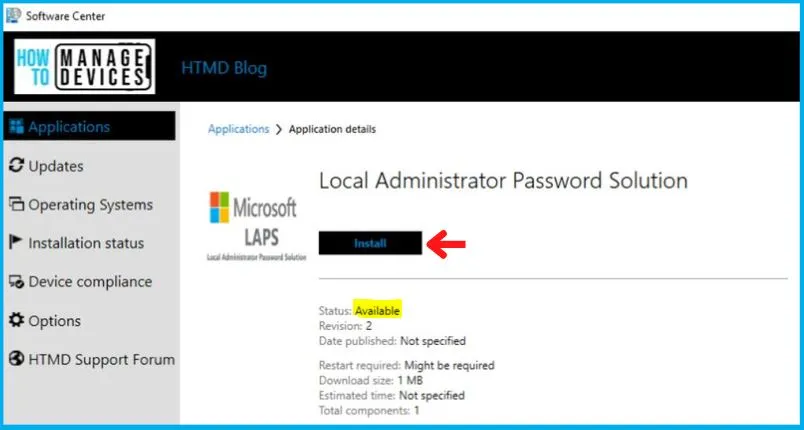
Now, if you check the Software Center of Win 10 device from the Windows 10 Device (or All Windows 11 Device) Collection, you will see the Application in Available Mode, and the user can install it as per the requirement.
As you can see in the below screenshot, the LAPS Application is installed successfully on Windows 10/11 devices. This proves the above MSI installer works fine for LAPS Application Installation using SCCM.
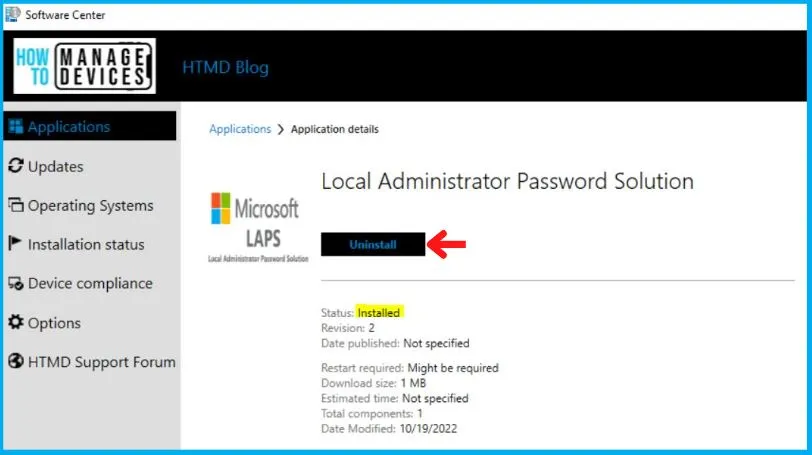
So in the above picture, you can see that we have finally created, Distributed, Deployed, and Installed the LAPS Application, as shown in the Software Center in the above image.
- Insiders Guide SCCM Application Model Troubleshooting
- Deep Dive SCCM Application Model Troubleshooting – Client End
Author
Abhinav Rana is working as an SCCM Admin. He loves to help the community by sharing his knowledge. He is a BTech graduate in Information Technology.
Curious, the article describes how to deploy Microsoft LAPS using MECM. We are currently planning on migrating our users over to Windows LAPS.
How do you use MECM to un-install LAPS? Is there a way to use this deployment to un-install or do you have to disable it then create a new one where the deployment actions is to “Uninstall”.
Regards,
Brando