






Enable Disable On-Screen Keyboard in Windows 11
Let’s discuss Enable Disable On-Screen Keyboard in Windows 11. The keyboard is one of the essential parts of a computer. The On-Screen Keyboard is a type of Keyboard available on Windows PC. It is a built-in accessibility tool for Windows users.
There are many Keyboards available on the market, and users can easily purchase one according to their preferences. An On-Screen Keyboard (OSK) is a physical Keyboard that can be easily accessed by different methods.
Sometimes, users may face issues with External Keyboards, keyboards in laptops, etc., and these keyboards may not respond as much as expected. I also faced such issues, and the On-Screen Keyboard really helped me to manage my activities.
An On-Screen Keyboard is not easy to use for beginners, but once users try this tool, they can easily manage their typing. This Virtual Keyboard can be used with our Mouse. In this blog post, I will help you enable and use Enable Disable On-Screen Keyboard in Windows 11.

What are Other Options for On-Screen Keyboard on Windows 11 PC?
1. You can use OSK for Keyboard scanning continuously with the Scan through keys option.
2. You can use click the sound option to make a sound when clicking on the key.
3. Turn on the numeric keypad to expand the OSK to show a numeric keypad.
4. Use the Text Prediction option if you want the OSK to suggest words.
- How to Find Wi-Fi Network Password in Windows 11
- How to Fix Printer Connection Printing Problems in Windows 11
Enable Disable On-Screen Keyboard in Windows 11
The On-Screen Keyboard can be easily used with your mouse and anywhere on your PC. You can select letters, and they will be displayed on the screen. The on-screen keyboard is similar to other keyboards, and you will also get all the keys on this Keyboard.
The On-Screen Keyboard can be quickly minimized, maximized, and closed. For example, you can use the On-Screen keyboard to type in the Notepad. There are many methods available to enable and disable this option. The different methods are shown in the table below.
| Different Methods to Enable Disable On-Screen Keyboard |
|---|
| Enable Disable On-Screen Keyboard using Keyboard Shortcut |
| Enable Disable On-Screen Keyboard using Settings |
| Enable Disable On-Screen Keyboard using Start Menu |
| Enable Disable On-Screen Keyboard using Windows Search |
| Enable Disable On-Screen Keyboard using Control Panel |
| Enable Disable On-Screen Keyboard using Run Command |
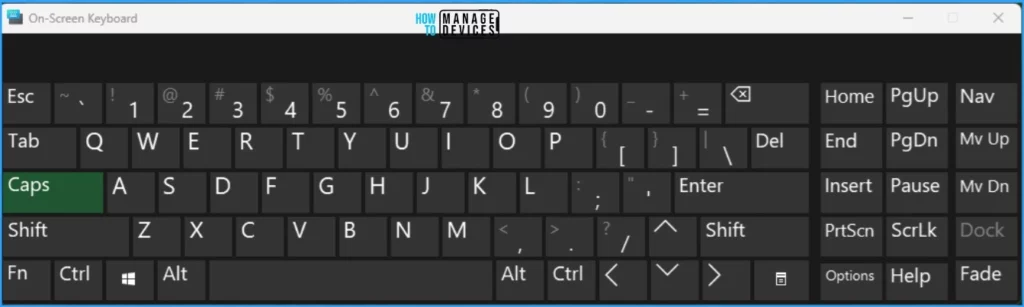
1. Enable Disable On-Screen Keyboard using Keyboard Shortcut
The easiest way to enable the On-Screen Keyboard on your PC is to use a keyboard Shortcut. To Enable this, Click Win Ctrl + O. After clicking on this, you will get the On-Screen Keyboard. If you want to disable it, Click the close button.
2. Enable Disable On-Screen Keyboard using Settings
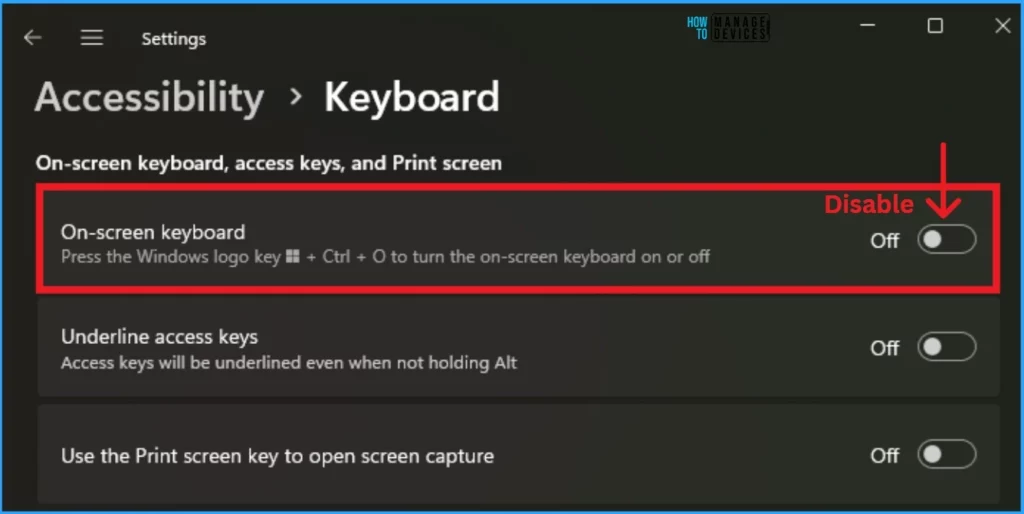
Users can easily enable this option via the Settings Application. It is also the simplest method for accessing the On-Screen Keyboard. To do this, Select Settings Application from the Start Menu.
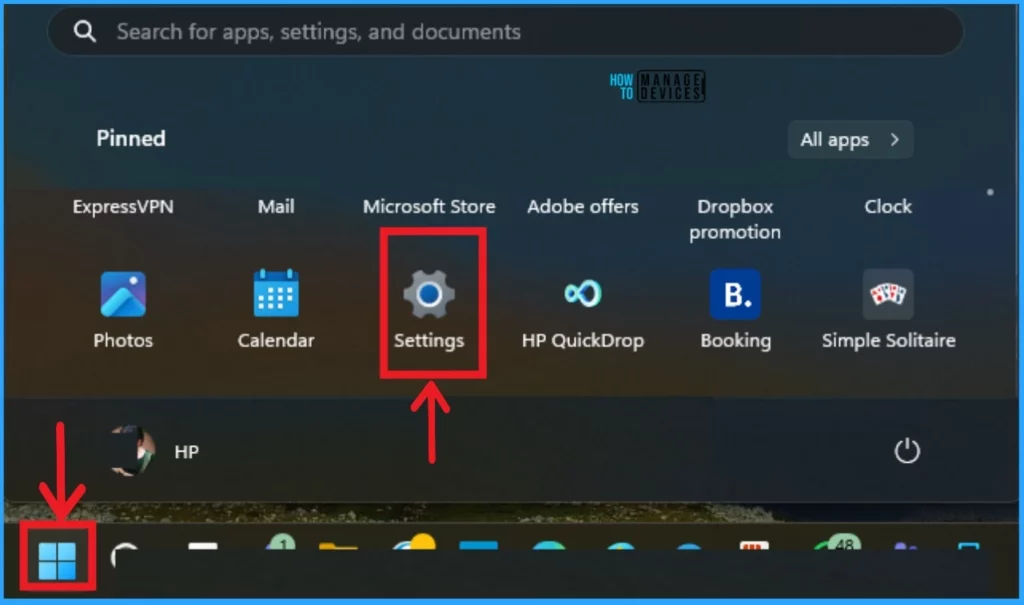
After opening the Settings Application you can see several settings on the left side of the Window. Select Accessibility Settings from the left side of the window.
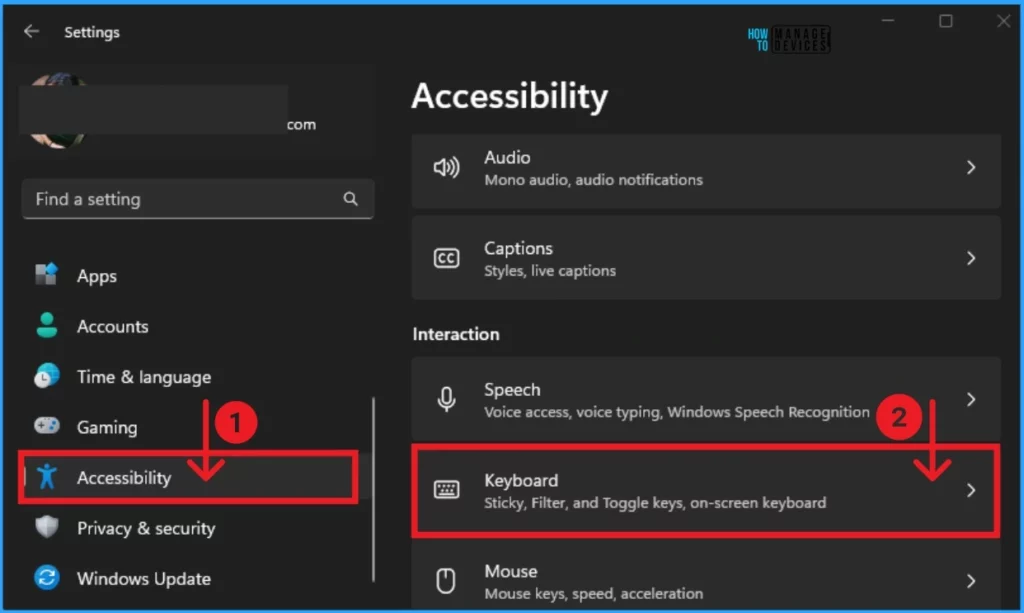
Accessibility Settings are the most important part of Windows Settings. These settings help you access different tools quickly. Here, we can select the Keyboard option and, from Keyboard, select On-Screen Keyboard.
- To Enable the On-Screen Keyboard option, toggle the pane to the right.
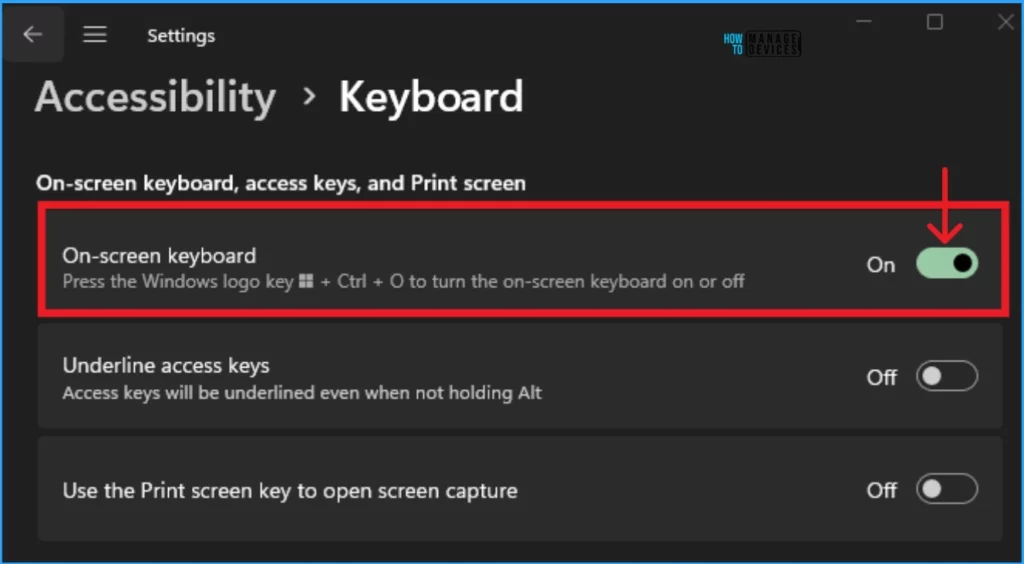
Disabling the On-Screen Keyboard is also very easy. For this, you can toggle the pane to the left side or simply click on the close button (x) on the On-Screen Keyboard.
3. Enable Disable On-Screen Keyboard using Start Menu
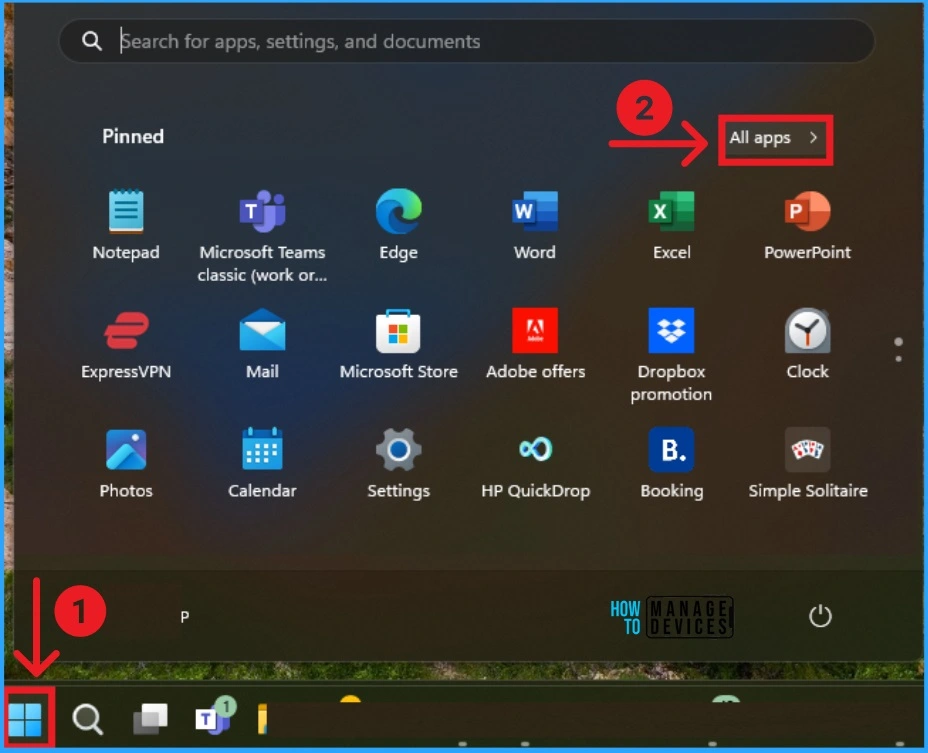
Users can enable the On-Screen Keyboard via the Start Menu. This is also the simplest method: Select Start Menu and All apps at the window’s top right corner. The screenshot below will help you.
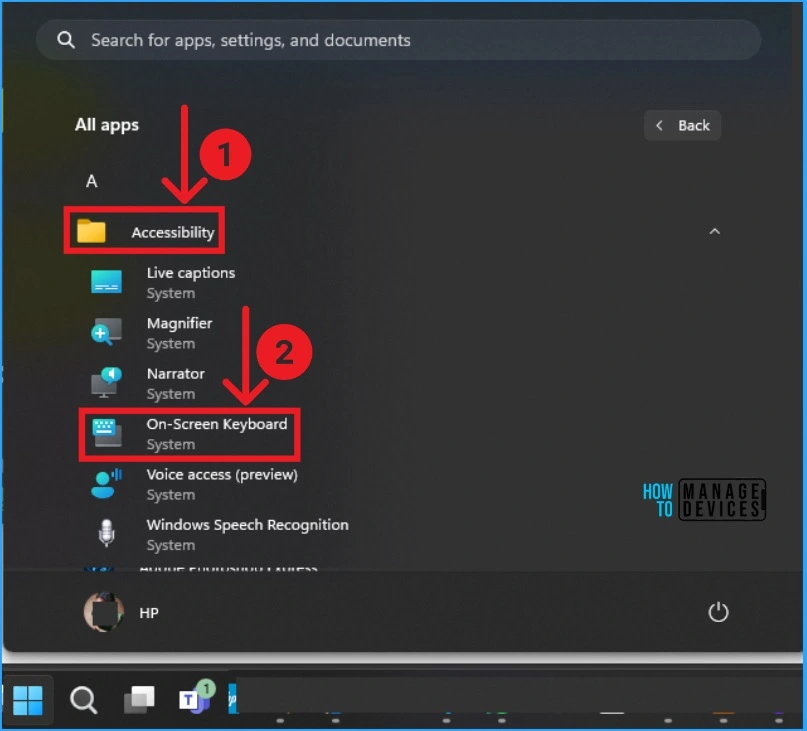
The All Apps section shows different apps on your PC. Select Accessibility settings and also select On-Screen Keyboard from Accessibility.
- How to Project Android Phone Screens to Windows 11 Computer
- How to Enable Disable Wake on LAN in Windows 11
4. Enable Disable On-Screen Keyboard using Windows Search
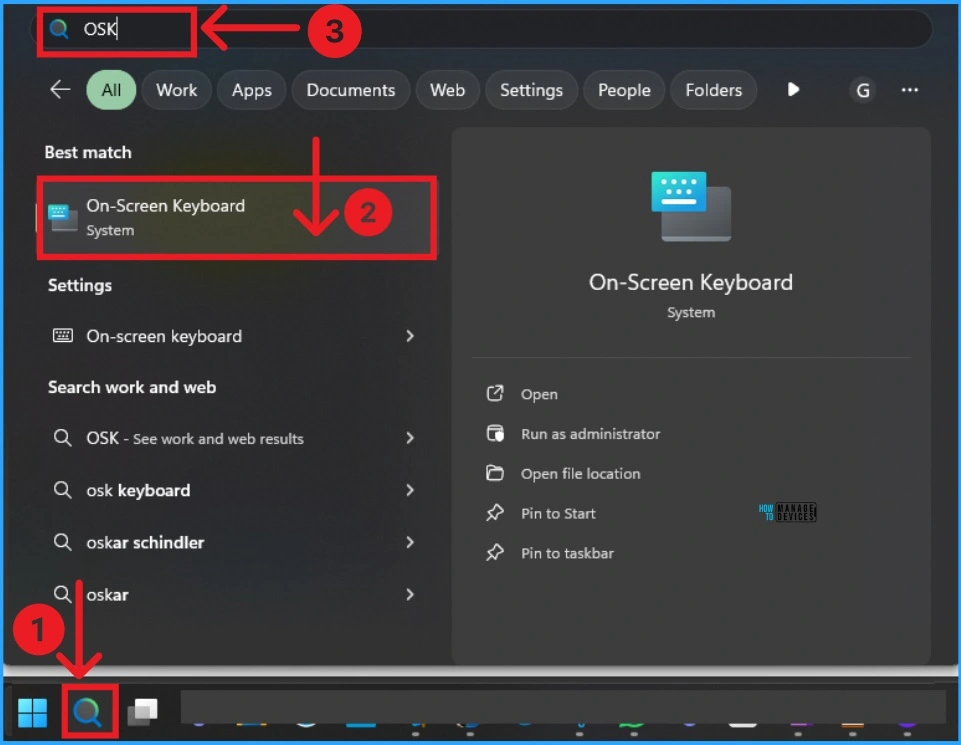
Using the Start Menu, you can easily enable the On-Screen Keyboard, which is easier than the previous method. To do this, click on the Search button near the Start Menu and Search for OSK (On-Screen Keyboard). You can see this option in the screenshot below.
5. Enable Disable On-Screen Keyboard using Control Panel
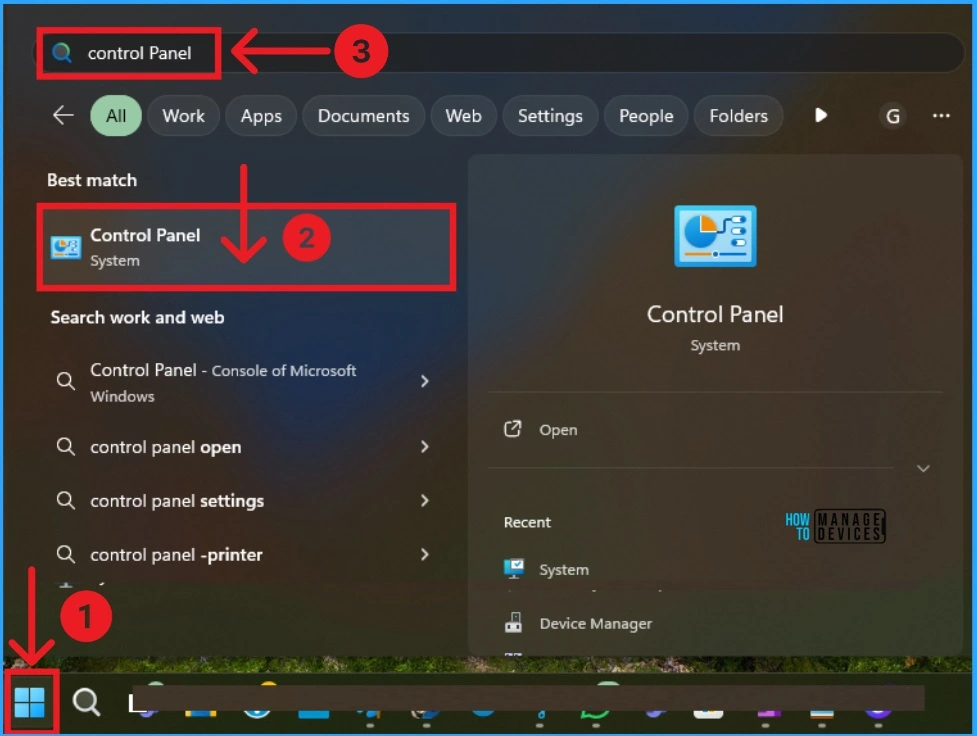
You can use the Control Panel to enable the On-Screen Keyboard. To do this, Click on the Start Menu and Search Control Panel. The below Screenshot will guide you.
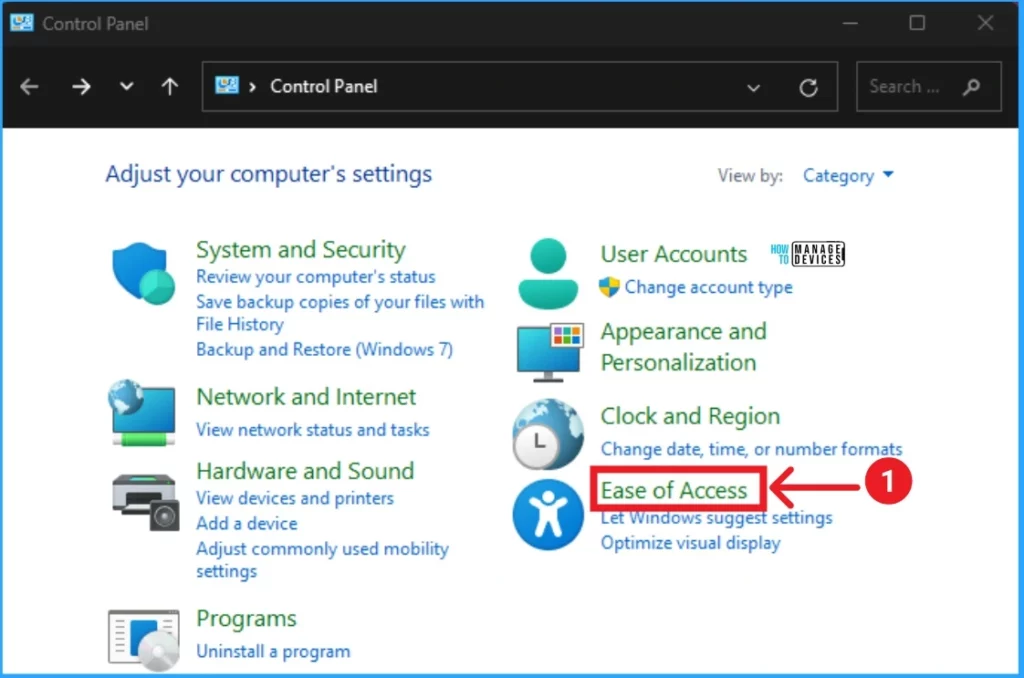
The control panel has many options. Click on the Ease of Access option at the bottom right of the control panel.
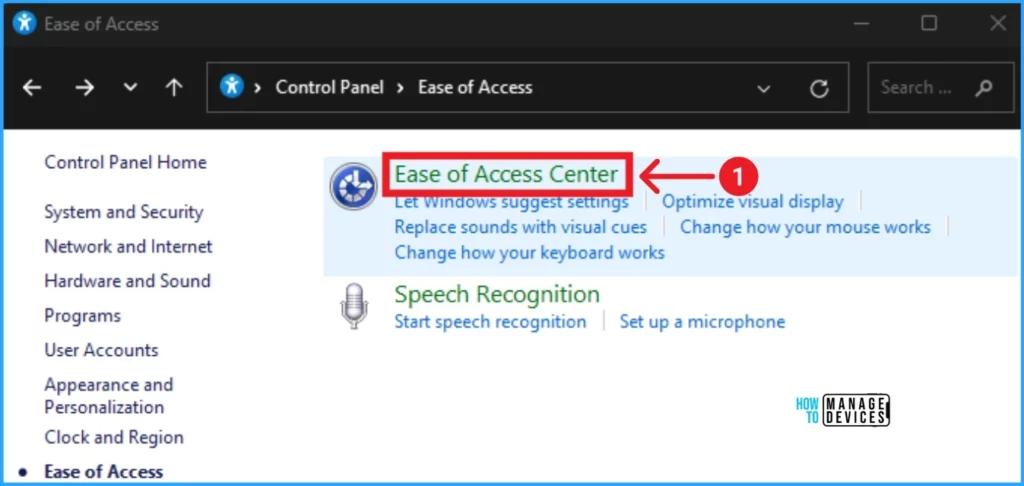
The Ease of Access window also shows many options for users. Here, Select the Ease of Access Center option. This option will give you access to different accessibility features of your System.
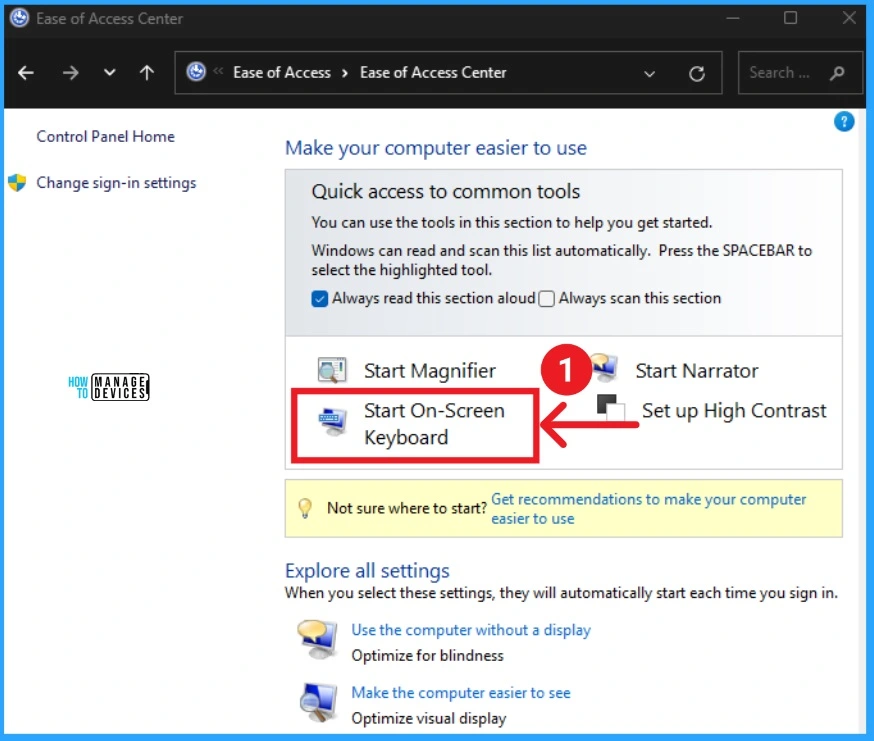
This Window Shows Quick Access to common tools. The Always read this section aloud option is enabled here. If you select any option on this window, it will read that option loudly. This is very helpful for disabled users. You can easily disable this option from this window.
- Click on the On-Screen Keyboard option.
5. Enable Disable On-Screen Keyboard using Run Command
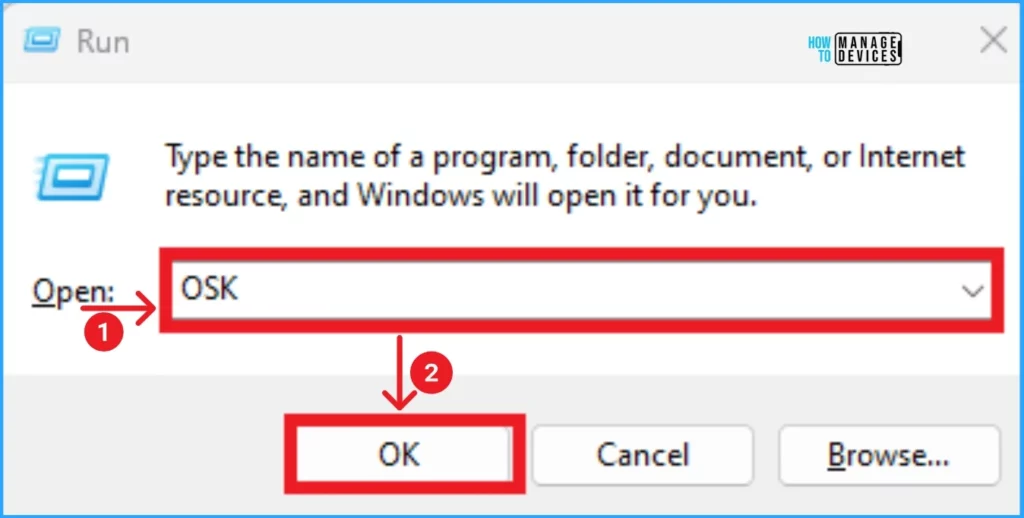
With the Run command, you can Enable the On-Screen keyboard on your PC. To enable this, click on Win + R to open the run command. In the command box, Type OSK and click on the OK button. The On-Screen Keyboard will be enabled.
Result Image
Now, we discuss the different methods for enabling an On-Screen Keyboard. You can use any method according to your preference. An on-screen keyboard can be used anywhere on your PC. You can easily use this Keyboard if you have a good typing speed.
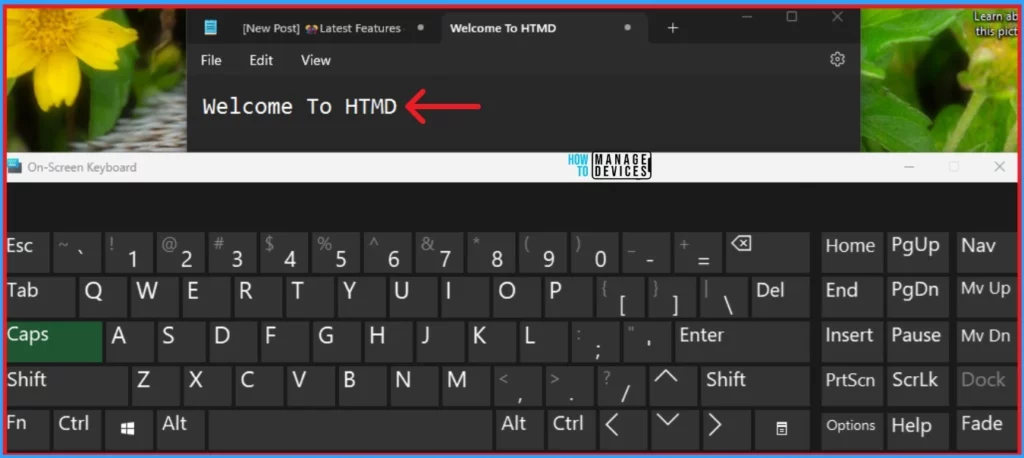
You can type the word on this keyboard by Selecting letters using the Mouse. Here I type Welcome To HTMD on the Notepad using On-Screen Keyboard. The below screenshot will guide you.
- Turn On or Off Facts Tips Tricks Notification on Lock Screen in Windows 11
- Best Way to Adjust Touchpad Sensitivity in Windows 11
We are on WhatsApp. To get the latest step-by-step guides and news updates, Join our Channel. Click here –HTMD WhatsApp.
Author
Anoop C Nair is Microsoft MVP! He is a Device Management Admin with more than 20 years of experience (calculation done in 2021) in IT. He is a Blogger, Speaker, and Local User Group HTMD Community leader. His main focus is on Device Management technologies like SCCM 2012, Current Branch, and Intune. He writes about ConfigMgr, Windows 11, Windows 10, Azure AD, Microsoft Intune, Windows 365, AVD, etc.




Discussion