






How to Configure Handwriting Panel Default Mode Docked Policy using Intune
Let’s discuss how to configure Handwriting Panel Default Mode Docked Policy using Intune. The Intune policy Handwriting Panel Default Mode Docked forces the handwriting input panel to dock at the bottom of the screen. This ensures a consistent, fixed location, especially useful for kiosk or other controlled environments.
The Windows Handwriting Panel service allows for flexible text input through touch keyboard or handwriting recognition. Users can write directly on the screen with a pen, stylus, or their fingers, adjust the panel size, and use it anywhere text input is needed.
There are two display modes for the handwriting panel: floating, which appears near the text entry area, and docked, which attaches to the bottom of the screen. The default is floating. To fix the panel to the bottom, apply Handwriting Panel Default Mode Docked Policy.
Through this blog post, I will explore how to configure Handwriting Panel Default Mode Docked Policy using Intune. Intune policies give organizations control over their devices and apps by defining rules and settings that ensure data security and compliance.

Table of Contents
Why Handwriting Panel Default Mode Docked Used in Kiosks?
Docked mode is best for kiosks because it keeps the handwriting panel fixed at the bottom, avoiding content blockage and the need for users to move it. This makes input simple and consistent, which is crucial for kiosks where user interaction should be minimal and straightforward.
Windows CSP Policy Details – Handwriting
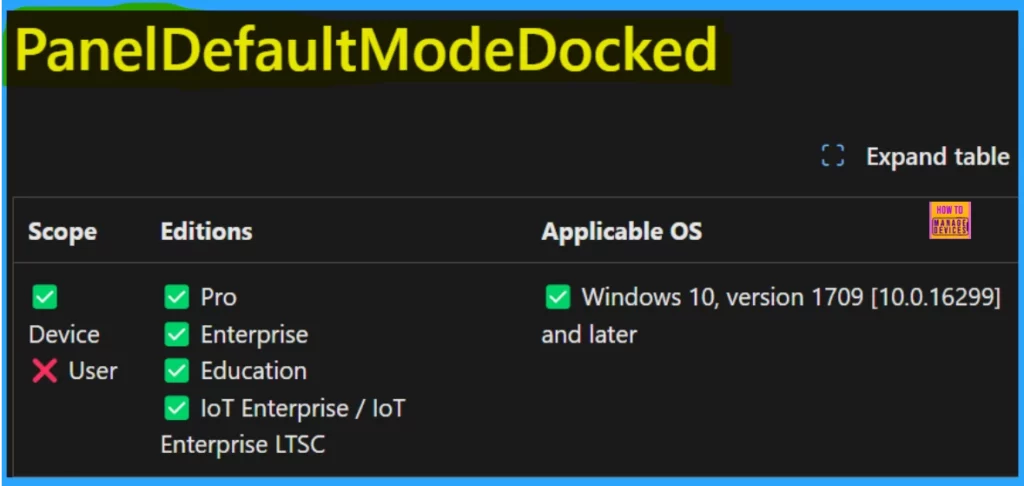
Configuration Service Providers (CSPs) enable administrators to control Windows device settings. To understand the CSP details of Handwriting Panel Default Mode Docked Policy, refer to the screenshot below.
| Property Name | Property Value |
|---|---|
| Format | int |
| Access Type | Add, Delete, Get, Replace |
| Default Value | 0 |
Allowed Values:
During policy or profile configuration in Intune, the available allowed values for each setting are displayed. Selecting an allowed value is critical for proper policy enforcement on managed devices, ensuring the intended behavior and security configuration.
| Value | Description |
|---|---|
| 0 (Default) | Disabled |
| 1 | Enabled |
Group Policy Mapping
Group Policy Mapping (GPOs) to Microsoft Intune facilitates a smoother transition to modern management for Windows devices in enterprise environments.
| Name | Value |
|---|---|
| Name | PanelDefaultModeDocked |
| Friendly Name | Handwriting Panel Default Mode Docked |
| Location | Computer Configuration |
| Path | Windows Components > Handwriting |
| Registry Key Name | Software\Policies\Microsoft\Handwriting |
| Registry Value Name | PanelDefaultModeDocked |
| ADMX File Name | Handwriting.admx |
./Device/Vendor/MSFT/Policy/Config/Handwriting/PanelDefaultModeDocked
- Enable Or Disable Touch Keyboard Handwriting Mode Availability In Text Input Using Intune Policy
- Enable Disable Font Providers Using Intune Policy
- How to Create Intune Settings Catalog Policy
Create Handwriting Panel Default Mode Docked Policy using Intune
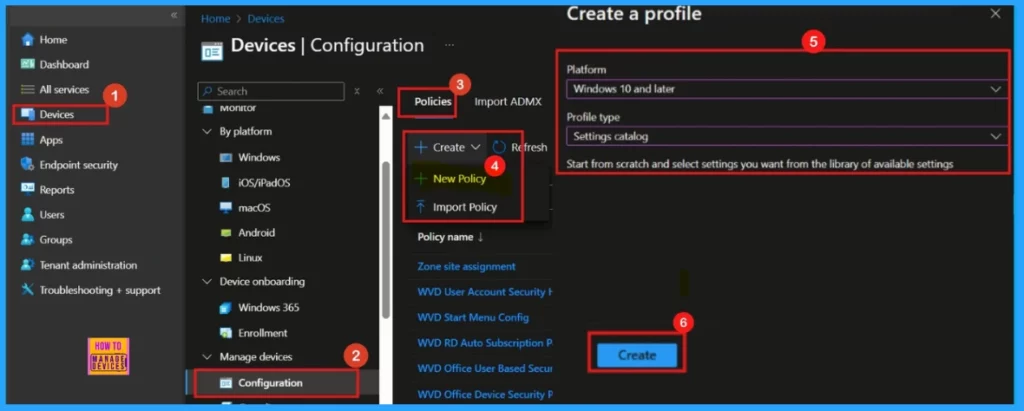
To set up a Handwriting Panel Default Mode Docked Policy using Microsoft Intune, begin by logging into the Microsoft Intune Admin Center with your administrator credentials.
- Navigate to Devices >Manage devices > Configuration > Policies
- Click on +Create > +New Policy
- Select the Platform as Windows 10 and later for policy deployment.
- Choose Settings catalog as the profile type.
- Hit Create to continue.
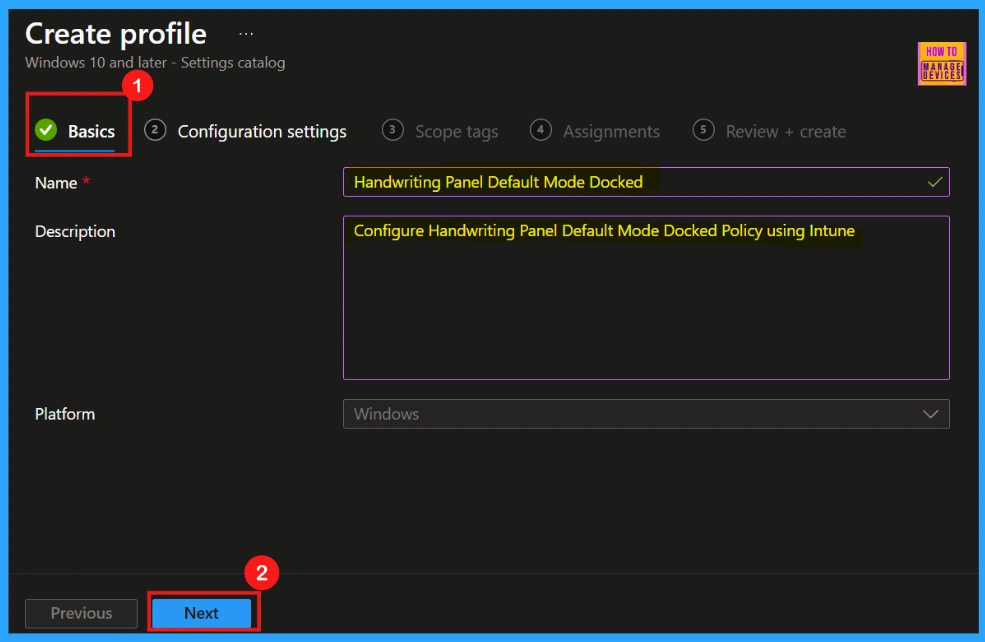
Basics
The Basics tab is the first step in policy setup. Enter a mandatory, descriptive Name. We can also add an optional Description to explain the policy’s purpose. The Platform we selected earlier will be shown for verification.
- Name of the Policy: Handwriting Panel Default Mode Docked
- Decription: Configure Handwriting Panel Default Mode Docked Policy using Intune
- Platform: Windows
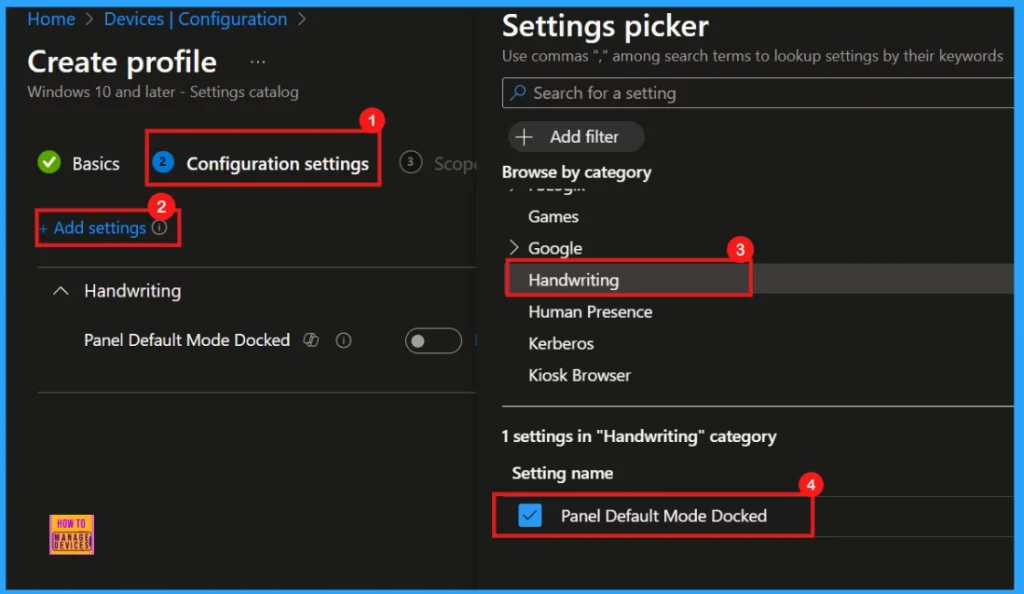
Configuration Settings
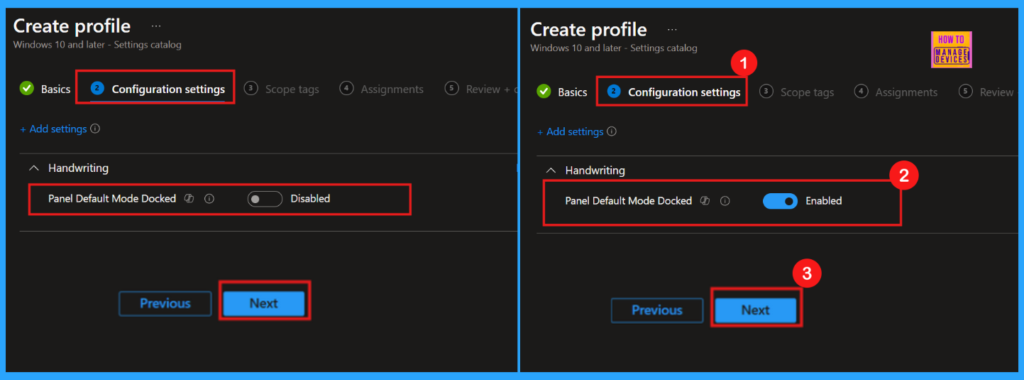
In the Configuration settings section, we can define the policy’s behavior. To add specific settings, click Add settings. This opens the Settings picker window, where we can browse and select setting categories. For the Handwriting Panel Default Mode Docked policy, navigate to and select the Handwriting category.
Enable or Disable Handwriting Panel Default Mode Docked Policy using Intune
Upon closing the settings picker, we will be returned to the main configuration settings page. This window allows us to change various settings enable or disable the policies. The Handwriting Panel Default Mode Docked policy will display as disabled by default.
- To activate the policy, change the default disabled setting to enabled using the dropdown arrow.
- After making this change, click Next to move forward in the configuration process.
Scope Tags
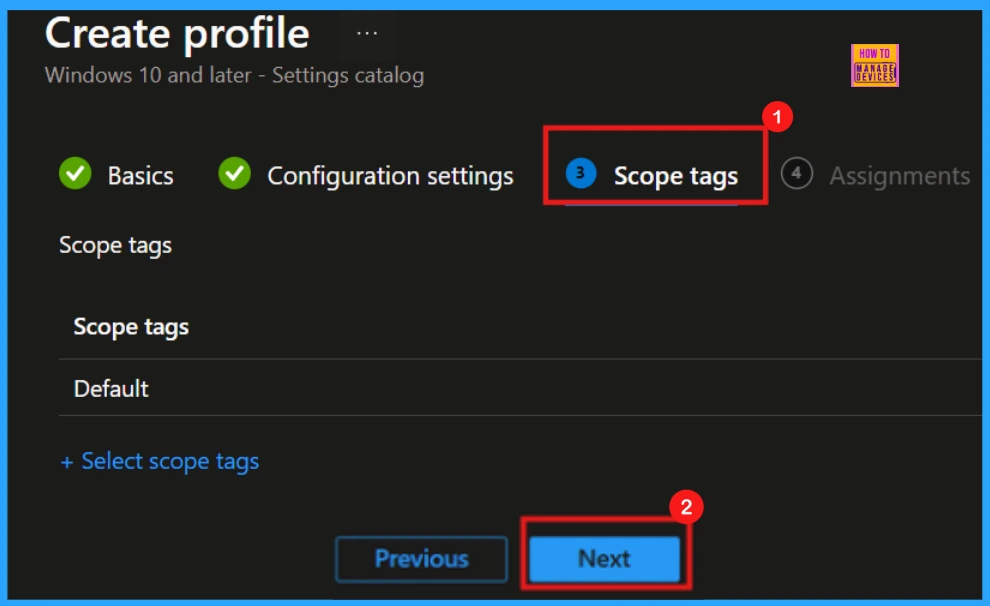
The next step is Scope tags. These tags help you organize and control access to the policy, based on things like department or location. However, applying scope tags is optional. If we wish to skip this step, click Next.
Assignments
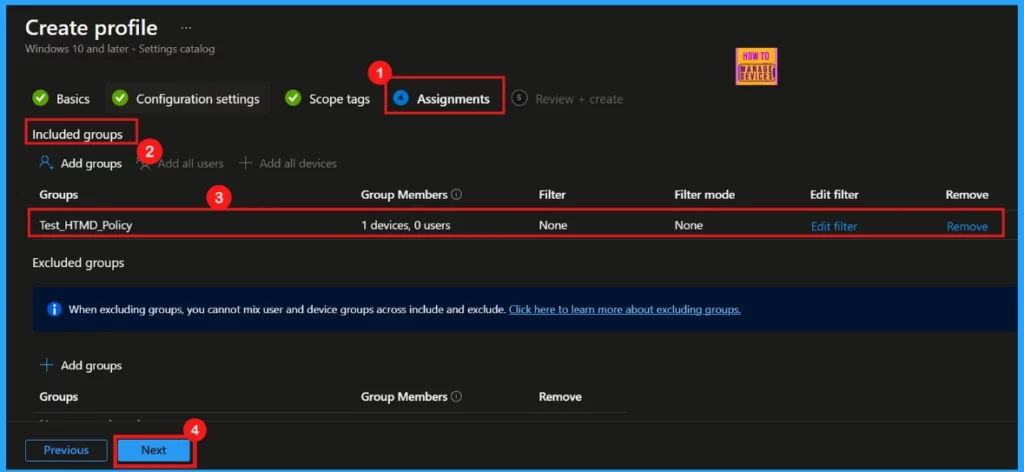
In the Assignments section, assign the policy to specific groups. Click Add groups under Include groups, select the desired group in the new window, and click Select.
- Here, I select Test_HTMD_Policy as the group.
- Proceed by clicking Next.
Review + Create
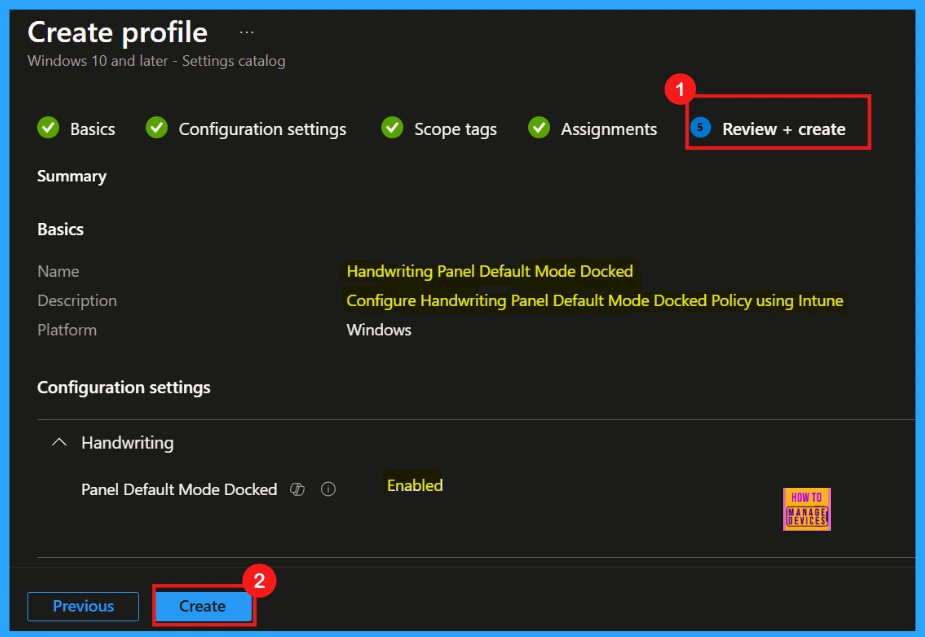
Before deployment, the Review + Create section provides a summary of the policy’s configuration. This includes the policy name, description, target platform, and other configured setting. If you need to modify any settings, use the Previous button to return to the relevant configuration steps.
- Once verified all settings are accurate, click Create to deploy the policy to the assigned groups.
Monitoring Status
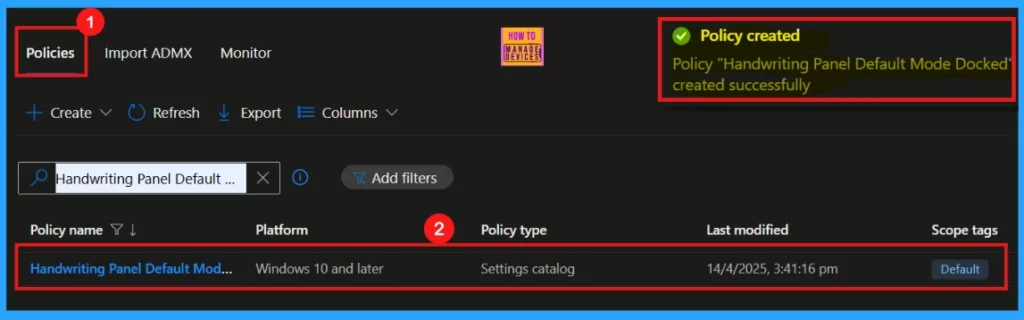
After clicking Create, a confirmation notification will appear, indicating successful policy creation. We can verify the newly created policy within the Intune Portal by navigating to Devices > Configuration > Policies.
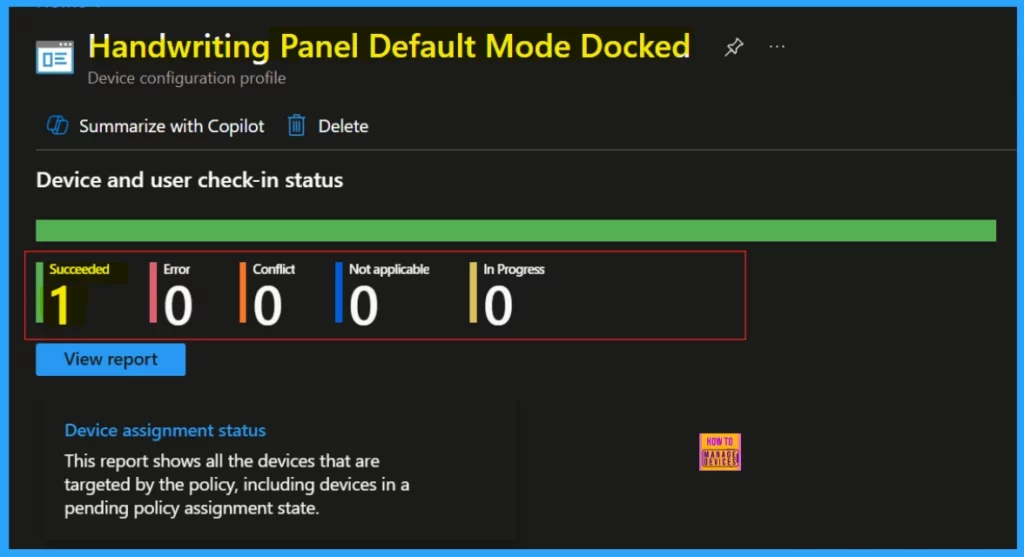
Device and User Check-in Status
We can monitor the deployment of the policy by opening it from the Configuration section (Devices > Windows > Configuration). For faster results, sync the device with the Company Portal. The Device and user check-in status will show the policy application status.
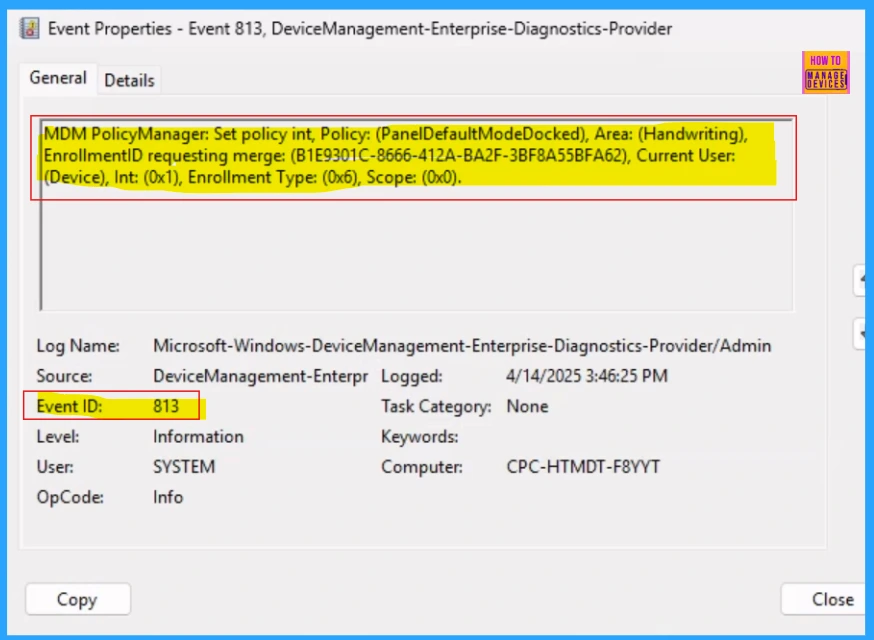
Client Side Verification
To verify policy application on a Windows 10 or 11 device, use Event Viewer and check for Intune event IDs 813 or 814. Navigate to Applications and Services Logs > Microsoft > Windows > Devicemanagement-Enterprise-Diagnostics-Provider > Admin. These events confirm successful policy application and display the policy value.
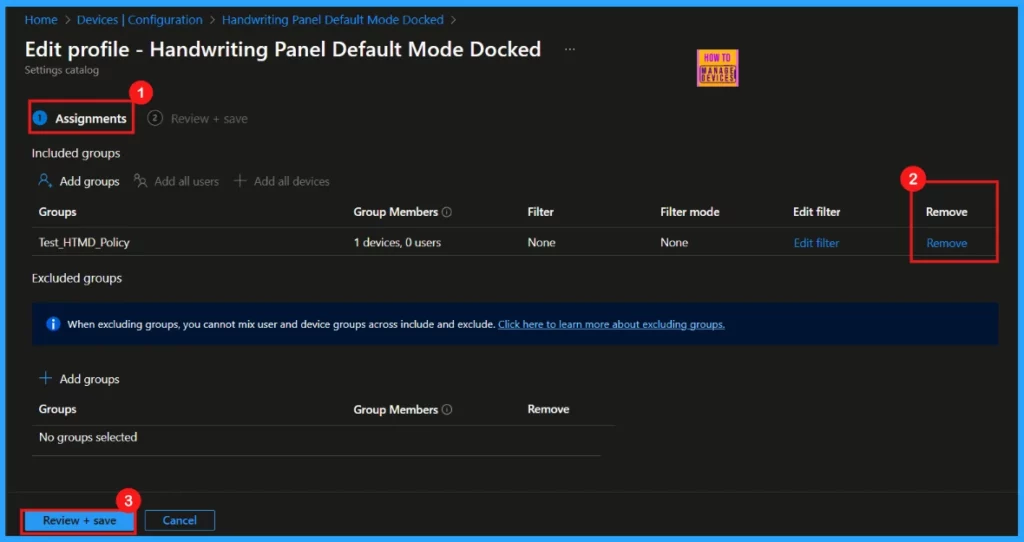
Remove Assigned Group
To remove a group from a policy assignment, following the steps shown in the screenshot. This action is frequently needed for security updates or improved workflow. Once the group is removed, click Review + Save to save your changes.
For detailed information, you can refer to our previous post – Learn How to Delete or Remove App Assignment from Intune using by Step-by-Step Guide.
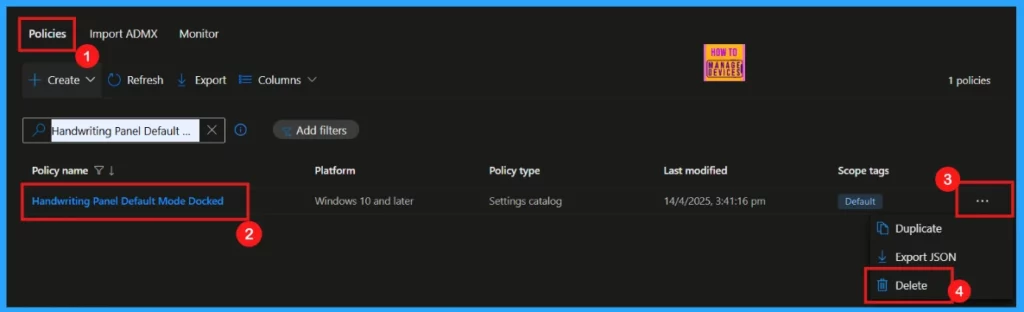
Deleting a Policy From Intune
The screenshot below demonstrates how to delete an Intune policy, an action that may be necessary for security or operational purposes.
For detailed information, you can refer to our previous post – How to Delete Allow Clipboard History Policy in Intune Step by Step Guide.
Need Further Assistance or Have Technical Questions?
Join the LinkedIn Page and Telegram group to get the latest step-by-step guides and news updates. Join our Meetup Page to participate in User group meetings. Also, Join the WhatsApp Community to get the latest news on Microsoft Technologies. We are there on Reddit as well.
Author
Anoop C Nair has been Microsoft MVP for 10 consecutive years from 2015 onwards. He is a Workplace Solution Architect with more than 22+ years of experience in Workplace technologies. He is a Blogger, Speaker, and Local User Group Community leader. His primary focus is on Device Management technologies like SCCM and Intune. He writes about technologies like Intune, SCCM, Windows, Cloud PC, Windows, Entra, Microsoft Security, Career, etc.


Discussion