






Protect Sensitive Data in Transit with Network Level Authentication using Intune Policy
In this post Protect Sensitive Data in Transit with Network Level Authentication using Intune Policy. This setting is about making Remote Desktop connections safer by asking users to prove who they are at an early stage. When someone tries to connect remotely, the system checks their login details before fully opening the Remote Desktop session. This helps ensure that only valid users can reach the system and reduces unnecessary exposure.
Remote Desktop is commonly used by IT teams and employees to access systems from different locations. Because it allows direct access to a computer, it can become a target for attackers if not protected properly. Enabling stronger authentication helps control who can connect and keeps systems more secure.
Network Level Authentication works in the background before the Remote Desktop screen appears. It verifies the user’s credentials first and only then allows the session to start. This approach reduces the load on the system and blocks many unauthorized or malicious attempts.
This policy is especially important because it stops attackers from even reaching the Remote Desktop login screen unless they are authenticated. Without this setting, attackers could try repeated login attempts or exploit weaknesses during the connection process. Enabling it adds an extra layer of protection right at the start.

Table of Contents
Protect Sensitive Data in Transit with Network Level Authentication using Intune Policy
Other key reason this setting matter is that it helps protect sensitive data. Since authentication happens earlier, the connection is more secure and less vulnerable to interception or misuse. This aligns with best practices for protecting data while it is being accessed remotely.
- How to Show or Hide Switch Account Option in Windows Start Menu using Intune Policy
- Enable or Disable Microsoft Account Connection Policy using Intune
- Intune Allow Microsoft Accounts to be Optional Policy
Create Profile
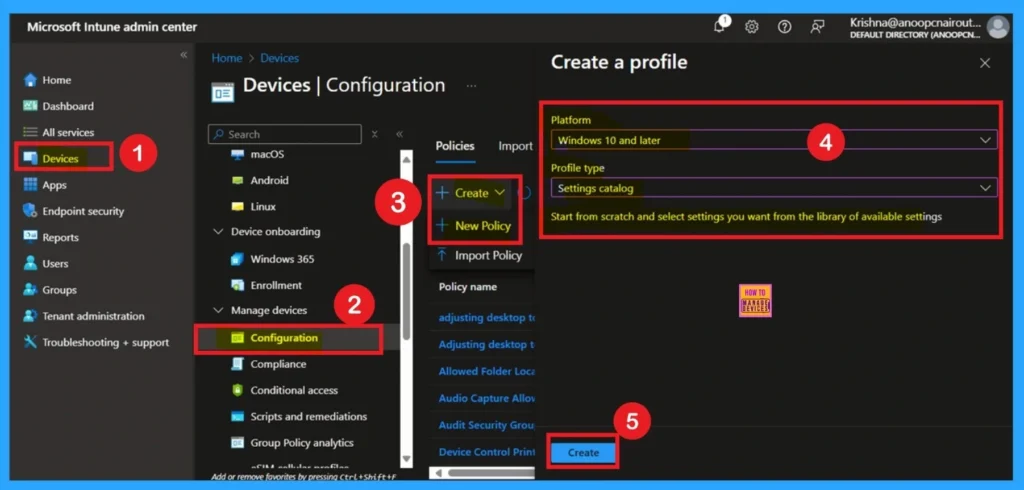
Now, let’s see how this policy can be deployed through the Microsoft Intune Admin Center. First, go to the Devices section. In Devices, select Configurations. In Configurations, click on the + Create policy option.
- Then click on the Next.
- Next, fill in the Platform and Profile type details in the Create profile window.
- Set Platform and Windows 10 later and set Profile type to Settings catalog.
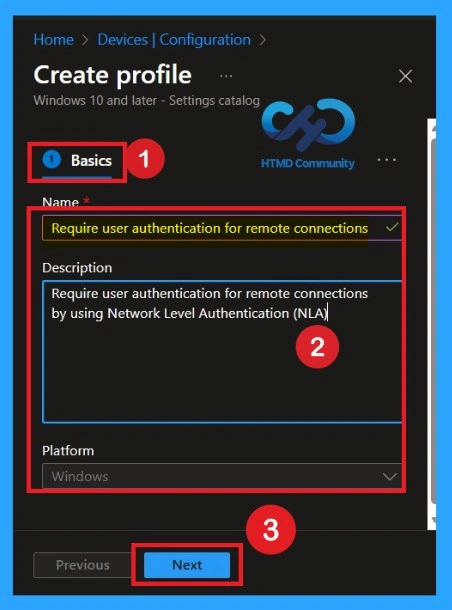
What is Basics
The Basics tab is the quickest step. Here, you need to enter the basic details such as the Name, Description, and Platform information. Since the platform is already set as Windows and you only need to provide a specific name and description for the policy, then click Next.
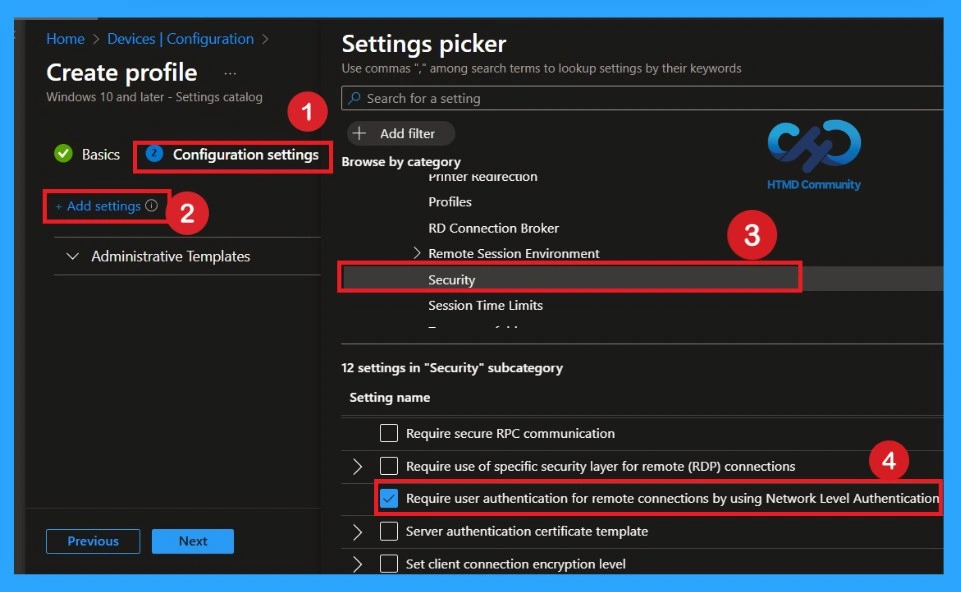
Configuration Settings
In the Configuration settings page, click Add settings. This opens the Settings picker window. In the Category section, navigate to Administrative Templates > Windows Components > Remote Desktop Services > Security. Under this category, you will find the required policy setting. From the list of policies, locate Require user authentication for remote connections by using Network Level Authentication
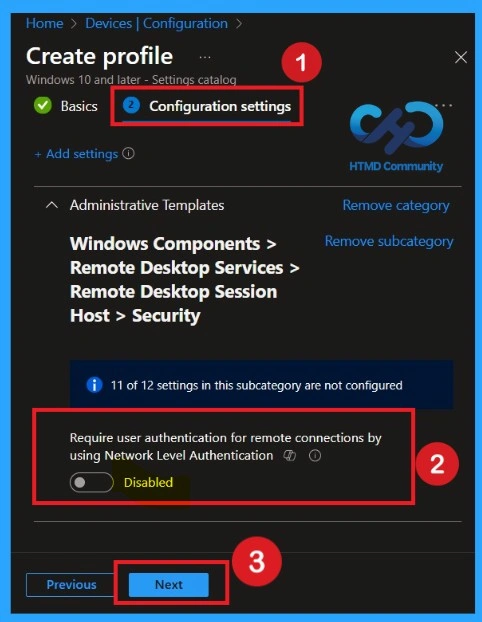
Disabled Mode
Now you are on the Configuration settings main page. Here, you will see that the selected policy has appeared in the list. By default, it is set to Disabled. If you want to keep it disabled that means, you do not want Require user authentication for remote connections by using Network Level Authentication enabled in your organization, so you can just click Next to continue.
Enable the Policy
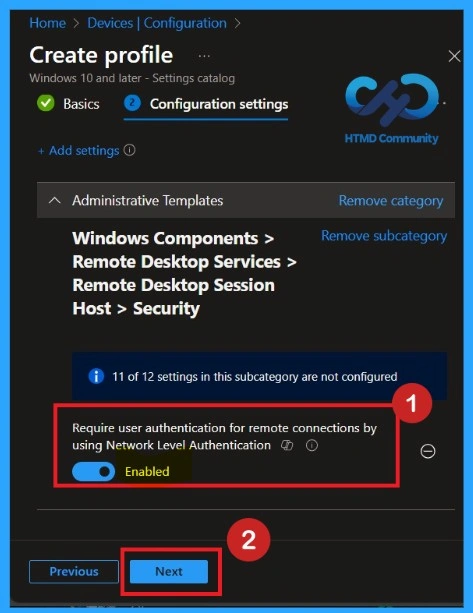
After closing settings picker, turn the toggle from Not configured to Enabled to enforce Network Level Authentication (NLA), which ensures users must authenticate before a remote desktop session is established. After enabling the policy, click Next to continue and complete the profile configuration.
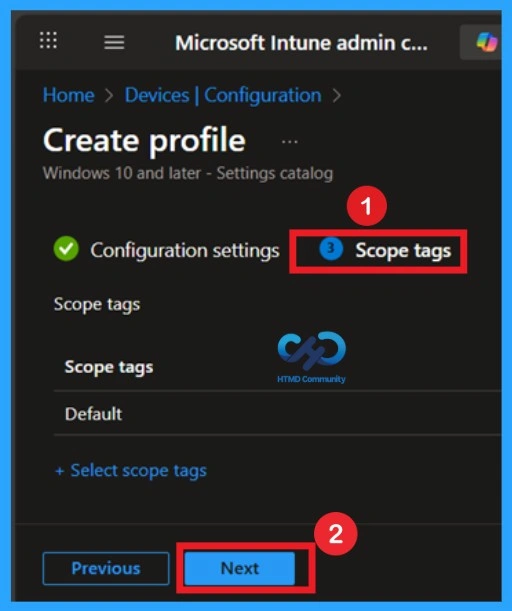
Known about Scope Tags
The Scope tags section is an important part of policy deployment. The advantage of this section is that it allows you to assign the policy to specific groups or departments within your organization. However, adding a scope tag is not mandatory and you can still deploy the policy successfully without using this step.
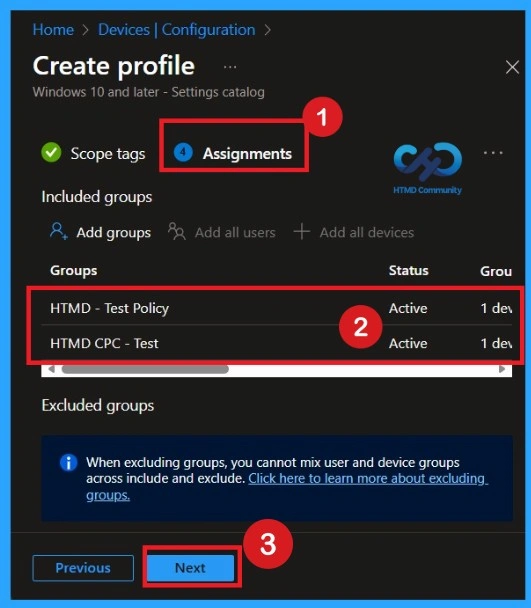
Assignment Section
The Assignment section is very important for policy deployment. In this section, you decide who will receive the policy within the organization. If you want to target specific groups, users, or devices, you can add them here to ensure the policy is applied only to the intended audience.
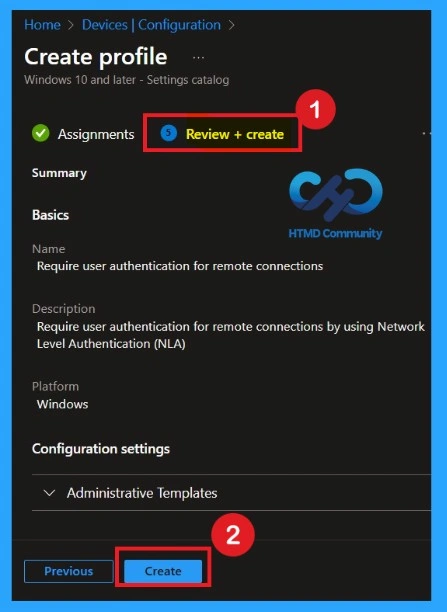
Review + Create
Review + Create is the last stage of policy creation. In this step, you will see a summary of all the details, including Basics, Configuration Settings, Assignments, and more. You can review all the information, and if anything needs to be changed, you can go back to the previous steps and edit them easily.
- In the Review + Create section, you will see a Create button
Monitoring Details
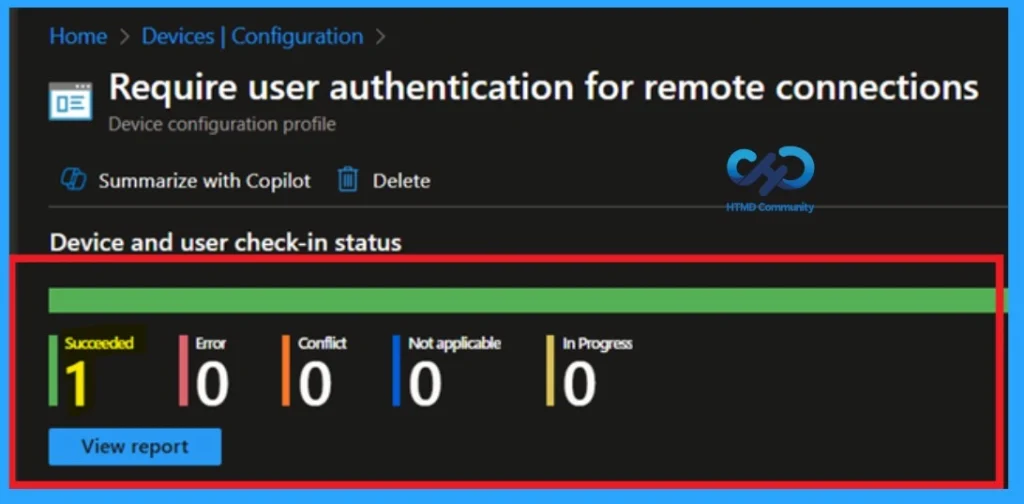
After creating the policy, you might in a thought that whether it was successfully applied or not. It is very important to verify this. To check, you normally need to wait up to 8 hours for the policy to sync automatically. However, if you want faster results, you can manually sync the policy through the Company Portal.
- Using this method ensures the policy is applied more quickly and you can confirm the outcome without waiting the full sync time. To check the Monitoring status follow the steps;
- Click on the policy to view its deployment status and details.
- Sign into the Microsoft Intune Admin Center.
- Navigate to Devices > Configuration Policies.
- In the Configuration Policies list, look for the policy you created.
Client-Side Verification
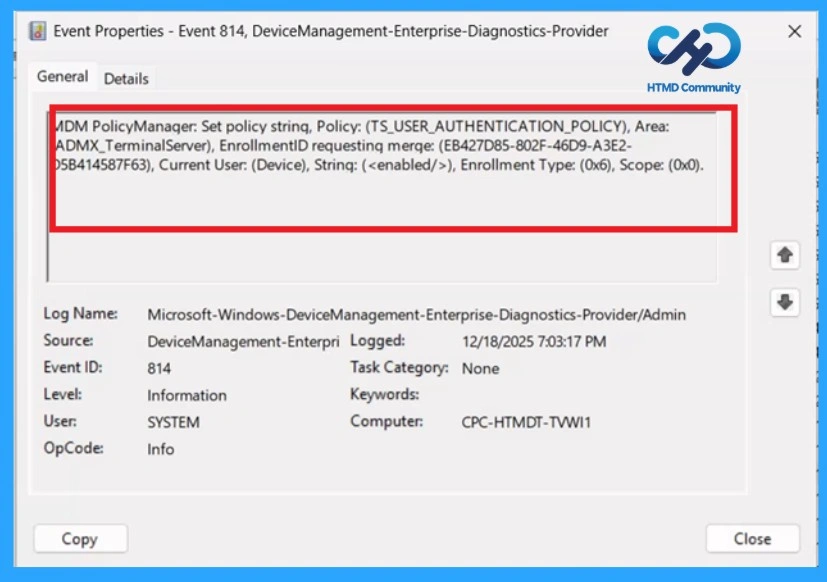
To get the client-side verification, open the Event Viewer and navigate to Applications and Services Logs > Microsoft> Windows > Device Management > Enterprise Diagnostic Provider > Admin. Once there, you can search for specific policy results by using the Filter Current Log feature located in the right pane. This helps quickly get the relevant results within the log.
| Policy Details |
|---|
| MDM PolicyManager: Set policy string, Policy: (TS_USER_AUTHENTICATION_POLICY), Area: ADMX_TerminalServer), EnrollmentID requestinq merqe: (EB427D85-802F-46D9-A3E2- 5B414587F63), Current User: (Device), Strinq: (), Enrollment Type: (0x6), Scope: (0x0). |
Removing the Policy Group
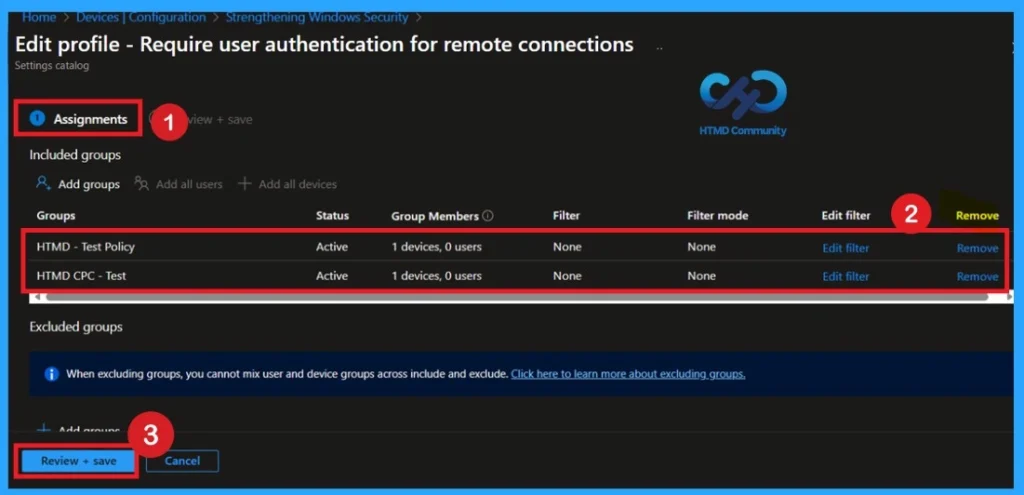
If you want to remove any group from your policy after the policy creation you can easily do that. First go to the Device Configuration then search the policy name and now you get the policy monitoring status page. Here you have to scroll down, and you will get the Assignment section there you will get an edit option.
- In the Assignment page you can see the Remove option Click on that for removing the Policy.
To get more detailed information, you can refer to our previous post – Learn How to Delete or Remove App Assignment from Intune using by Step-by-Step Guide.
How to Delete the Policy that you created
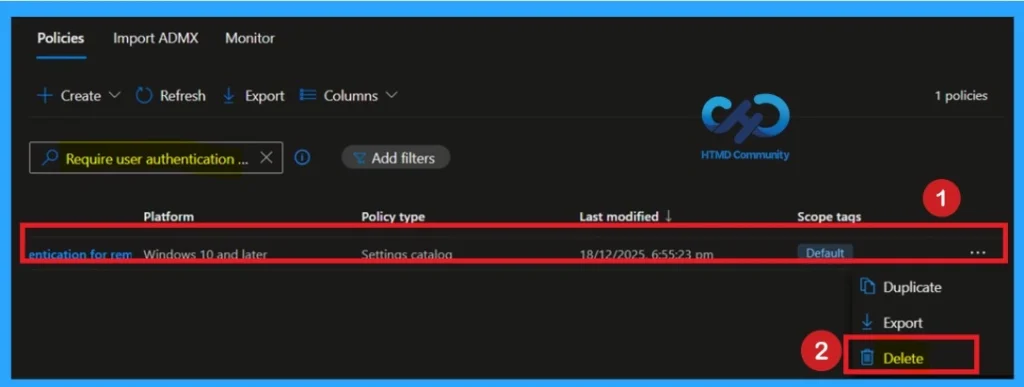
You can easily delete the Policy from the Intune Portal. From the Configuration section, you can delete the policy. It will completely remove it from the client devices. For that search the picy name in the configuration profiles. Locate and select the specific policy you want to remove.
- When you’re on the policy details page, click the More menu in the top right corner and choose Delete from the available options.
For detailed information, you can refer to our previous post – How to Delete Allow Clipboard History Policy in Intune Step by Step Guide.
Need Further Assistance or Have Technical Questions?
Join the LinkedIn Page and Telegram group to get the step-by-step guides and news updates. Join our Meetup Page to participate in User group meetings. Also, Join the WhatsApp Community to get the latest news on Microsoft Technologies. We are there on Reddit as well.
Author
Anoop C Nair has been Microsoft MVP for 10 consecutive years from 2015 onwards. He is a Workplace Solution Architect with more than 22+ years of experience in Workplace technologies. He is a Blogger, Speaker, and Local User Group Community leader. His primary focus is on Device Management technologies like SCCM and Intune. He writes about technologies like Intune, SCCM, Windows, Cloud PC, Windows, Entra, Microsoft Security, Career, etc


Discussion