






Improve VM Network Performance Using Azure Proximity Placement Groups
Let’s check how to Improve VM Network Performance Using Azure Proximity Placement Groups. In this article, you will be learning about what is Proximity Placement Groups and their configuration details. Proximity placement groups are useful for workloads where low latency is a requirement.
Once you have configured this Azure proximity solution, you can decrease the inter-VM network latency associated with your applications. You can use tools such as SockPerf (for Linux) and latte.exe (for Windows) to measure network latency.
The performance issues because of latency are one of the pain points of all cloud deployment. This is the law of physics. If your data is not nearer to the VM, and you have a lot of ground to cover the performance issues that might arise with the apps hosted in the cloud. Let’s have a walkthrough of Azure proximity placement groups and analyze whether this helps you with the cloud deployments or not.
What is Proximity Placement Groups?
As per Microsoft, A proximity placement group is an Azure Virtual Machine logical grouping capability that you can use to decrease the inter-VM network latency associated with your applications. When the VMs are deployed within the same proximity placement group, they are physically located as close as possible to each other in Azure Datacenter. Proximity placement groups cannot be used with dedicated hosts.

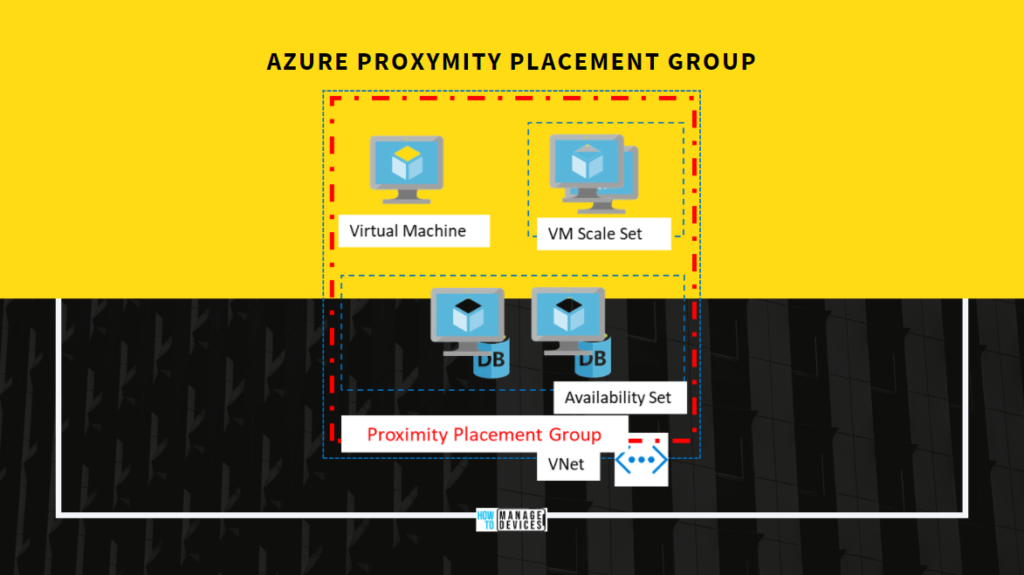
Proximity placement groups are useful for below workloads where low latency is a requirement –
- Between stand-alone VMs.
- Between VMs in a single availability set or a virtual machine scale set.
- Between stand-alone VMs, VMs in multiple Availability Sets, or multiple scale sets. You can have multiple compute resources in a single placement group to bring together a multi-tiered application.
- Between multiple application tiers using different hardware types. For example, running the backend using M-series in an availability set and the front end on a D-series instance, in a scale set, in a single proximity placement group.
Why We Use Proximity Placement Groups?
Some workloads require high-speed network traffic connection between two VMs than normal like SAP workloads, some custom App and DB workloads, etc. to achieve these requirements, Azure provides us Proximity Placement Groups by leveraging this, we can place our VMs as close as possible in Azure Datacenter which decreases the Network Latency between those VMs.
Steps to Create Proximity Placement Groups
Let’s create proximity placement groups to help to reduce the network latency in Azure. I would recommend performing this in a staging environment first and then try to replicate this with the production environment.
- Under Services, click Proximity placement groups.
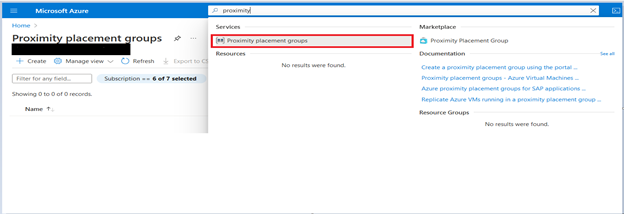
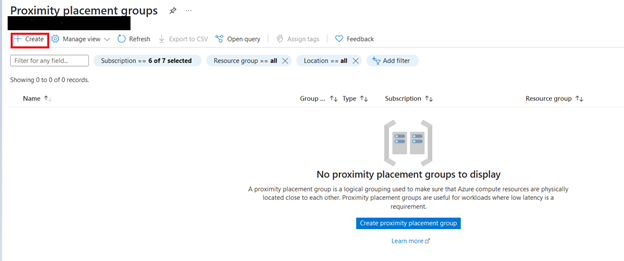
- Then “Proximity placement groups“ Page will open in that click on Create.
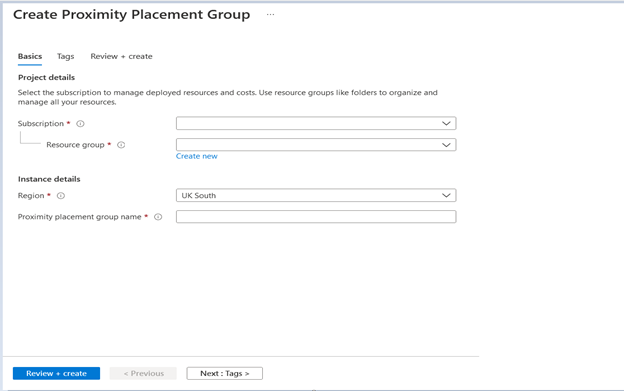
You have to fill the options below while creating Proximity Placement Group, fill Tags, and click on Review+Create.
- Subscription – In the Basics tab, under Project details, make sure the correct subscription is selected.
- Resource Group – You can create a new Resource Group by clicking on the “Create new” link, or you can choose the existing one from the dropdown.
Region – Select the same region where you want to spin up your VMs. VM region is important because of the law of physics, as I mentioned above. Enter the Proximity placement group name – Type a well-defined name.
Add Existing VM in Proximity Placement Group
Let’s follow the below steps to add existing VM in the Proximity Placement Group –
- First we have to deallocate the VM that we have to add in Proximity Placement Group.
- Then click on Configuration tab under settings
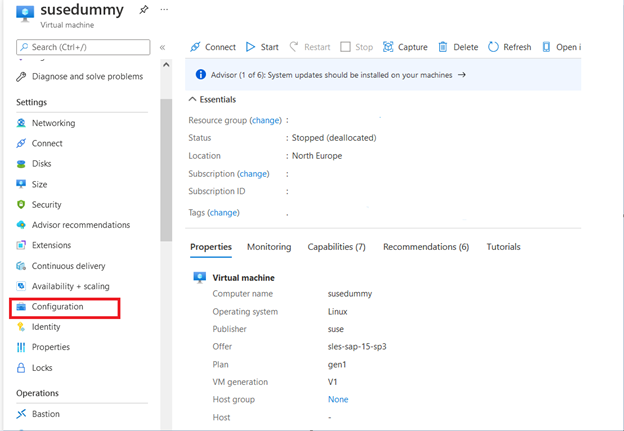
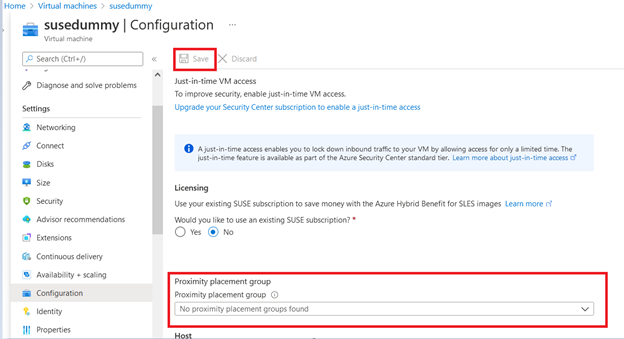
It will lead us to the configuration page, where you have to select the Proximity placement group from the dropdown and click on “Save.“
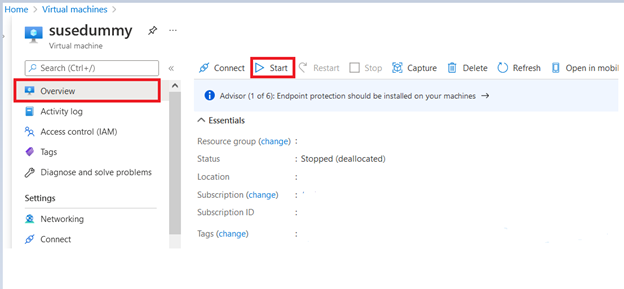
Go to the Overview page and select “Start” to start the VM.
Add VM in Proximity Placement Group
Let’s follow the below steps to add VM in Proximity Placement Group while creating, and You can learn step-by-step processes to create a virtual machine in Azure.
- While creating a Virtual Machine, Go to Advanced setting tab.
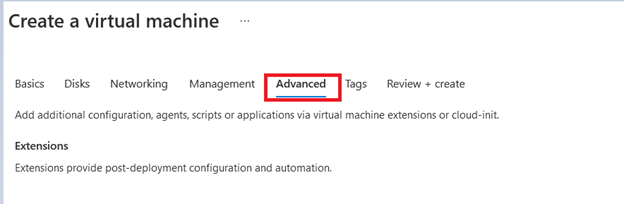
In the Proximity placement group selection, select the correct placement group.
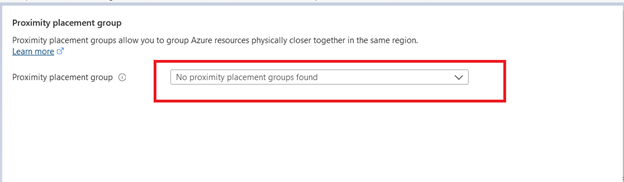
- When you are done making all of the other required selections, select Review + create.
- After it passes validation, select Create to deploy the VM in the placement group.
Author
About Author -> Abhinash has over 5 years of working experience in the IT Industry. His primary focus area is Azure IAAS, PAAS & SAAS, and Azure DevOps. He writes and shares his experiences related to Cloud Computing, mainly Azure.

Discussion